We are a small chicken farm that sells the eggs at our local natural marketplaces. We have been growing faster than anticipated due to demand and needed to come up with a transportable coop that would allow us to replant our fields and prevent overgrazing. We are new at chicken farming; less than 2 years, and we are learning as we go. This is our adventure in building the "Chicken Arks."
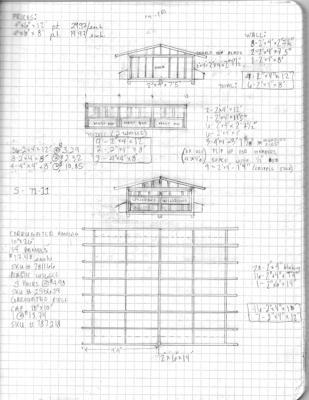
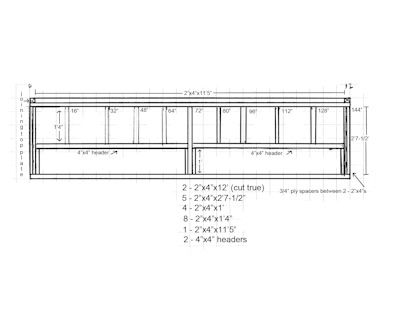
This is the first concept drawing I had to help us determine cost and give us a rough idea of what the finished product should be. There are actually several pages of ramblings and sketches, but this gives the best idea in one page.

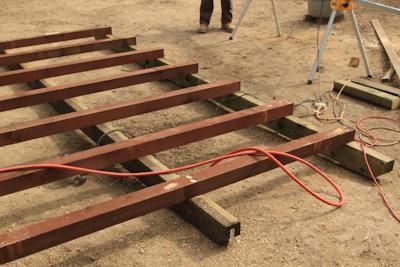
Here is the skid base for the first Ark. We attached the 4'x'6'x14' pressure treated skids to the 4'x4'x8' pressure treated cross supports with 7" lag bolts. 2 lag bolts per connection for a total of 42 lag bolts. We switched to 6" lag bolts with the next ark; primarily because Home Depot was out of the 7". However, the 6" lag bolts worked just fine.
We predrilled each bolt location and then used a router to make a recess big enough for the bolt head and the socket. We used both an impact gun and ratchet for when the compressor was ctaching up. On the 4'x6' skids we cut an angle on each end so when we pulled it the skids wouldn't bury into the ground
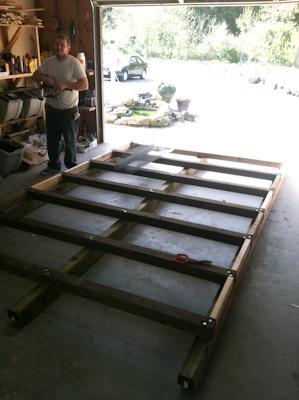
This is the second ark. The first one was constructed on a dirt pad outside the barn. We built the second in the garage so there would be no stoppage of work when it rained, we could work before and past dark, and it was closer to amenities of home.We added blocking to the sides between each 4'x4' on this one. It allowed us to put down the wire before the walls. MUCH easier than the first ark. That's our friend Casey complaining about me taking his picture or something.
Closer view of what the lag bolts fastened look like.
This was the original way of wiring the floor. Meg had to crawl inside and move carefully about to attach the wire to the walls and floor and cut notches around the 2'x4's. Although it worked we decided there had to be a better way. The walls are up and framed and Casey is attching the wiggle board at this point.
This is the better way. We rolled out the 1" wire mesh and used the air nailer to attach it flush to the edges.
Next comes the walls. Here is the concept drawing of the second arks after we decided it would be easier to have two nesting boxes on each side instead of three. Easier to build, looks better, and more functional. This first drawing is of the side walls and the second is of the front wall. I didn't draw out the back wall, but it is similiar to the first, except it has two windows instead of a door.
This is the first ark. Notice the three openings for nesting boxes on the bottom of the walls. Casey and I are discussing who's idea was going to win the day.
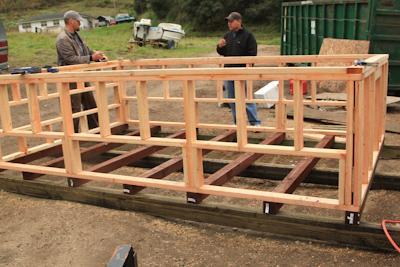
This is the second ark with walls framed up and ready to nail together.
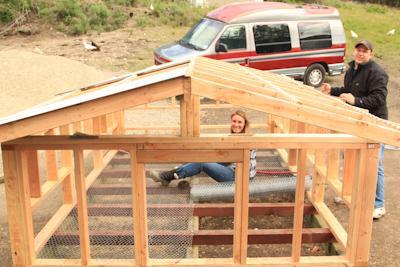
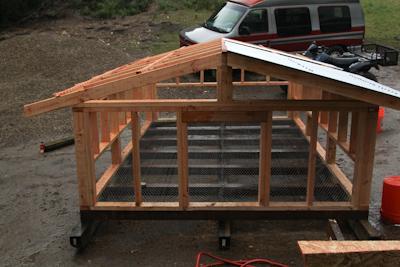
This is the first ark. Total rain delay at this point so we decided to finish the roof tomorrow.
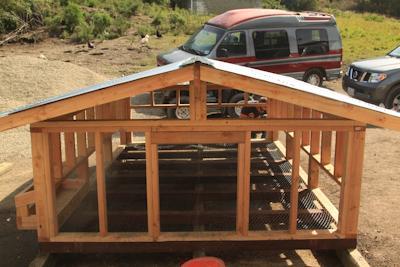
Suns out, ground is dry, and the roof is on. We used 10' metal corrugated panels and cut them in half.
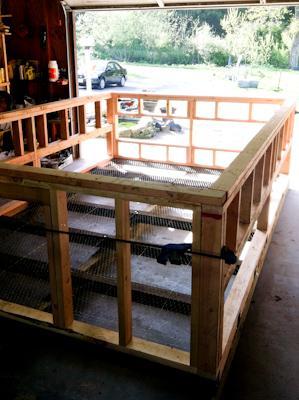
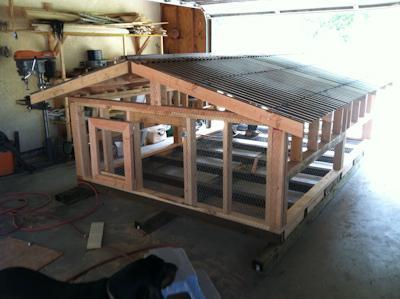
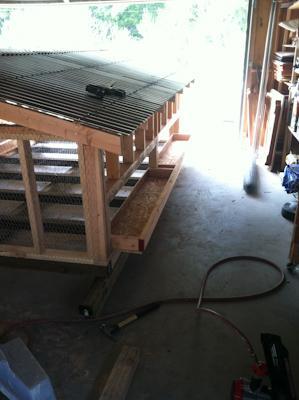
Second ark in the garage. Roof is on, door is done, wire mesh on front, and now time to start framing out the nesting boxes.
The bottom of the nesting box is framed and from there we just add a few small 2'x4's and they are ready to side. I just can't seem to find the pictures of that whole process.
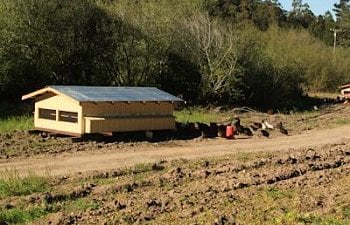
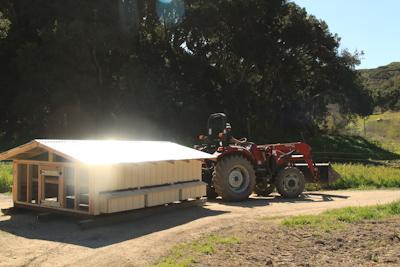
So here it the first ark getting pulled to her new home, gleaming in the sunshine ready to be the chickens new home!!
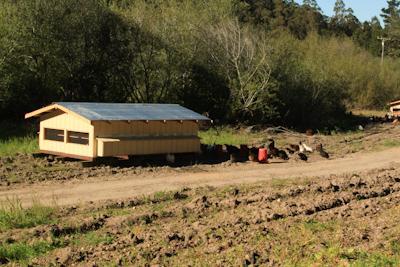
Here is the second ark in her new location. The chickens are now foraging in fresh territory.
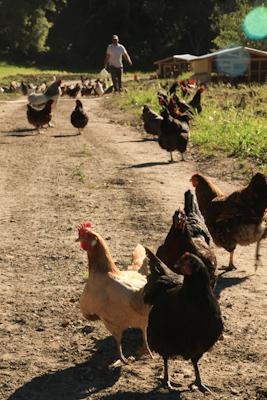
Me giving the chickens their treat of hen scratch.
2 of the now 3 chicken arks in the upper field.
We plan on making more of the chicken arks to house the chickens as we have plenty of field left in the upper field. Our lower field is now planted to ryegrass, clover, sunflower seeds, and flax. We will be rotating the flock back to that field in about two to three months. We are in the process of converting our permanent coops into breeding pens after the grass grows back and we run underground pvc water lines to the pens instead of having garden hoses running everywhere.
A couple of things I didn't include above:
This is the first concept drawing I had to help us determine cost and give us a rough idea of what the finished product should be. There are actually several pages of ramblings and sketches, but this gives the best idea in one page.
Here is the skid base for the first Ark. We attached the 4'x'6'x14' pressure treated skids to the 4'x4'x8' pressure treated cross supports with 7" lag bolts. 2 lag bolts per connection for a total of 42 lag bolts. We switched to 6" lag bolts with the next ark; primarily because Home Depot was out of the 7". However, the 6" lag bolts worked just fine.
We predrilled each bolt location and then used a router to make a recess big enough for the bolt head and the socket. We used both an impact gun and ratchet for when the compressor was ctaching up. On the 4'x6' skids we cut an angle on each end so when we pulled it the skids wouldn't bury into the ground
This is the second ark. The first one was constructed on a dirt pad outside the barn. We built the second in the garage so there would be no stoppage of work when it rained, we could work before and past dark, and it was closer to amenities of home.We added blocking to the sides between each 4'x4' on this one. It allowed us to put down the wire before the walls. MUCH easier than the first ark. That's our friend Casey complaining about me taking his picture or something.
Closer view of what the lag bolts fastened look like.

This was the original way of wiring the floor. Meg had to crawl inside and move carefully about to attach the wire to the walls and floor and cut notches around the 2'x4's. Although it worked we decided there had to be a better way. The walls are up and framed and Casey is attching the wiggle board at this point.
This is the better way. We rolled out the 1" wire mesh and used the air nailer to attach it flush to the edges.

Next comes the walls. Here is the concept drawing of the second arks after we decided it would be easier to have two nesting boxes on each side instead of three. Easier to build, looks better, and more functional. This first drawing is of the side walls and the second is of the front wall. I didn't draw out the back wall, but it is similiar to the first, except it has two windows instead of a door.

This is the first ark. Notice the three openings for nesting boxes on the bottom of the walls. Casey and I are discussing who's idea was going to win the day.
This is the second ark with walls framed up and ready to nail together.
This is the first ark. Total rain delay at this point so we decided to finish the roof tomorrow.
Suns out, ground is dry, and the roof is on. We used 10' metal corrugated panels and cut them in half.
Second ark in the garage. Roof is on, door is done, wire mesh on front, and now time to start framing out the nesting boxes.
The bottom of the nesting box is framed and from there we just add a few small 2'x4's and they are ready to side. I just can't seem to find the pictures of that whole process.
So here it the first ark getting pulled to her new home, gleaming in the sunshine ready to be the chickens new home!!
Here is the second ark in her new location. The chickens are now foraging in fresh territory.
Me giving the chickens their treat of hen scratch.
2 of the now 3 chicken arks in the upper field.
We plan on making more of the chicken arks to house the chickens as we have plenty of field left in the upper field. Our lower field is now planted to ryegrass, clover, sunflower seeds, and flax. We will be rotating the flock back to that field in about two to three months. We are in the process of converting our permanent coops into breeding pens after the grass grows back and we run underground pvc water lines to the pens instead of having garden hoses running everywhere.
A couple of things I didn't include above:
- We drilled 1 3/4" holes into each 4'x6' skid on each end. We ran a chain through the holes and attached it the tractor with shackles. We used the tractor because it was convenient but I am positive a decent sized pickup would pull an ark into the field with ease.
- We used 2"x3"s across the 8' span of the ark for roosts. We used 2x4 metal brackets so we can take out the roosts when we need to clean the inside or do any repairs.
- The 1' poultry netting flooring is working amazing. The poop drops right through and when we move the ark to a new location we will drag it out and fertilize the soil for the next pasture planting.
- We are in a mild climate on the central coast of california where it hardly every drops below freezing so we left one side of the coop open for ventilation.