Although I live in north-central Ohio now, I grew up in the mountains of east Tennessee. I kept chickens from the time I was a little boy until I went to college. We live in town on a very small lot so I tried buying chickens for relatives that lived in the country in the hopes of getting fresh eggs. Well that didn't work out too well so I decided to build a chicken tractor, get a few hens of my own and hope I can keep the neighbors happy.
It had to be small so I decided on 8 feet long by 4 feet wide with an elevated coop but wired underneath for maximum yard space. I really liked the idea of the tractors so I could move it around the yard. I'm also very happy with the unexpected benefit of the hens eating the clover and other other weeds out of the yard!
I bought six chicks in February 2012. Two Rhode Islands Reds, two Buff Orpingtons and two Plymouth Rocks. My favorite of all time is probably Dominiques or "Domineckers" as we called them back home. However, true Domineckers are hard to find so I settled for Plymouth Rocks. At about 8 weeks we lost one of the P.R.s. Her head drooped down and when she walked she would actually do flips. I tried researching it but ended up putting her down. That was a sad thing but I realized that I had given my "townie" kids one of the life-lessons that they had not yet experienced because they didn't grow up in the country.
Three years ago, I made a brooder of my own. It is collapsible for easy storage and works very well. This was my third set of chicks raised in it.

When we bought the chicks in February, I thought I would have plenty of time to build the chicken tractor... I know some of you are laughing now and it is true... time slipped away from me. Between my real job, kids activities, and much needed down-time on weekends, time kept marching on and the chicks kept growing. By the time the weather was warm enough to start building the tractor, the chicks heads were rubbing the top of the brooder. (I actually had to raise the top of the brooder before I finished their new home!)
Anyway, armed only with ideas from BYC, I put together a plan in my mind, gathered all my scrap lumber from previous, miscellaneous home improvements, bought some additional lumber and started putting it all together. Budget was critical to me (ie. my wife) so the construction took quite a bit longer than I had planned. I think in total I spent around 100 hours getting the tractor to the stage it is currently in.
The basic plan for the coop is show below. I started in my brother-in-law's wood shop so I could work after dark and stay out of the rain.
Quite a bit of my plan came together as I was building it. As you can imagine, this led to a bit of rework but I did manage to keep the waste to a minimum. I added windows, a drop door in the floor and nest boxes on the outside. My youngest son complained a little as I started trimming out the nest boxes. He said he didn't think the chickens would care how it looked. I tried to explain that I cared... I still don't think he gets it but he does make sure to point out that feature when he shows the tractor to other people.
When I first planned the nest boxes, I intended to make the roof hinged. After moving in that direction, however, I realized I would have a problem keep it weather proof so I decided to make the back of the nest boxes hinged and the fix the roof in place. In the second pic below, you can see the outside wall of the nest boxes. The hinges are underneath and I used simple eye-hooks to keep it closed.
There was lots of eye-rolling from my son as I continued to add trim to the tractor like around the windows and the edges of the roof.
I used car-siding to as the siding for the tractor. It worked out very well, was easy to use, and is tongue-and-groove so it very weather tight.
The day finally came when we moved from my brother-in-law's shop to our house. At this point, we only had the coop finished. We still had to add the run.
Our Golden was very curious about it. Especially when we added the chicks inside. He could hear and smell them but not see them. The below pics show the back and the front. I probably should have added another window for light but I was more concerned about the cold winters up here. I intend to wire the coop so I can add a heat light and an outlet for a timer and water heater. With the timer, I hope to be able to keep the girls laying all winter.
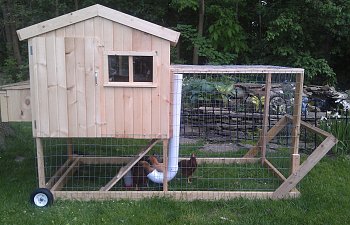
My brother-in-law and I thought we had come up with an ingenious idea for the feeder by using PVC. After we put the plan together and added it to the coop, I was reading more on BYC and found that many others had beat me to the idea already. In the below pic, you can see that we started adding the run and the wire and you can see that the drop board is on a chain so we can raise and lower it to protect the girls.
I wish I had made the feeder tube high enough to extend thru the top of the run. I eventually had to cut a hole in the wire that covers the run so I could pour the feed in easier. The cap is also PVC and made to fit the pipe. We used a 90 degree elbow and a 45 degree elbow on the bottom to allow the hens access to the feed and to prevent them from scratching it out.
We made a mistake with the wire too. We should have cut it to fit each side instead of wrapping it around the entire run. Wrapping it caused some the wire to get out of square and doesn't look as good as it could have. Correcting that mistake is on my "to-do" list.
When everything was finished, we moved the girls into their new home and added the tractor to our yard. They figured out the feeder right away.
We added the wheels and the handle to be able to move it around easily. There were a couple of design flaws here that are also on my "to-do" list for correction. 1. The wheels are too small. Well, they aren't really too small but the overall wheel design doesn't work. The bolts I used for the axles are too short so I couldn't add enough bracing. So, the bolts are bending now. 2. The drop-board that allows the hens access to the coop rests on the ground when open. When you move the coop, the board pushes into the ground. Eventually the hinges were torn out so I have to re-hinge it and shorten the chain so the board does not rest on the ground. 3. I need a door into the run itself. 4. I need to hang the waterer instead of sitting it on the ground. When we move the tractor, we always have to pull the waterer out first.
We had some left over hinges and drip-edge from the new roof on our house, so we used them on our tractor.
This is a better picture of the nest boxes with the door open.
... and the door closed.
Inside... the temporary roost and the chain that allows the drop door to be opened and closed (when it is hinged, of course).
The floor and the main door were designed so I can easily rake the litter out into the wheel barrow for composting.
Below is a pic of three of the ladies at 5 months. Hopefully only another 6 to 8 weeks before we get the first egg.
It had to be small so I decided on 8 feet long by 4 feet wide with an elevated coop but wired underneath for maximum yard space. I really liked the idea of the tractors so I could move it around the yard. I'm also very happy with the unexpected benefit of the hens eating the clover and other other weeds out of the yard!
I bought six chicks in February 2012. Two Rhode Islands Reds, two Buff Orpingtons and two Plymouth Rocks. My favorite of all time is probably Dominiques or "Domineckers" as we called them back home. However, true Domineckers are hard to find so I settled for Plymouth Rocks. At about 8 weeks we lost one of the P.R.s. Her head drooped down and when she walked she would actually do flips. I tried researching it but ended up putting her down. That was a sad thing but I realized that I had given my "townie" kids one of the life-lessons that they had not yet experienced because they didn't grow up in the country.
Three years ago, I made a brooder of my own. It is collapsible for easy storage and works very well. This was my third set of chicks raised in it.
When we bought the chicks in February, I thought I would have plenty of time to build the chicken tractor... I know some of you are laughing now and it is true... time slipped away from me. Between my real job, kids activities, and much needed down-time on weekends, time kept marching on and the chicks kept growing. By the time the weather was warm enough to start building the tractor, the chicks heads were rubbing the top of the brooder. (I actually had to raise the top of the brooder before I finished their new home!)
Anyway, armed only with ideas from BYC, I put together a plan in my mind, gathered all my scrap lumber from previous, miscellaneous home improvements, bought some additional lumber and started putting it all together. Budget was critical to me (ie. my wife) so the construction took quite a bit longer than I had planned. I think in total I spent around 100 hours getting the tractor to the stage it is currently in.
The basic plan for the coop is show below. I started in my brother-in-law's wood shop so I could work after dark and stay out of the rain.
Quite a bit of my plan came together as I was building it. As you can imagine, this led to a bit of rework but I did manage to keep the waste to a minimum. I added windows, a drop door in the floor and nest boxes on the outside. My youngest son complained a little as I started trimming out the nest boxes. He said he didn't think the chickens would care how it looked. I tried to explain that I cared... I still don't think he gets it but he does make sure to point out that feature when he shows the tractor to other people.
When I first planned the nest boxes, I intended to make the roof hinged. After moving in that direction, however, I realized I would have a problem keep it weather proof so I decided to make the back of the nest boxes hinged and the fix the roof in place. In the second pic below, you can see the outside wall of the nest boxes. The hinges are underneath and I used simple eye-hooks to keep it closed.
There was lots of eye-rolling from my son as I continued to add trim to the tractor like around the windows and the edges of the roof.
I used car-siding to as the siding for the tractor. It worked out very well, was easy to use, and is tongue-and-groove so it very weather tight.
The day finally came when we moved from my brother-in-law's shop to our house. At this point, we only had the coop finished. We still had to add the run.
Our Golden was very curious about it. Especially when we added the chicks inside. He could hear and smell them but not see them. The below pics show the back and the front. I probably should have added another window for light but I was more concerned about the cold winters up here. I intend to wire the coop so I can add a heat light and an outlet for a timer and water heater. With the timer, I hope to be able to keep the girls laying all winter.
My brother-in-law and I thought we had come up with an ingenious idea for the feeder by using PVC. After we put the plan together and added it to the coop, I was reading more on BYC and found that many others had beat me to the idea already. In the below pic, you can see that we started adding the run and the wire and you can see that the drop board is on a chain so we can raise and lower it to protect the girls.
I wish I had made the feeder tube high enough to extend thru the top of the run. I eventually had to cut a hole in the wire that covers the run so I could pour the feed in easier. The cap is also PVC and made to fit the pipe. We used a 90 degree elbow and a 45 degree elbow on the bottom to allow the hens access to the feed and to prevent them from scratching it out.
We made a mistake with the wire too. We should have cut it to fit each side instead of wrapping it around the entire run. Wrapping it caused some the wire to get out of square and doesn't look as good as it could have. Correcting that mistake is on my "to-do" list.
When everything was finished, we moved the girls into their new home and added the tractor to our yard. They figured out the feeder right away.
We added the wheels and the handle to be able to move it around easily. There were a couple of design flaws here that are also on my "to-do" list for correction. 1. The wheels are too small. Well, they aren't really too small but the overall wheel design doesn't work. The bolts I used for the axles are too short so I couldn't add enough bracing. So, the bolts are bending now. 2. The drop-board that allows the hens access to the coop rests on the ground when open. When you move the coop, the board pushes into the ground. Eventually the hinges were torn out so I have to re-hinge it and shorten the chain so the board does not rest on the ground. 3. I need a door into the run itself. 4. I need to hang the waterer instead of sitting it on the ground. When we move the tractor, we always have to pull the waterer out first.
We had some left over hinges and drip-edge from the new roof on our house, so we used them on our tractor.
This is a better picture of the nest boxes with the door open.
... and the door closed.
Inside... the temporary roost and the chain that allows the drop door to be opened and closed (when it is hinged, of course).
The floor and the main door were designed so I can easily rake the litter out into the wheel barrow for composting.
Below is a pic of three of the ladies at 5 months. Hopefully only another 6 to 8 weeks before we get the first egg.