This Page Submitted By: NChickenwing
Building Your Own Chicken Coop

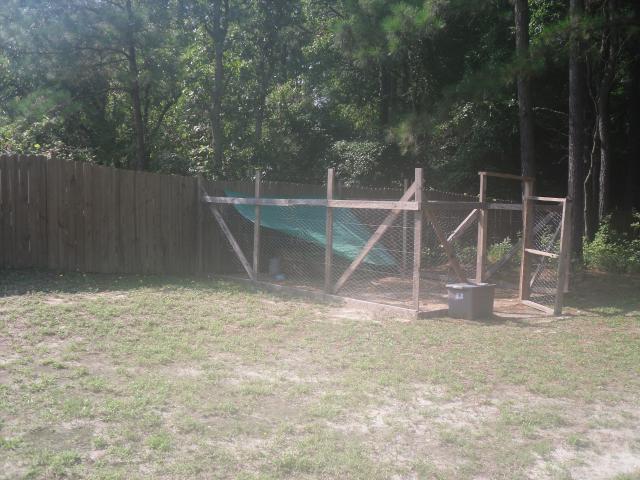
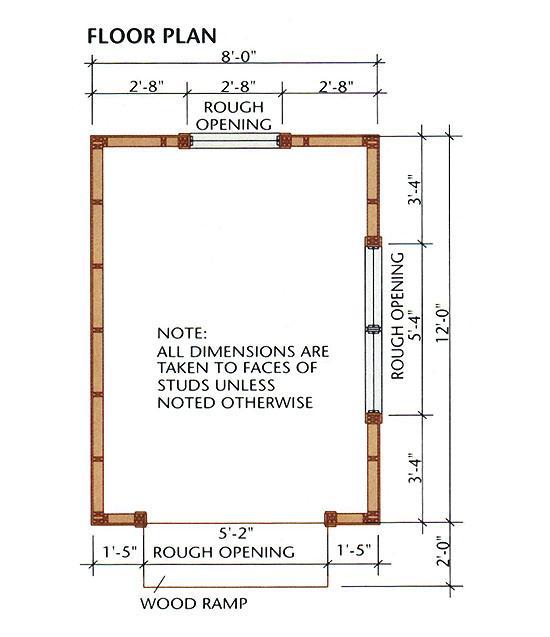
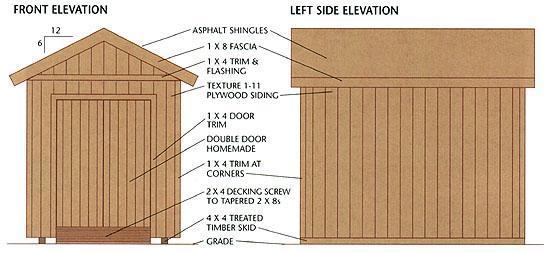
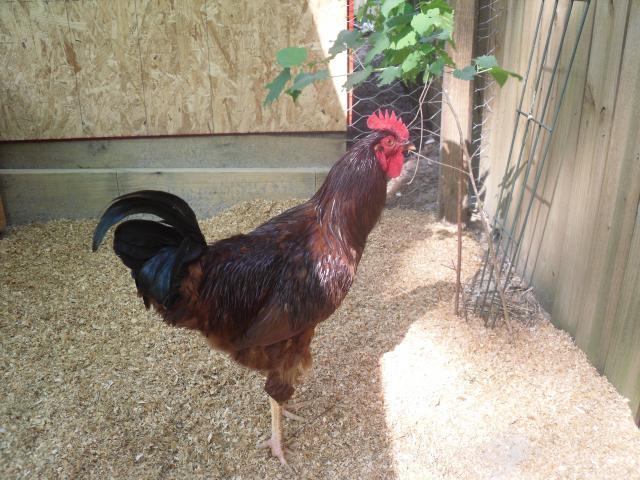
In the spring of 2009 we decided to join a friend in raising chickens for meat and eggs. Quickly we realized we needed housing for the birds and a way to keep them safe. I decided they needed a large building that would provide shelter, a safe place to sleep, and a place for them to leave my eggs. After much research I decided a 8x12 building would provide the needed space. Now I needed to figure out how I was going to build this building and what modifications I needed to make for the birds. I found a nice building I could modify easily and move when necessary. Only one problem, Lowe's wanted almost $2200 for the lumber. That was out of the question, so back to the drawing board. I needed lumber for cheap, I checked Craigslist, checked the local paper, and then a light went off in my head. My bossman's dad builds houses! I started out gathering scrap lumber, (anything that had been cut or had nails), in 3 days I had most of the framing materials. I stopped at a huge construction site and asked the super if I could get scraps from the dumpster, he said sure and after 3 truckloads I had everything I needed to begin construction. Oh, wait, what am I going to build? I needed plans, I searched the internet, and went to Lowe's with my camera. I finally came up with some plans and a building materials list. The photo to the right is a graphic representation of the basic plan.
On the following pages you will find a complete set of building plans with graphic representations, elevation drawings, work in progress photos, a complete building materials list, templates, and an explanation of how to assemble this building on your own. Throughout this page you will find tips for construction. Just look for the red text.
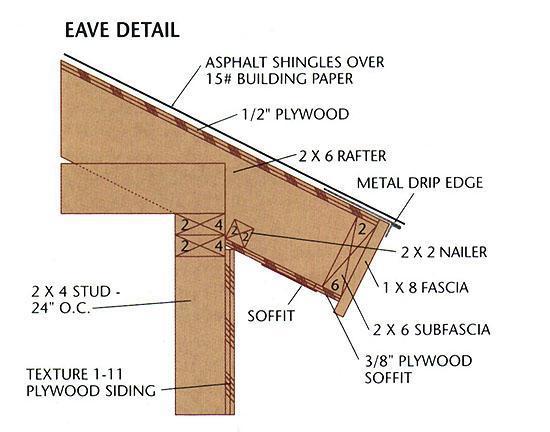
**NOTE: In the construction of the unit shown, 2x6 boards were used "ONLY" in the construction of the joists. Drawings showing 2x6 boards in the roofing section are inaccurate. **
For Starters: You will need access to a circular saw, chalk box, tape measure, speed square , hammer, ladder.
Below is the materials list:
Materials List | ||
Description | Quantity/Size | Material |
Foundation | ||
Drainage material | 1.4 cu. yd. | Compactable gravel |
Skids | 3 @ 12'-0" | 4 × 4 treated timbers |
Floor Framing | ||
Rim joists | 2 @ 12'-0" | 2 × 6 pressure treated |
Joists | 10 @ 8'-0" | 2 × 6 pressure treated |
Floor Sheathing | 3 sheets, 4 ×8' | 3/4" tongue&groove |
Joist clip angles | 20 | 3" × 3" × 3" ×16 gauge galvanized |
Wall Framing | ||
Bottom plates | 2 @ 12'-0", 1@ 8'-0" | 2 × 4 |
Top plates | 4 @ 12'-0", 4@ 8'-0" | 2 × 4 |
Studs | 40 @ 92 5/8" | 2 × 4 |
Headers | 2 @ 10'-0'', 2@ 6'-0" | 2 × 6 |
Header spacers | 1 @ 9'-0", 1 @ 6'-0" | 1/2" plywood 5" wide |
Gable Wall Framing | ||
Top plates | 2 @ 8'-0" | 2 × 4 |
Studs | 2 @ 8'-0" | 2 × 4 |
Roof Framing | ||
Rafters | 22 @ 6'-0" | 2 × 4 |
Metal anchors | 10, with nails | Simpson H1 |
Rafter ties | 3 @ 8'-0" | 2 × 4 |
Ridge board | 1 @ 14'-0" | 2 × 4 |
Lookouts | 1 @ 8'-0" | 2 × 4 |
Subfascia | 1 @ 8'-0", 2 @10'-0'' | 2 × 4 |
Soffit nailers | 3 @ 8'-0" | 2 × 2 |
Exterior Finishes | ||
Plywood siding | 10 sheets @ 4×8' | T1-11 plywood siding |
Z-flashing | 2 pieces @ 8ft. | Galvanized 18 gauge |
Trim | 10 @ 10'-0" | 1 × 4 S4S cedar |
Fascia | 8 @ 8'-0" | 1 × 6 S4S cedar |
Plywood soffits | 2 sheets @ 4 ×8' | 3/8" cedar or fir plywood |
Soffit vents | 4 @ 4 × 12" | Louver with bug screen |
Flashing | 8 linear ft. | Galvanized 18 gauge |
Roofing | ||
Roof sheathing | 6 sheets @ 4 ×8' | 7/16" OSB |
Asphalt shingles | 150 sq. ft. | 6 Bundles |
15# building paper | 150 sq. ft. | 1 Roll |
Metal drip edge | 2 @ 14'-0", 4@ 6'-0" | Galvanized metal |
Roof vents | 2 units | (optional) |
Door | ||
Frame | 2 @ 8'-0", 1 @ 6'-0" | 3/4 × 4 1/4" S4S cedar |
Stops | 2 @ 8'-0", 1 @ 6'-0" | 1 × 2 S4S cedar |
Panel material | 12 @ 8'-0" | 1 × 6 T&G V-joint S4S cedar |
Z-brace | 4 @ 6'-0" | 1 × 6 S4S cedar |
Construction adhesive | 1 tube | |
Exterior trim | 2 @ 8'-0", 1 @ 6'-0" | 1 × 4 S4S cedar |
Interior trim | 2 @ 8'-0", 1 @6'-0" | 1 × 2 S4S cedar |
Strap hinges | 6 with screws | Exterior hinges |
Windows | ||
Frames | 5 @ 6'-0" | 3/4 × 4 1/4" S4S cedar |
Mullion | 1 @ 3'-0" | 2 × 4 S4S cedar |
Stops | 10 @ 6'-0" | 1 × 2 S4S cedar |
Glazing tape | 30 linear ft. | |
Glass | 3 pieces | 1/4" clear tempered |
Window muntins | 3 @ 8'-0" | 1 × 1 S4S cedar |
Exterior trim | 5 @ 8'-0" | 1 × 4 S4S cedar |
Interior trim | 5 @ 8'-0" | 1 × 2 S4S cedar |
Ramp (Optional) | ||
Pads | 2 @ 6'-0" | 2 × 8 pressure treated |
Stringers | 1 @ 8'-0" | 2 × 8 pressure treated |
Decking | 7 @ 6'-0" | 2 × 4 pressure treated |
Fasteners | ||
16d common nails | 16 lbs. | |
10d common nails | 1 lb. | |
10d galvanized casing nails | 1 lb. | |
8d common nails | 1/2 lb. | |
8d box nails | 3 lbs. | |
8d galvanized box nails | 1 1/2 lbs. | |
8d galvanized finish nails | 7 lbs. | |
3d galvanized box nails | 1/4 lb. | |
7/8" galvanized roofing nails | 2 lbs. | |
1 1/2" joist hanger nails | 80 nails | |
1 1/4" wood screws | 70 screws | |
3 1/2" deck screws | 12 screws | |
3" deck screws | 50 screws | |
2 1/2" deck screws | 40 screws | |
1 1/4" deck screws | 30 screws | |
Silicone latex caulk | 1 Tube |
Step A: Build the Foundation & Floor Frame
1. Excavate the building site making sure it is flat and level.
2. Cut three 4×4 treated timber skids at 144". Arrange and level the skids on the ground, following the FLOOR FRAMING PLAN.
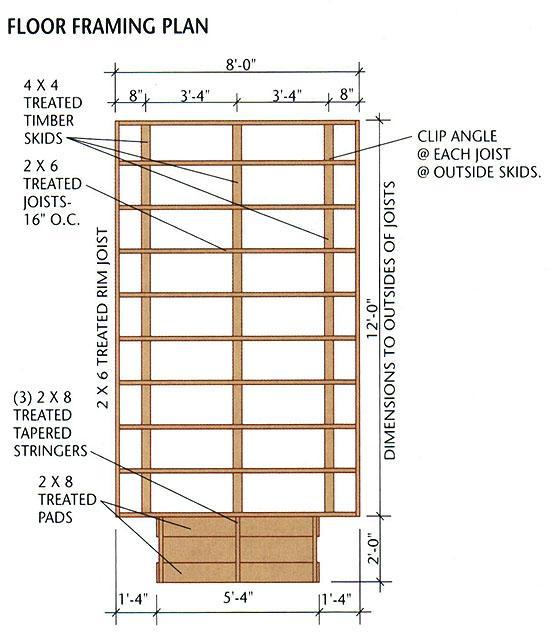
3. Cut two 2×6 rim joists at 144" and ten joists at 93". Mark the joist layout onto the rim joists, following the plan. Assemble frame with 16d galv. common nails; be sure to check each joist for crowning and install it with the crowned edge up.
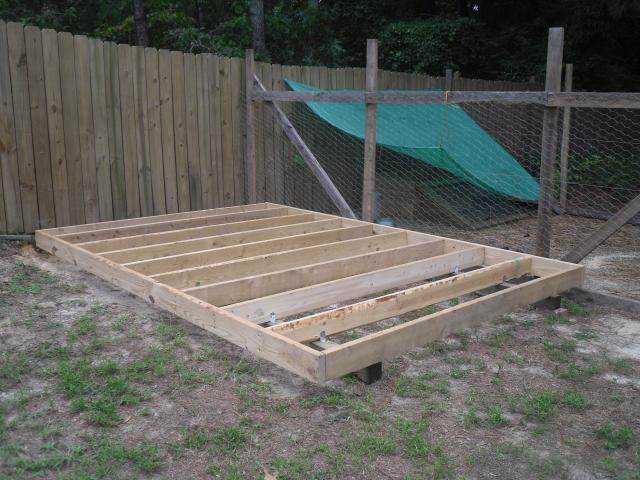
4. Set the floor frame on top of the skids and measure the diagonals to make sure it's square. Install metal clip angles at each joist along the two outer skids, using 1 1/2" joist hanger nails and 16d galv. common nails, and toenail each joist to the center skid with 16d galv. nails.
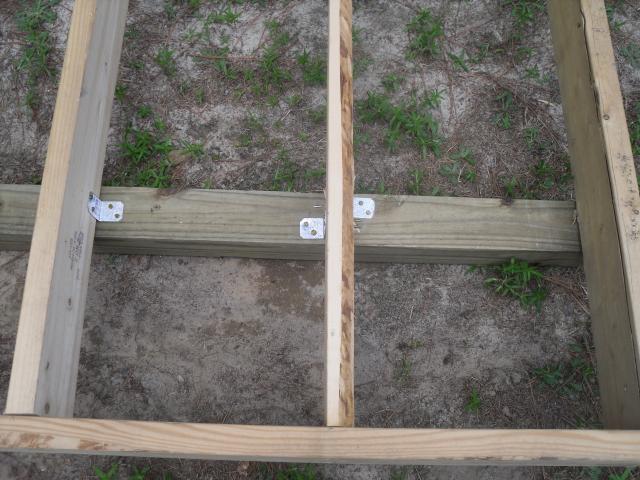
Notice the crowned edge is up.
5. Install the tongue-and-groove floor sheathing, starting with a full sheet at one corner of the frame. Use 8d galv. nails driven every 6" along the edges and every 12" in the field.
Tip - Use a wood block to tap the sheets tongue into the other sheets groove. The object is to not damage the groove of the sheet you are inserting.
Step B: Frame the Walls
1. Snap chalk lines on the floor for the wall plates.
2. Cut the 2 × 4 wall plates: four at 144" for the side walls and four at 89" for the front and back walls.
3. Mark the stud layouts onto the plates following the FLOOR PLAN.
4. Cut twenty-seven studs at 92 5/8", and cut six at 81 1/2" to serve as jack studs.
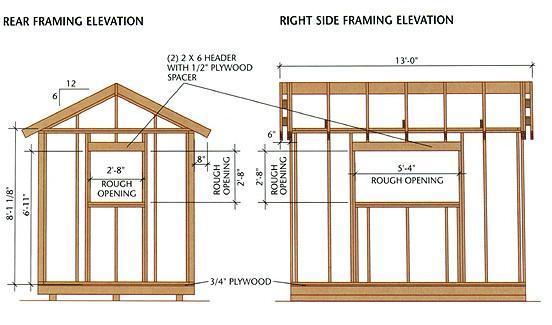
5. Build three headers with 2 × 4s and 1/2" plywood: one at 65" for the door opening, one at 67" for the right side window, and one at 35" for the rear window.
6. Assemble, raise, and brace the walls one at a time, then add the double top plates.
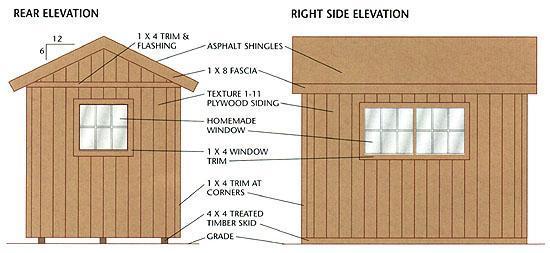
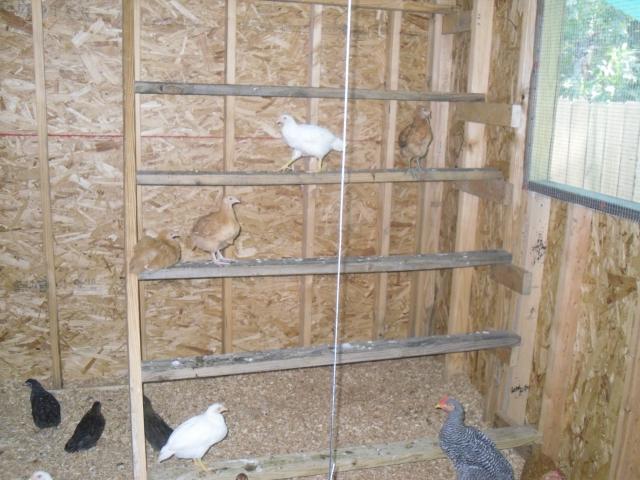
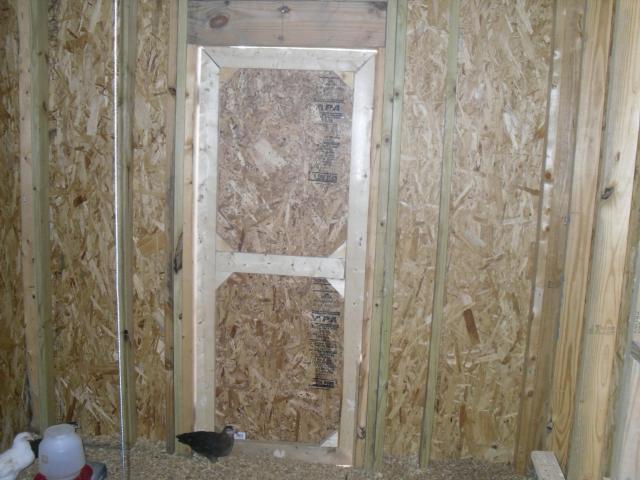
You can see the framing for the nest boxes in the wall; I needed 10 boxes for 30 birds. I made the framing 70x32.
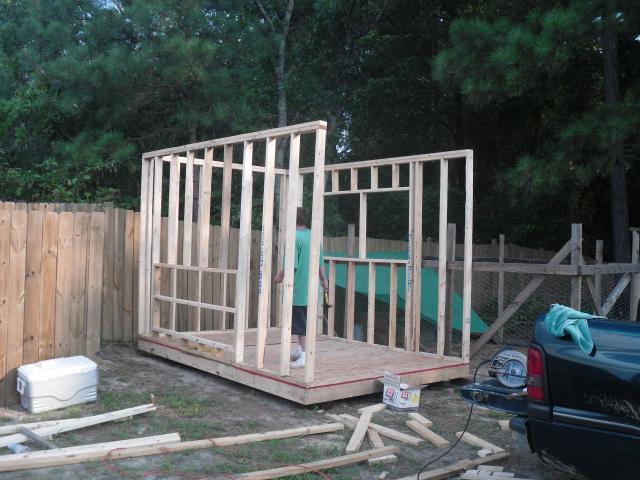
The window on the right wall measures 72x36.

I did not need a double door so I made a single door at 29x74. The header was cut at 32 inches and doubled with a piece of 1/2 plywood as a spacer.
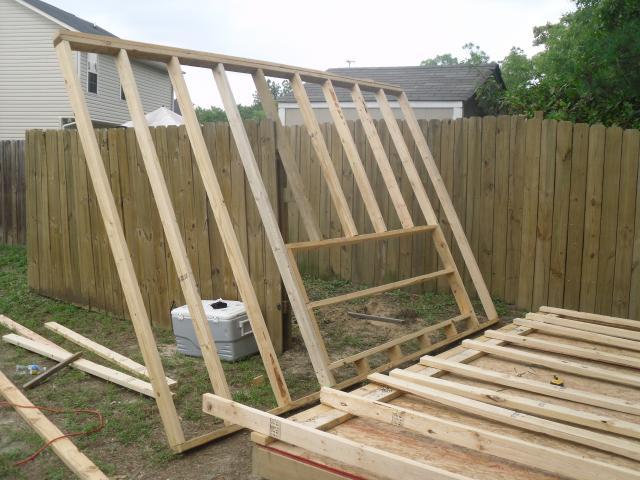
Step C: Frame the Roof
1. Cut two pattern rafters, following the RAFTER TEMPLATE. Test-fit the rafters using a 2 × 4 spacer block, then cut the remaining twelve common rafters. Cut eight rafters for the gable end overhangs-these do not have bird's mouth cuts.

Tip - Follow the rafter template. Cut the angle first on a 6' 2x4, then measure the overall length and make the plum cut. After both cuts are made measure and mark the birds mouth cuts. Use wood screws to install the top of the rafters to the ridge board.
2. Cut the 2 × 4 ridge board at 156". Draw the rafter layout onto the top plates and ridge board, using 16" on-center spacing. The outsides of the outer common rafters should be 6" from the ends of the ridge board.
2. Cut the 2 × 4 ridge board at 156". Draw the rafter layout onto the top plates and ridge board, using 16" on-center spacing. The outsides of the outer common rafters should be 6" from the ends of the ridge board.
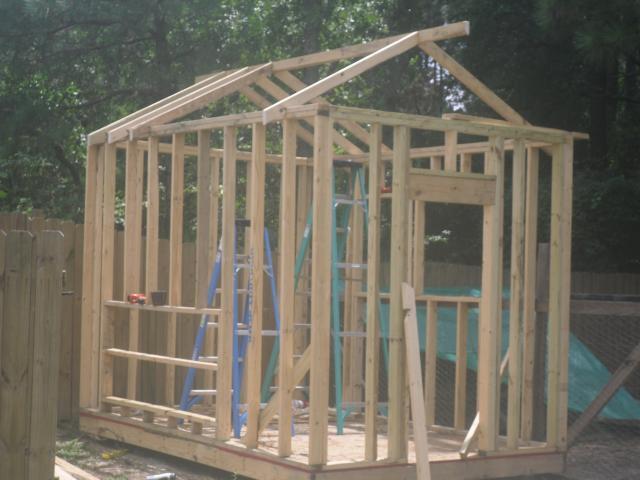
3. Install the rafters. Reinforce the rafter-wall connection with metal anchors-install them on all but the outer common rafters.
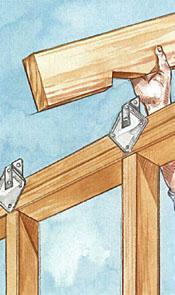
4. Cut three 2 × 4 rafter ties at 96", and clip the top outer corners so they won't project above the rafters. Position each tie next to a pair of rafters as shown in the FRAMING ELEVATIONS. Face nail each tie end to the rafter with three 10d nails, then toenail each tie end to the top wall plate with two 8d nails.
5. Cut the gable-wall plates to reach from the ridge to the wall plates. Install the plates with their outside edges flush with the outer common rafters. Cut and install the gable studs, following the FRAMING ELEVATIONS.
5. Cut the gable-wall plates to reach from the ridge to the wall plates. Install the plates with their outside edges flush with the outer common rafters. Cut and install the gable studs, following the FRAMING ELEVATIONS.

Step D: Build the Gable Overhangs
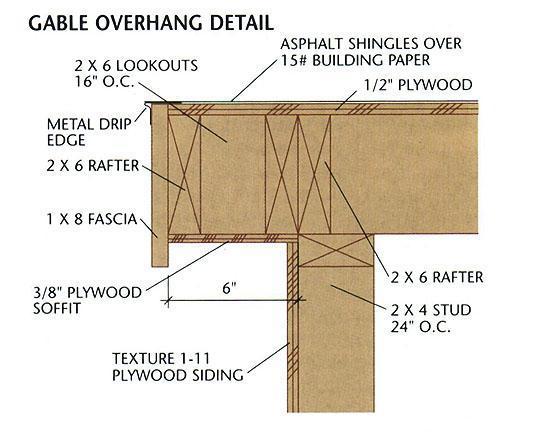
1. Cut twelve 2 × 4 lookouts at 3". End nail the lookouts to each of the inner overhang rafters, using 16" on-center spacing (see the GABLE OVERHANG DETAIL).
1. Cut twelve 2 × 4 lookouts at 3". End nail the lookouts to each of the inner overhang rafters, using 16" on-center spacing (see the GABLE OVERHANG DETAIL).
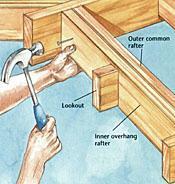
2. Face nail the inner overhang rafters to the outer common rafters with 10d nails.
3. Fasten the outer overhang rafters to the ridge and lookouts, using 16d nails.
3. Fasten the outer overhang rafters to the ridge and lookouts, using 16d nails.
Step E: Install the Fascia, Sheathing & Roofing
1. Cut and install the 2 x 4 subfascia along the eaves (see the EAVE DETAIL Below). Keep the ends flush with the outsides of the overhang rafters, and the bottom edges flush with the bottom rafter edges; use 16d nails.2. Install the 1 x 6 fascia along the gable overhangs, then along the eaves, holding it 1/2" above the rafters so it will be flush with the sheathing; use 6d galv. finish nails.
3. Install the 7/16" OSB sheathing, starting at a lower corner of the roof; use 8d box nails driven every 6" along the edges and every 12" in the field of the sheets.
5. Install the asphalt shingles, starting at the eave edge. If desired, install roof vents.
Step F: Install the Soffits & Siding
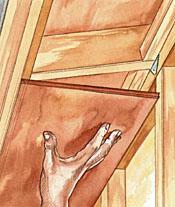
1. Cut twelve 2 x 2 nailers to fit between the rafters, as shown in the EAVE DETAIL. Fasten the nailers between the rafters with 10d face nails or 8d toenails.
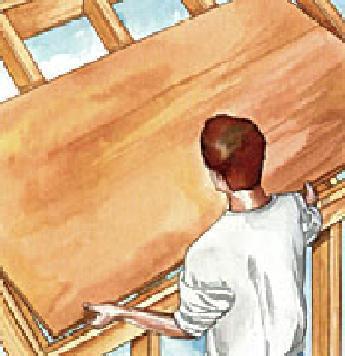
4. Install the plywood siding, using 8d galv. finish nails. Butt the top edges of the siding against the soffits. Don't nail the siding to the rear-window and door headers in this step. At the gable ends, install Z-flashing along the top edge of siding, then continue the siding up to the soffits.
Note: Along the side walls, 8-ft. siding will cover the floor plywood by about 1/2" (this is necessary); if you want the siding to cover the floor framing, use 4 x 9-ft. sheets.
Step G: Build & Install the Doors
1. Cut out the bottom plate from the door opening.
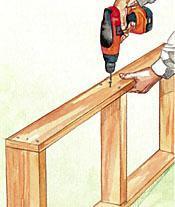
2. Cut the door frame pieces from 3/4" x 4 1/2" (actual dimension) cedar: cut the head jamb at 61 1/4" and the side jambs at 81 7/8". Assemble the frame by screwing through the head jamb and into the side jambs with 2 1/2" deck screws.
3. Cut 1 x 2 stops and install them inside the jambs with 1 1/4" deck screws or 3d galv. finish nails. If the doors will swing out, install the stops 2 1/4" from the outside edges of the frame; if they'll swing in, install the stops 2 1/4" from the inside edges.
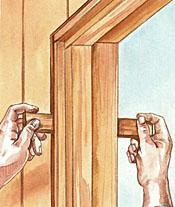
4. Install the door frame in the rough opening, using shims and 10d galv. casing nails. Make sure the frame is square and plumb.
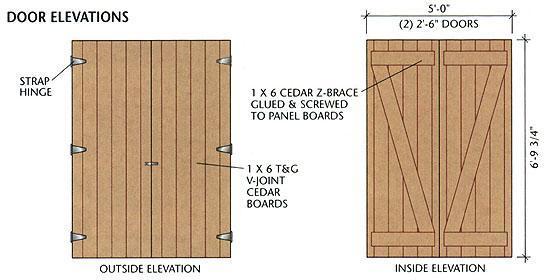
5. Cut twelve pieces of 1 x 6 tongue-&-groove boards at 81 3/4". For each door, fit together six boards with their ends flush, then mark the two end boards for trimming so that the total width is 30". Trim the end boards.
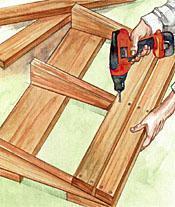
6. Cut the Z-brace boards following the DOOR ELEVATIONS. Lay the doors on a flat surface and attach the brace boards using construction adhesive and l 1/4" wood screws.
Step H: Build & Install the Windows & Trim
Note: If you've bought pre-hung windows for the coop, install them following the manufacturer's directions.
To build homemade windows, use the following directions.
1. For each window, cut the 3/4" x 4 1/4" frame stock to form a rectangular frame with outer dimensions that are 1/2" shorter and narrower than the rough opening. Assemble the frame with 2 1/2" deck screws. Cut and install a 2 x 4 mullion in the center of the frame for the side-wall window.
3. Cut the 1 x 2 stops. Bevel the outer sill stops as shown in the WINDOW JAMB DETAIL. Attach the inner stops with 6d galv. finish nails. Order the glass to fit.
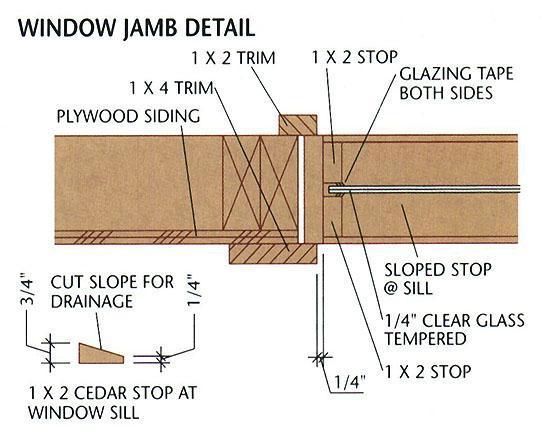
5. Install the horizontal 1 x 4 trim as shown in the ELEVATIONS. Fasten the trim with 8d galv. finish nails.
6. Install the 1 x 4 corner trim so that it butts against the horizontal trim and extends to the bottom edges of the siding.
Step I: Build the Ramp (Optional)
Determining the width and length (and thus the slope) of the ramp is up to you, but here is the basic construction procedure:
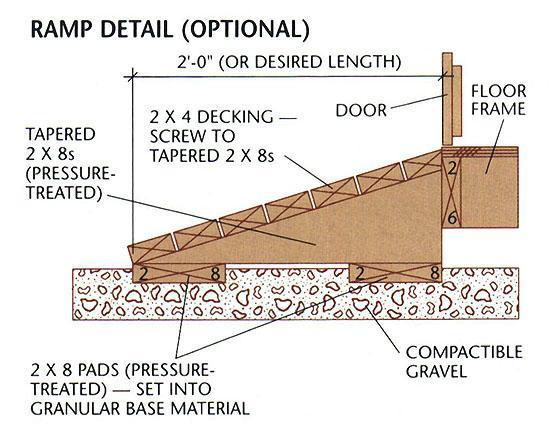
2. Cut two 2 x 8 pads to the full width of the ramp.
3. Measure the distance from the ground to the shed floor; subtract 2" from that dimension to get the height of the tapered stringers.
4. Use the ground marking to determine the length of the stringers-be sure to account for the 1 1/2" thickness of the decking. Cut the tapered stringers from 2 x 8 lumber: cut one for each end and one for every 16" to 24" in between.
5. Attach the pads to the stringers with 16d galv. nails driven through the bottom faces of the pads and into the stringers.
7. Attach the decking boards to the supports with 16d galv. nails or 3" deck screws, maintaining a 1/8" gap between boards.
8. Set the ramp in place against the shed and fasten it by toe nailing through the end stringers and top decking board with 3 1/2" deck screws.
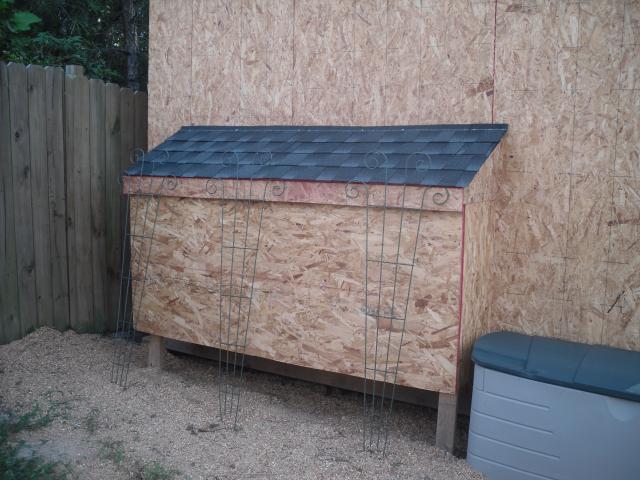
My Modifications
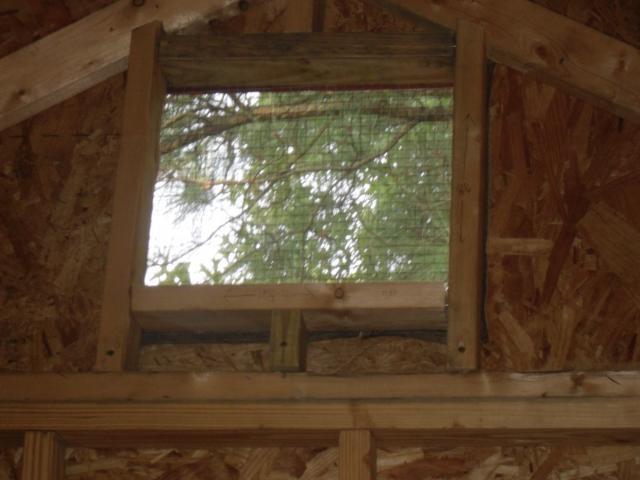
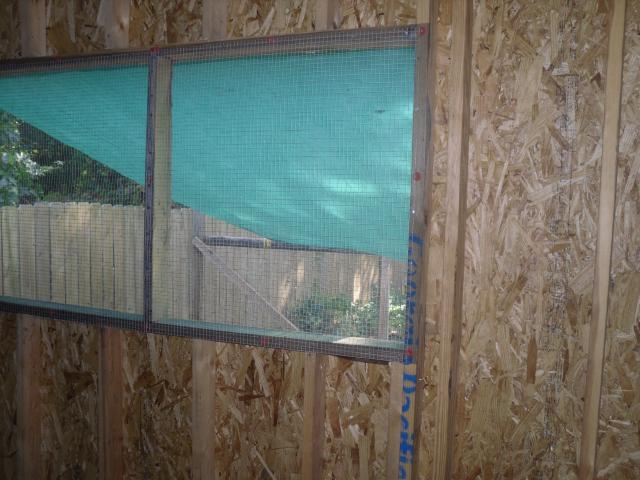
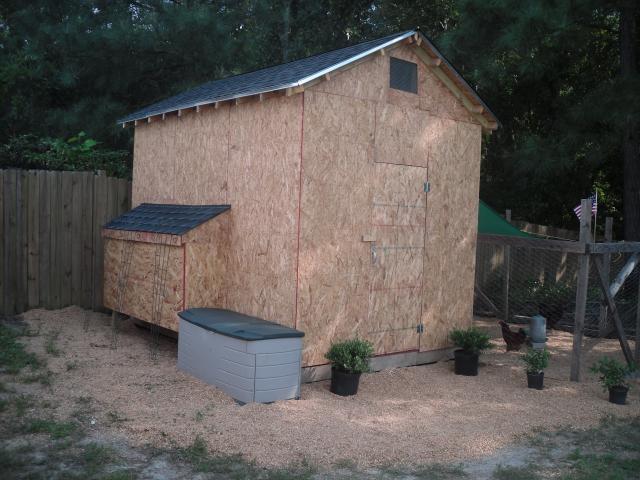
1. I decided to make 16x16 openings in the gable wall for ventilation.

Things Left to Finish and Change
- I still need to paint and add the trim work. I also need to build a partition wall inside the coop. After the chicks are ready to integrate with the older members of the flock I need to add the pop door and ladder.
- What I would add or change.
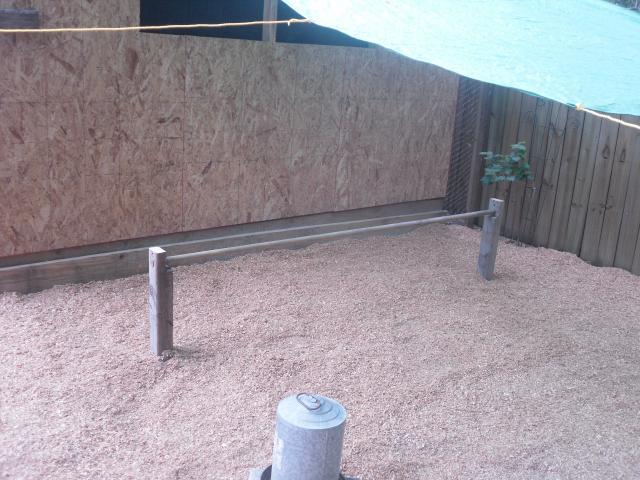
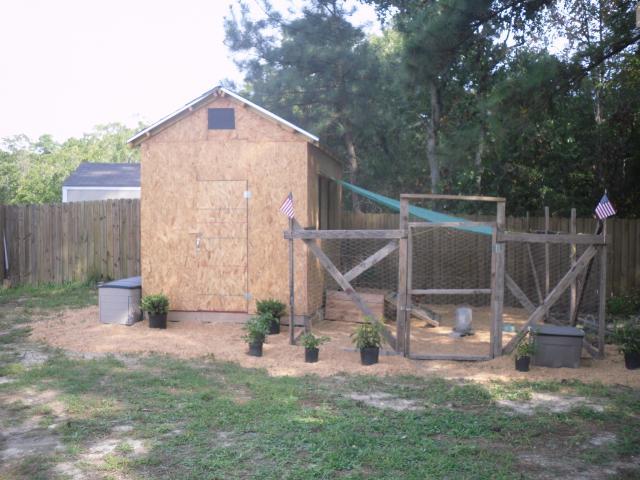
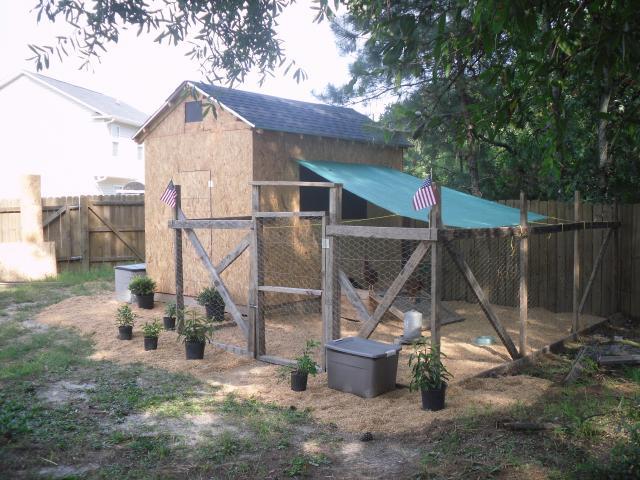
- I would like to add a window over the nest box and two windows, one on either side of the door. I want to add to the run and increase the size from it's current 12x18 to 15x20 and add netting over the top.
This basic plan can be modified to suit any size coop you wish to build; the only changes you have to make are the measurements. You can add windows wherever you like by following the guidelines in the window section. Consider all of your modifications before you begin framing. Modifications are sometimes difficult to make after you apply the siding. Take your time doing the framing. The key to any good structure is the framing. I hope this guide will help you succeed with building your New Chicken Coop.

