Our Garage Coop 
We used to live in the suburbs on a small lot, only 100 x 55 feet. We decided to utilize part of our existing garage for the henhouse and save the yard real estate for the enclosed run. We also had other considerations based on the brand new city ordinance about keeping chickens, which we helped pass in 2007: the coop has to be aesthetically pleasing, it has to have wire buried 12" deep and no chicken wire, etc. We're only allowed up to 6 hens (no roosters) so we knew that we didn't need to build bigger for a possible future flock. Since our city requires that the hens be enclosed at all times unless they're in a FENCED yard with SUPERVISION, we wanted to be sure their run was big enough to keep them happy and busy most of the day. We used as many recycled, Freecycled, or salvaged materials as we could. We also tried to take passive solar ideas into consideration for the run, which is in an otherwise shady location. The inside garage coop took one weekend to build (after sourcing the materials earlier) and the exterior run also took one weekend. Figuring out the plans, looking at all the coops on this site, and researching designs, however, took all summer! I hope that this collection of coop pages that nifty-chicken is putting together will make the process much easier for future coop-builders. Great idea, nifty-chicken! The interior door: 
Olivia's portrait mural of the girls: 
Looking in the big door: 
CONSTRUCTION & DETAILS 1. Using 2x3s, we framed in two new walls in our existing garage, utilizing the existing corner (exterior) walls, existing wood floor and ceiling. We framed in openings for a human-size door (using a salvaged interior door from our 1926 house; we cut out the upper panel and installed 1/2" hardware cloth and brackets to hold a storm window in winter), a fixed window to allow more light into the henhouse (bought for $6 at a "Habitat for Humanity RE-Store"), and a large, opening horizontal window that spans the whole side wall (salvaged from a neighbor's house during renovations), and openings for nest-box access doors. 
2. We insulated all of the walls and ceilings. We covered the outer walls with nice plywood I salvaged from a construction site and covered the inner walls with thin luan plywood and paneling we'd also salvaged. The floor is covered with linoleum (for easy cleaning). 
3. Using a Sawz-All, we cut a 12x12 hole in the garage wall for the pop-hole. We framed it in and made a sliding door from 1/4" plywood. It runs true in a track made of aluminum angle iron, is accessible from outside the henhouse and has a latch to keep it shut at night. 
4. Nest boxes are made of salvaged plywood and are 12" wide, 14" deep, and have a steeply pitched roof to prevent roosting. We painted the insides dark brown in an effort to make the cozy and dark. They're about 15" off the ground. On the wall above is a remote thermometer sensor that we can monitor from inside the house. 
5. Feeder and waterer: The feeder is hung on a shelf bracket; we had to string rope above it to prevent roosting. The waterer is atop an inverted flower pot. We bought a heated dog bowl and removed the heating element. It fits perfectly in an old cast iron pot lid atop the flower pot, and the waterer sits on top of that. (edited 1/08: we switched to a plastic waterer so we could add ACV to the water; we palced a plastic frisbee beneath it to catch any spills so they wouldn't get on the heating element. It has worked great in temps down to around zero F!) The whole thing is plugged into a therostatic plug (from Lowes) that turns the circuit on at 38 degrees. We made a top for the waterer out of an old squirrel baffle (from a bird feeder) to prevent the girls perching on top and pooping in the water. Oyster shell and grit are offered in tuna cans screwed to the wall. 
6. Electrical: We found a thermostatic plug (that turns the circuit on at 38 degrees) for the water heater, to prevent freezing in winter. The coop light is on a timer, we'll keep it adjusted to allow 14 hours of light all winter. The bulb is a 13 watt (60 watt equivalent) compact flourescent to save energy. 

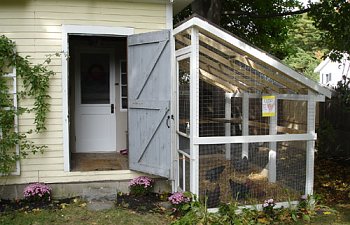
THE EXTERIOR RUN~ The run is 11' x 6'. We used salvaged 4x4s for the posts and prefab deck footings. Since it's quite shady there on the north-east side of the garage we used a clear roofing material called Sun-Tuf. The bottom three feet of the run is fenced with 1/2" hardware cloth, for protection from raccoons. The upper wire is 2 x 3 galvanized fencing. The wire is buried 12" deep. Olivia painted a sweet "Coop Sweet Coop" sign and we installed a fallen branch from our neighbors' yard as a perch. 


Here's the finished product, complete with a bottle of waterless hand sanitizer on the door (Olivia is very good about making sure the neighborhood kids all wash hands after petting the chickens. We also have two pairs of old rubber gardening clogs that are our "coop shoes".) 
Happy chickens!!!! 

|
Our Garage Coop
- Author SeaChick
- Publish date
- Updated
- Article read time 4 min read
-
- Tags
- small-coops

Article information
More from SeaChick
-
 Seachicks PagelSeaChickl Who we are: Olivia (age 11), mom Stacey (who asks most of...