Poultry in Motion
Because some of your basic materials may differ from mine, causing dimensions to vary, precise plans are less helpful than a detailed description with pictures, and it's up to you to do the rest. I will organize the instructions by section, from chassis to trim.
CHASSIS:
1. Begin with a 4’ x 8’ single axle trailer with a metal frame and a bolted-on axle. Remove the axle.
2. For wheels, you have two options. One is to use the existing trailer wheels for one axle and then acquire a second matching axle. The disadvantage is that, with the standard trailer wheels, your tires will probably look too small. My solution was spare tires from late-model wrecks, which have big wheels and small tires, so they come closest to Model A size without the great expense of authentic wheels.
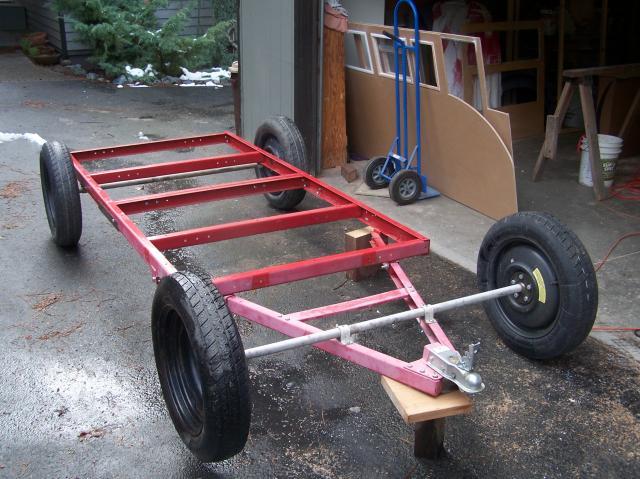
Figure 1: Chassis
3. If you use spares, the challenge is to attach them to axles. I paid a fabricator to weld plates onto the ends of pipes and drill bolt holes to match my wheels. (Remember, bolt holes are not all spaced identically). Then I drilled holes in my frame for U-brackets which I attached to my trailer frame (Figure 2).
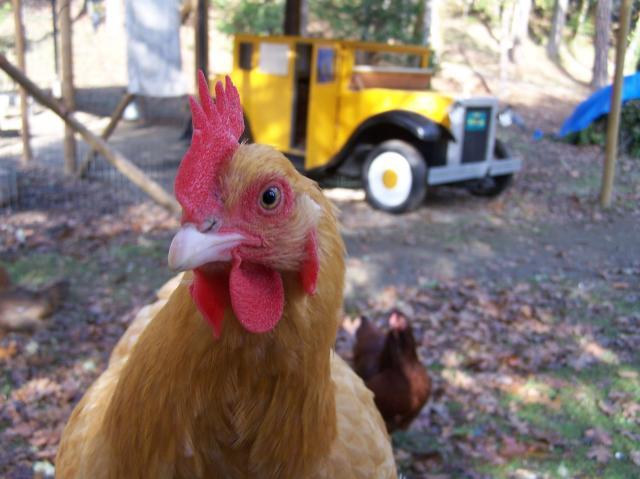
4. Bolt wheels to axles with the cavity side out, and cut ¼” plywood circles for hubcaps. Paint white with a yellow yolk (Figure 3, with my Orp-Rock mix "Amber" posing for scale). The color I used for the coop body and hubcaps is a very yolky Caterpillar Tractor yellow, sold in most larger hardware stores.
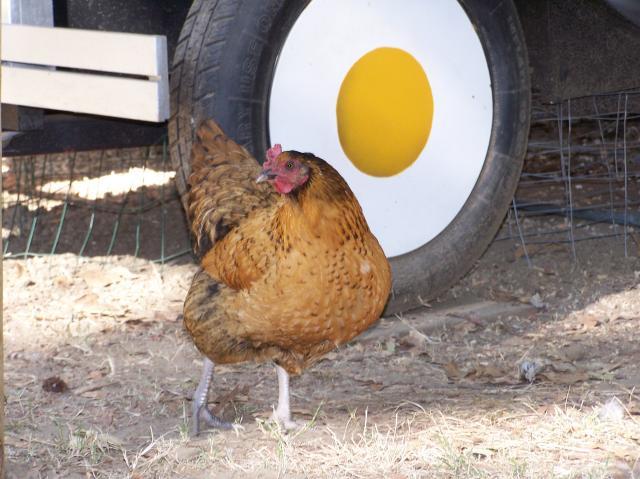
Figure 2: Wheel Detail
CAB:
Before you begin the body, you will need to find fenders from an antique car (or if you are handy with sheet metal, make your own). I got lucky and found ’30 Ford fenders for $50 on craigslist (Figure 3). The rear fenders are simply bolted to the body above the wheels. But front fenders vary in length and width, so from this point I will be less precise about dimensions that involve the front end.
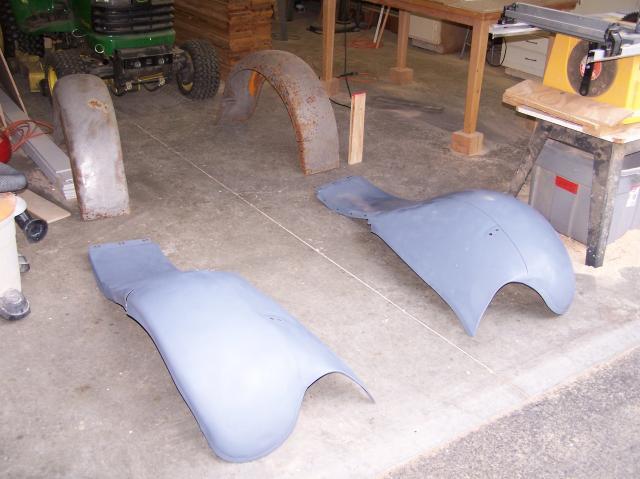
Figure 3: Fenders from a '30 Ford Model A
A decision to make before proceeding is the position of your nesting boxes. My three open-top boxes (Figure 4) rest on a shelf protruding a few inches into the cab under a sloped “dash,” with most of the boxes under the hood. This leaves room in the engine compartment for storage of food and bedding, and I can access the eggs either from the coop door or the hinged lid above the boxes. An alternate design would be to place the nesting boxes along one side of the engine compartment. This design might work best in a cold climate if you want to insulate the engine compartment to keep your hens cozy while laying.
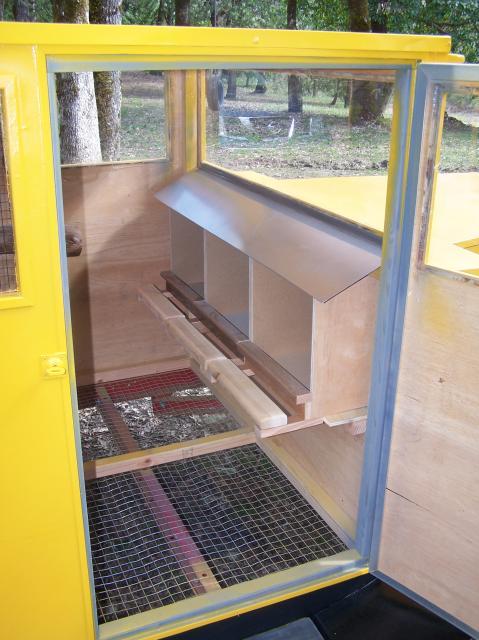
Figure 4: Interior detail showing nesting boxes, dashboard, door, floor
1. Determine the dimensions of the cab floor and build a frame of 2” x 2” to overlap all four edges of the cab floor about 1/8”. Cover the bottom of the frame with 1” wire and place it on the trailer bed, wire side down; it is not necessary to attach it to the frame.
2. Cut the side panels (Figure 5) from ½’ plywood (a smooth-surfaced plywood will make for a more car-like finish). Note that my side panels include the cab and 8” of the hood, so the actual cab floor is 8” less than eight feet. Window cutouts should leave 1 ½” to allow for reinforcing framing of 2” x 2” lumber. Doors may be cut on either side, but I chose only one on the passenger side,, which I knew would be the side I would usually approach (Figure 6 below). 3. Cut 10 pieces of 2” x 2” the same length as the width of your wire cab floor; attach four of these at top of cab, one at base of windshield, one at floor of cab front 4 ½” from bottom, one at bottom of rear window, one 16” from rear bottom, and two along the curve of the trunk.
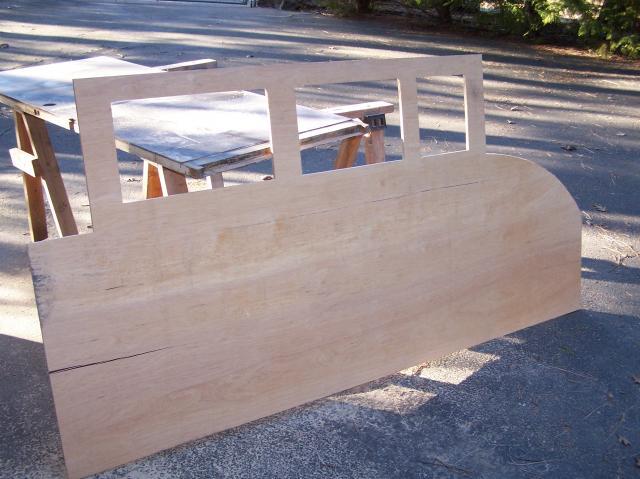
Figure 5: Side Panel
4. Cut 2” x 2” the length of the side panels minus 1 5/8”. Attach these on the inside of the panels 3 ½” from the bottom.
5. Cut plywood for the rear end 16” high and the width of the space between the side panels. Cut a 12" x 12" hole in the middle of this piece 4 1/2" from the bottom, 1 1/2" from the top. Attach 2” x 2”s to the sides and 3 ½” from the bottom, then attach to the side panels.
6. Cut plywood for the front as wide as the space between the side panels. Cut a hole for the windshield, 12” high, leaving 1½” on all sides. Cut a lower hole 3” b8low the windshield hole 13” high and 42” wide. Attach 2” x 2”s along the edges and along the lower edge of the lower hole, then attach to the side panels. Place the cab shell on the chassis (Figure 6).
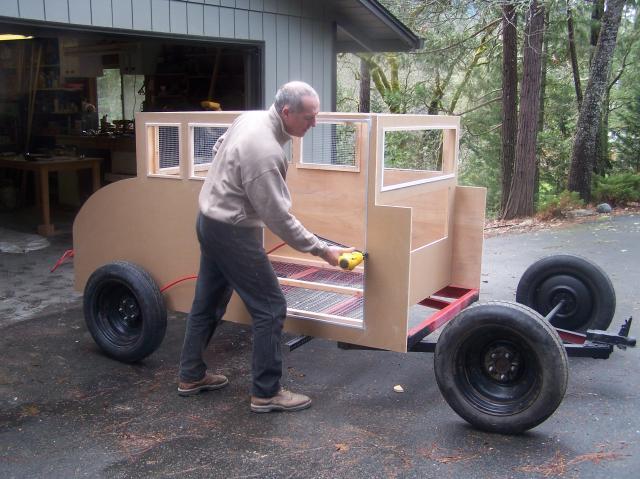
Figure 6: Assembly of side panels to front and placement on trailer frame
You now have the basic cab, about 4’ x 8’, which should stay in place with the 3 1/2” overlap over the trailer frame, but you may choose to secure it with four bolts through the side panels and trailer frame.
8. Cut sheet metal panel to fit over curve of trunk. Pre-drill holes, apply silicon adhesive to framing pieces and curved edges of side panels, and attach with flat-topped nails or round-head screws. 9. Cut sheet metal to fit over top of cab. I had a piece made with edges folded ½” and glued it to the framing and glued it to the top. I also ran a wire (through peck-proof plastic conduit) inside to the roof for a dome light, placed rigid foam insulation between the roof joists, and covered that with 1/4” paneling (Figure 7). This helps keep the chickens cooler in summer and warmer in winter.
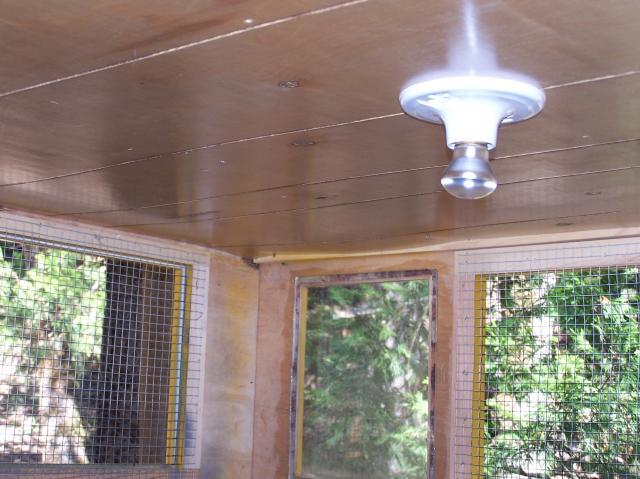
Figure 7: Interior detail showing dome light, ceiling paneling, wire and Plexiglas windows
10. Construct a 12” square chute to the rear opening, extending about 8” away from the coop, with its outside edge in 1” x 2” fir. Then back the coop up to the run, cut a hole in the chicken wire, and screw a second identical 1” x 2” frame to the first one (Figure 8, with my Welsummer roo "Russell Crow" posing for scale). Attach a ramp from the bottom edge of the chute to the floor of the run (Figure 9).

Figure 8: Back chute detail, with Russell Crow
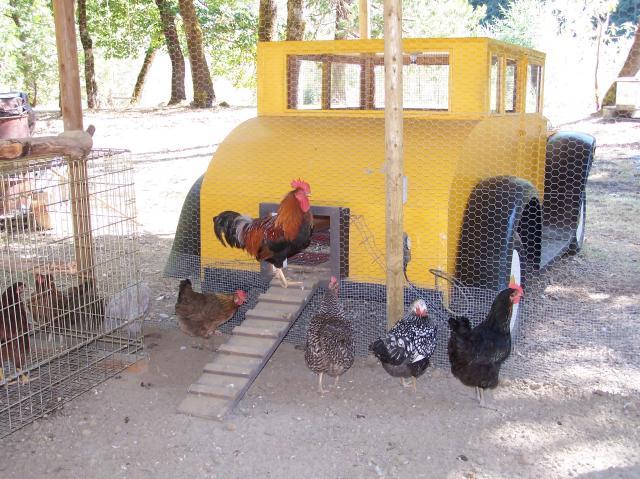
Figure 9: Rear of coupe showing ramp into run
11. For windows, I glued Plexiglas for the windshield and front side windows. For the rear window and other side windows, I stapled ½“ wire onto wood frames and attached those to the inside of the panels (see Figure 7 above). In a cold climate, the windows can be covered from the outside, and a heat light can be installed (but do not put it directly above the roost).
12. Attach a cowl above the windshield made from a piece of 1” x 3” fir tapered to ½ “ x 3”, curved at the front corners.
13. Joints and window frames may be sanded and caulked. I chose to go a little more fancy with ¾” right angle molding around the windows and 1” metal angle (flashing) on the body. I also glued ½” U-molding (for drywall) around the door and door frame.
14. Attach roosting bars to the inside of the cab. I used three tree branches about 3” in diameter, 14” apart. One fits under curve of the trunk, the other two inside the cab at different heights (Figure 10). Each bar provides four feet of roosting space; together with the three nesting boxes, the coupe will accommodate as many as fifteen standard hens.
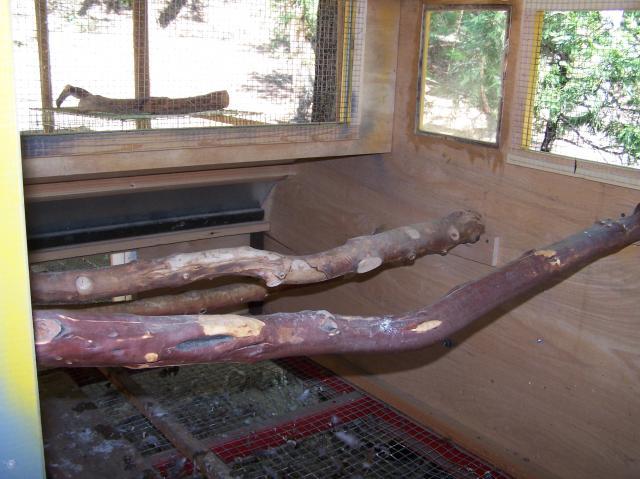
Figure 10: Interior detail showing three roosting bars
ENGINE COMPARTMENT AND FRONT END:
My fenders jog inward 5” about 12” from the cab end of the running board, and they taper in toward the grill about 8” (Figure 11). In my design, this required placing 5” vertical panels at right angles to the front of the cab, hanging down over the trailer frame. Then I tapered my engine compartment from 40” at the windshield end to 22” at the grill end (Figure 12). This front end is still a bit wide for authenticity, but my overall width was fixed by the need to cover the trailer base. The length of my engine compartment is 36”. Again, this length is determined in part by how far your trailer hitch extends from your trailer frame and how far you want it to protrude beyond your grill. Mine extends 36” from the trailer, and 8” from the grill (remember I cut my side panels to extend 8” forward from the cab).
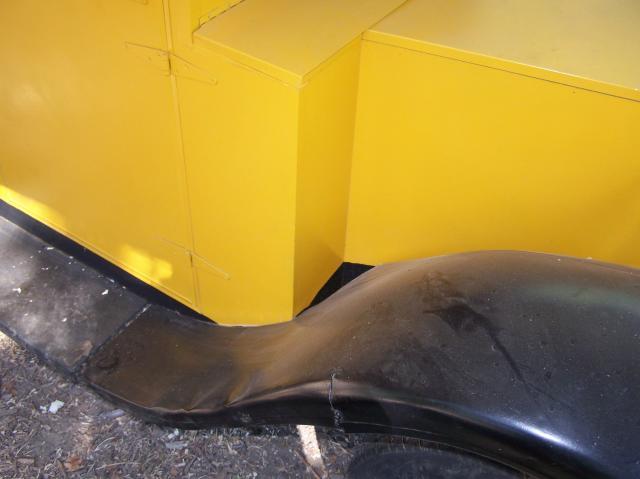
Figure 11: Exterior detail showing cab meeting engine compartment where fender jogs inward
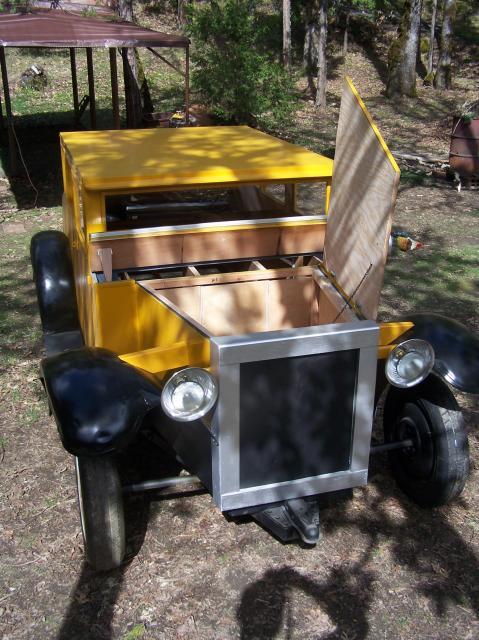
Figure 12: Front end detail showing hood and egg access lid
1. Cut the side pieces of the hood and figure out the angle to rip from the 2” x 2” inside framing, which will give a flat surface for attachment to cab and to grill. Remember to attach the bottom horizontal pieces 4 ½“ from the bottom to conceal the trailer frame.
2. Cut a trapezoidal piece of plywood for the floor and a rectangle for the grill; attach these to the side pieces.
3. Attach 1” x 3” pieces to frame the grill.
4. With a pair of utility hinges, attach a trapezoidal piece to the top of the hood. Cover with sheet metal with edges bent over ½“. Glue weather stripping to the underside edges.
5. With a piano hinge, attach a lid covering the 8” extension from cab to hood. Cover with sheet metal with edges bent over ½” and front edge extending 1” over hood. This must be opened before the hood, but with weather stripping beneath, it acts as a moisture seal for the nesting boxes and supplies below (Figure 13).
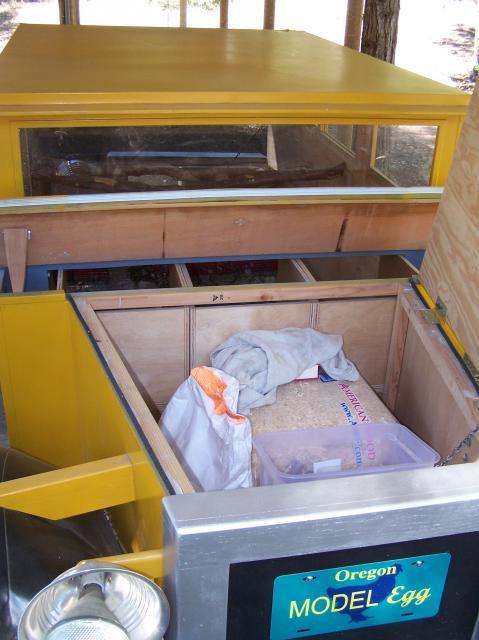
Figure 13: Engine compartment
6. Construct three nesting boxes, 13 ½” wide, 12” tall, 12” deep, with perches facing the inside of the cab (Figure 4 above). These will slide in and out of the shelf between the cab and engine compartment. Make sure that your "dashboard" above the boxes (mine is a piece of sheet metal duct taped below the windshield) is slanted to keep chickens from roosting on it. If you choose to place boxes under the hood, the chickens will walk along the shelf on one side, as a kind of hallway, to access the boxes.
Now you are ready to prime and paint the body. Paint the lower body black behind the tires and a few inches above the running boards before attaching the fenders.
TRIM:
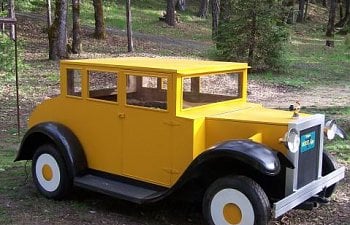
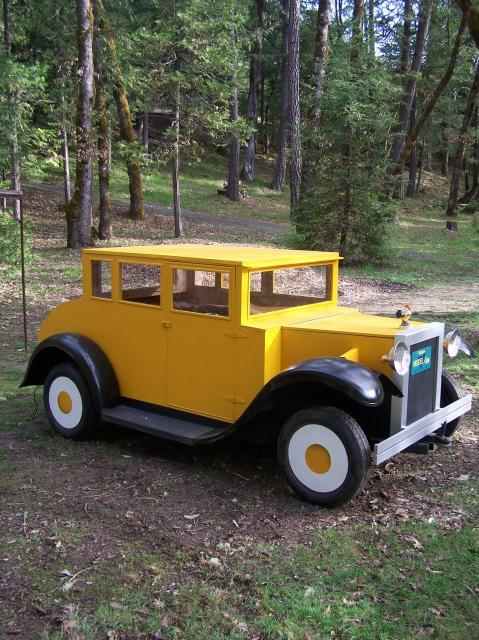
After painting, bolt the rear fenders to the body. Depending on how far the front hitch extends out from the grill, you may not have much of a turning radius when hauling the coop, so you may want to move the coop into place before installing the front fenders, headlights, and bumper. As you see in Figure 14, I moved the coupe down to my garden this way, hitching it to the back of my pickup.
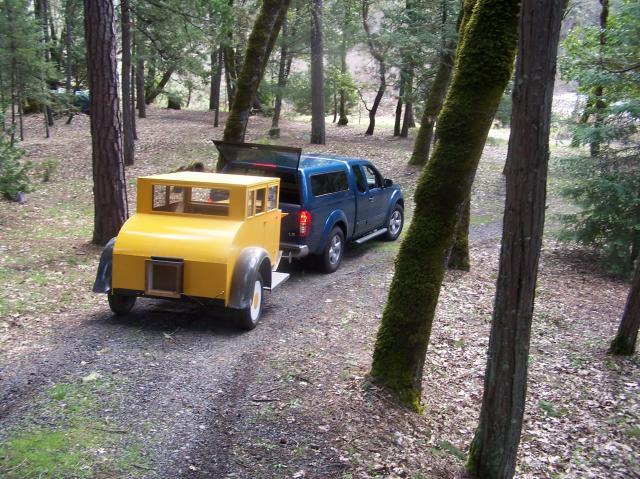
Figure 14: Moving day
1. Bolt the front fenders to the sides of the engine compartment, and add stability by attaching a wooden brace to both the inside top of the fender and the engine compartment. Figure 13 shows the brace.
2. Attach headlight assembly to the brace. I fashioned headlights from worklight reflectors and burned-out spotlight bulbs (Figure 15). The hood ornatment is a resin rooster from a local thrift shop, and I spent $20 for the custom license plate from a design-your-own web site.

Figure 15: Front end
3. Attach a bumper either to the front of the frame or to braces extending from the underside of the grill. I simulated an old-fashioned bumper with two pieces of silver-painted wood (Figure 15).
4. Attach plywood running boards between the fenders (Figure 16). These will need to be cut to fit depending on how close the running boards end up once attached. I covered mine with black pool liner to simulate rubber, but they could simply be painted black. I bolted pieces of 1” angle iron to the underside of the trailer frame and also drilled holes in the fenders where they met the running boards. This is enough to take my full weight.
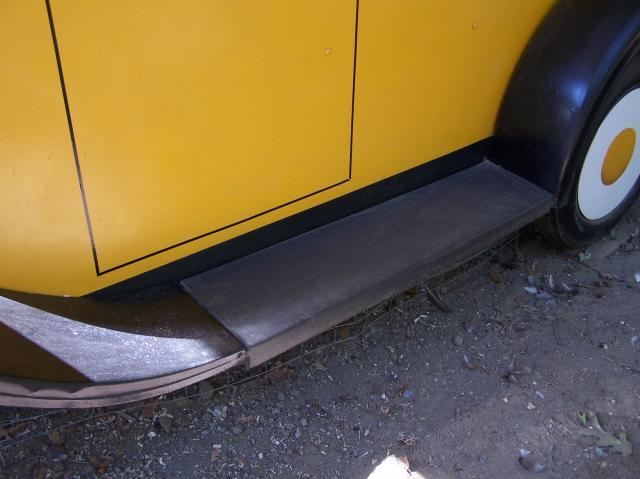
Figure 16: Running board
PLACING THE COUPE:
When complete, the coop weighs about 350 pounds, so it is easy to jockey it into place by a combination of rolling/towing and picking up one end at a time to make turns. I buried at ground level four 2” x 10” x 12” pieces of treated lumber so my tires would not rest on bare ground, and I found two galvanized oil-change trays to put under the coop for easy removal of droppings. I later discovered that the chickens like to hide under the coop, so I made a barricade of green wire fencing just inside the tires to keep them out. I ran power to the run and plugged a timer in, so my chickens think it is summer and continue laying in the dark months. The same power source could provide heat, but even if the wire windows are covered, the wire floor is going to allow much of the heat to escape.
I believe the coop is water tight, but I was concerned about it becoming an oven on hot days, so I first stretched a tarp over some poles, then extended the roof of my chicken run, so the flock is now even better protected. I live in a wild area next to a river, where predators abound, and I have even buried hardware cloth under the floor of the run. So far the coop has resisted one big raccoon who scratched off some of the paint around one of the windows, and I suspect that foxes, skunks, and weasels have tried and failed. My biggest fear is a bear, especially since I have beehives thirty feet from the coupe. If that happens, hopefully I'll hear it from the house and send my wife out with the dog.

Figure 17: Enlarged chicken run with "carport" roof for coupe
When I started this project eight months ago, I was new to chickens, but I am pleased to report that I wouldn't change a thing about the coupe design. Here, however, is one idea for the ambitious handyman: If you construct a steerable front axle and a large, lightweight wheeled run, you can achieve true "poultry in motion" to change the coupe position. Since I don't have much level ground, this would be impractical for me.
I have assembled a small flock of ten hens, all different breeds and colors. While the coupe itself has been drawn many admirers and was featured in the Aug-Sep 2011 issue of Mother Earth News, it is the birds themselves whose personalities provide endless entertainment. Even though they can't go for a ride in their Model Egg, my chickens seem quite content to roost and lay in their classy coupe.
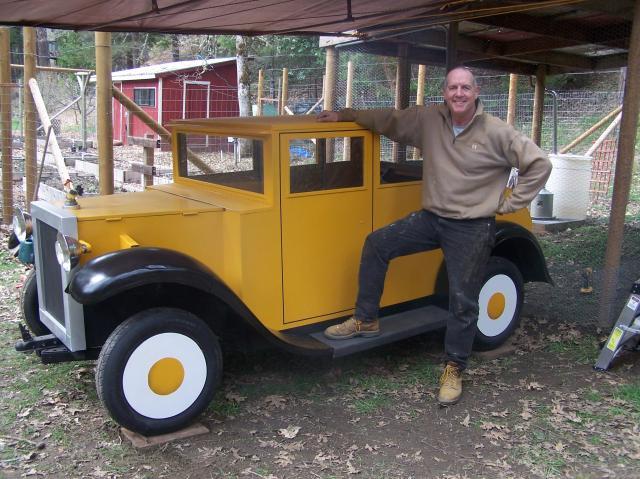
Figure 18: The Coupe's Creator
APPENDIX: Materials, Costs, and Sources
1. Metail trailer $150 (craigslist)2. 4 fenders, '30 Ford 50 (craigslist)
3. 4 spare tires/wheels 80 (junkyard)
4. 2 axles with wheel mounts 80 (local metal fabricator who used odd pieces lying around his shop)
5. sheet metal cut to fit 140 (heating vent supplier)
6. 2 sheets 1/2" plywood 60 (lumber yard)
7. 2"x2" fir 50 (lumber yard, garage scraps)
8. plywood for nest boxes, etc. 0 (garage scraps)
9. wire for floor, windows 20 (hardware store)
10. spray primer & paint 100 (hardware store)
11. miscellaneous 150 (hardware store, garage extras)
TOTAL $880 [Your cost will vary, of course, depending on how cheap you can acquire trailer, fenders, and wheels, and what materials you have on hand.]