wacky professor's coop #2 - "The Convent of St. Gall (patron saint of birds)"
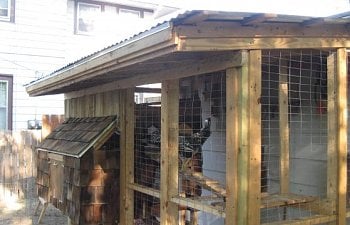
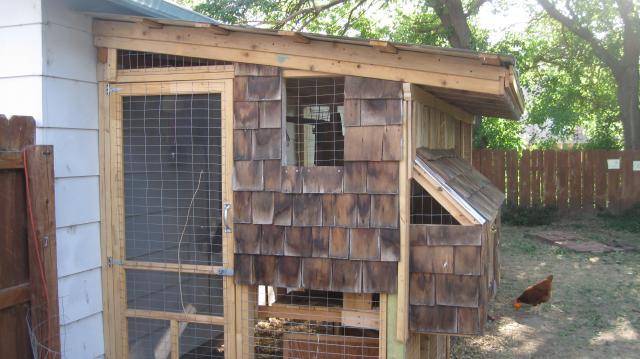
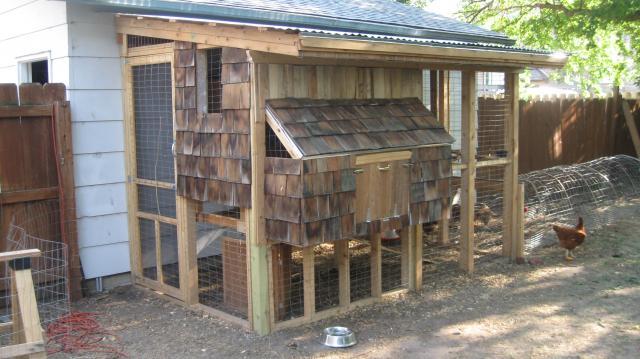
Even more hygienic and efficient than the first one, built under a treehouse at my ex-wife's house. *Built on the "Great American Steppes" (a/k/a the Great Plains) where frequent high winds, violent thunderstorms, and extremes of temperature, both high and low are all important design considerations. In order to build the pen up against this particular garage, it called for a shallow roof pitch -- that is, to accommodate the door and make it so that a tall adult could walk around comfortably. Because of the shallow pitch, and because one day the roof will potentially need to support 12" or more of snow at times in winter, 2x6 lumber was used for the rafters.

Aesthetically, it looks like a cross between gulag and dacha; this sort of just happened, and comes with the territory when you use salvaged materials. I tried NOT to make it pretty -- the coop abuts is such a non-descript, unattractive garage that a pretty coop would look out of place. About 40% of the materials were scrounged / recycled / salvaged, but with that, this 4'x6' coop, built on and in a 6'x12' pen, cost less than $500 in materials. 14-guage welded wire was selected for the pen in order to deter (and so far it has deterred) the hordes of raccoons, opossums and ferrel cats living in the area. It's in an older neighborhood with overgrown alleys, and this coop sits just half a block from a river. These factors led me to build a "Fort Apache" style chicken coop, as a way to jealously guard and protect my dear birds from so many varmints, who will continue their raids in search of such attractive, high-quality protein.
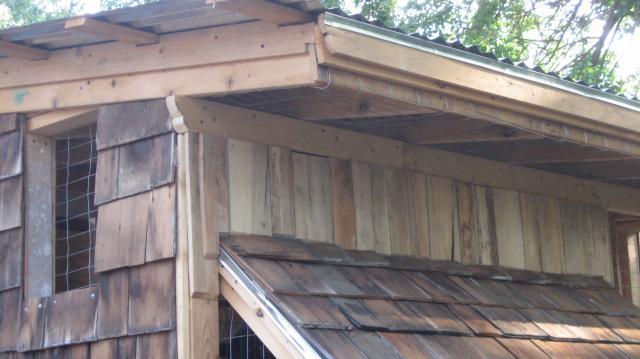
Note the cage wire wrapped under the rafters, up around the rafter tails and secured by fascia board. Ventilation plus coon-proofing. The cage wire also wraps around underneath the walls, extending approx. 2 feet into the pen, where it is staked down and buried. Other deterrent to digging animals: galvanized sheet metal, inserted to a depth of 10 inches around perimeter of pen.
Stud walls for the left and right sides were pre-built (with stud "center" equal to the width of the cage wire). Wire was pre- attached (leaving additional wire as needed at top and bottom of the wall) because this wire and its particular application called for the kind of staples that are hammered in. As minimally as I tried to build, I didn't want to have to beat up on these stick walls until after they were all tied together.
Only then were post-holes dug for the two 4x4 corner posts, along what would be the front wall. Side walls, once they were built and covered with wire (including the screen door) were lag-bolted to other 2x4s which had been previously been lag-bolted to the garage studs, to provide points of attachment for the pen. Other ends of these side walls were then lag-bolted to the 2x4s, once I had marked out and dug the holes for the corner posts. Brick clinkers were placed in the holes in such a way as to temporarily hold the 4x4s plumb, and only then was quikrete product and water dumped into the post holes. Then I temporarily tied the two side walls together with long (temporary) 4x4 braces, to keep the whole thing plumb and square.
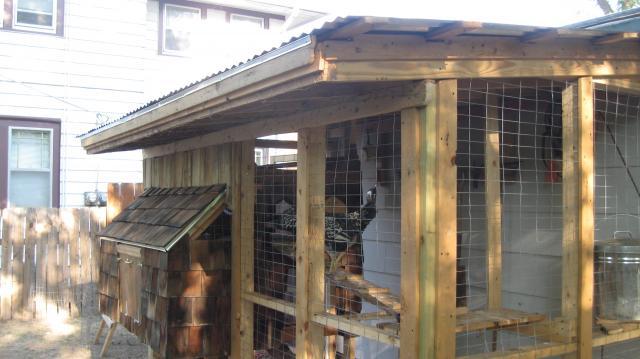
Once the concrete had set up, another section of full-height (well, not quite; was a bit shorter than the side walls, due to the height constraints previously mentioned) stud wall was built, and attached to a center 4x4 post, which was made plumb and set in instant concrete like the cornerposts. The final section of wall was only a couple feet tall, and was designed to support the nesting area (which juts out from the pen), cantilevered against the roosting area (which is fully inside the pen and not quite two feet above the nest area). Once this short section was tied in, I put up a more substantial sill for the rafters, to which I added more support and further support still when I later framed out the coop.
Rafters were then hung and tied together with 1x4 purlins. I had pre-hung the door and tacked it shut, in order to keep things all squared up while the rafters were hung and tied in, etc.
I then framed out the cantilevered, split-level coop (roost and nesting area), allowing copious ventilation and a passageway between the two, as well as a separate entrance (via chicken ladder) to each "room." Once I framed out the coop, I built up a little more support under the rafters, installed the corrugated roof, then sheathed the coop proper, inside and out, with plywood, and then finally the outside with roofing tar and salvaged cedar shakes.
Wasn't quite done with siding or the inside appointments when I serendipitously acquired the start of my flock -- eight hens who'd just started laying -- from an old guy who'd bought them a few weeks earlier as pullets. Although he was too nice to say it, I think he was only giving them up because his wife wouldn't have them. He was proud of them (with good reason, these are some hearty, healthy 1/2 Rhode Island Red / 1/2 White Plymouth Rocks, who each lay at least 6 days out of 7) and he seemed sad to see them go.
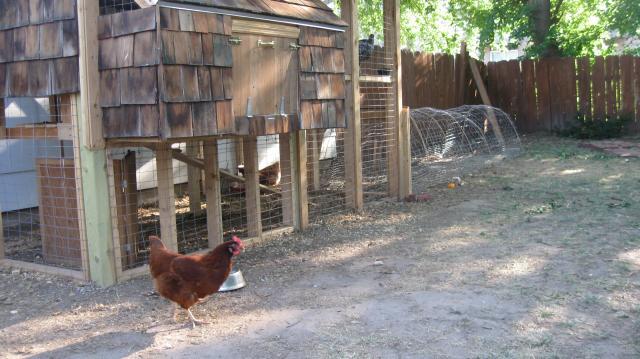
Eventually I finished out the interior of the coop, and moved on to creating the "CHICKEN CONDUIT". Because I live in a rough neighborhood (for chickens, that is), it seemed a bad idea to leave them running free in the yard if I wasn't around. By making a tunnel out of welded wire (with a floor, and each section wired thoroughly to the adjoining section, the whole length of the thing), I was able to almost double the size of their secure ranging area, and give them some legitimate yard time (back to the gulag . . .)
There is a secure door between the permanent pen and the "conduit", which I close off in the evening when they've gone up to roost. Eventually, I will attach a second 16' conduit, connecting and articulating the two with a hexagonal box that will allow me to change the angle at which the sections connect, and thereby vary the ground over which the birds peck and scratch and defecate. A seemingly baroque and Byzantine way to achieve what one might achieve with a "chicken tractor," but with my ultimate flock of 12 and the need to provide for weather extremes, a larger, fixed, sheltered pen seemed essential.
The little ones: my four barred-rock pullets. A few months before they're likely to lay.
Climbing up to lay an egg . . . This particular hen shows virtually no hostility toward any of the birds, and seems to fully accept the two minority groups among the flock at large. I might have to re-name her Rodney "Why can't we all just get along?" King.
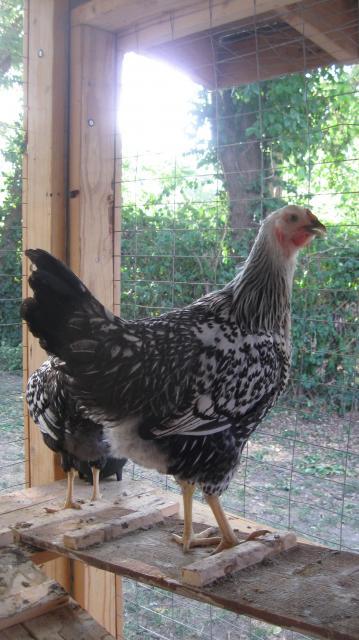
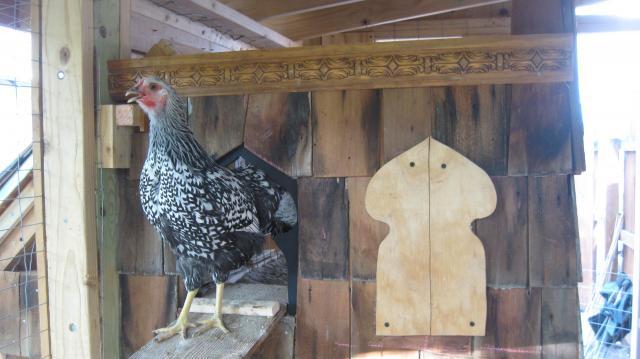
The reticent, ghastly but elegant Silver-Laced Wyandottes. They might start laying sooner if they would stop primping and preening. Their superior attitude draws more abuse from the red hens than the baby barred rocks seem to attract, even though you would expect chickens, dinosaurish as they are, to pick on the most vulnerable among them. The Wyandottes keep to themselves and have to be pushed into going outside, and rarely get down from the roost or the ladders. In the week after I got them, once I saw signs of dehydration I started letting them take their food water up where they stay. You can see the pullet in the background getting water from the plastic molcajete in the corner.
Maybe this is too indulgent and an inappropriate intervention, but the two sudden additions (first the 2 Wyandottes, then the 4 baby Barred Rocks) to my flock have been fairly uneventful. When a bird really sinks her beak into another one, beyond a passing peck, I have no compunction about squirting the aggressor with a squirt gun. Maybe that's wrong, too, but it seems to immediately modify their behavior without inspiring any fear of me. Chicken little only knows she's getting water in her face, doesn't like it, and immediately cuts out the excessive violence.
I swear, she looks like some tawdry, past-her-prime prostitute, that mess of rouge and her tattered frock. To think I traded two of those wholesome red hens for these fancy ones, who think they're better than the others and really don't seem chaste enough for this avian convent.
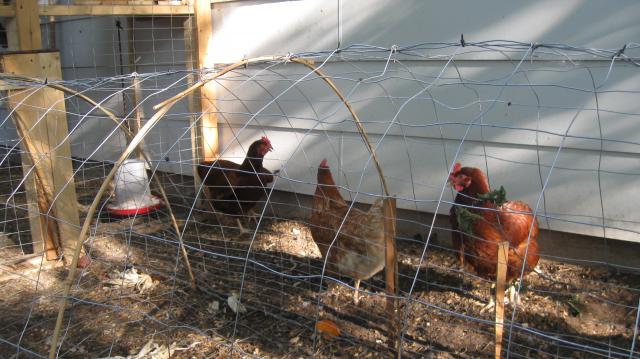
Original flock of eight red hens, photo taken before I plucked out two of the least distinctive-looking ones and took them away to trade for the Wyandottes. I don't really regret the trade, and for some reason, it seems important for me that I am able to readily distinguish each one of my hens from all the others.
This feed bin is the kind with a locking handle -- when the handle's up, the top won't come off. And just in case it gets knocked off its ledge, it's attached to a rope that's attached to the rafters, all of this meant to catch the bin before it hits the ground or the lid can come off.
I've found that shrouding the waterer helps the water stay cleaner for longer -- fewer angles from which dirt can be kicked into it, far less likely to be pooped in, and rarely will the birds walk in it -- it's unstable and hanging, for goodness sake. Not something that Chicken Little is comfortable messing with.
The (obsessive? maybe just unusually committed) author, designer/builder/benefactor of this coop (right), along with the "Hen Superior" (left) of this devotional community of cloistered birds.
STILL TO ADD / DO to the coop:
1. Double the size of the chicken conduit / exterior run, by connecting a second section to the first, by means of a modular box that will allow re-attachment and reconfiguration at different angles. This will allow the run to be shifted over different parts of the yard, to obtain a "chicken tractor" effect, without the girls' losing the benefit of their remarkably cool, shady and secure coop.
2. As the weather gets cooler, install wintertime coop wall sections and shrouds for some of the vents.
3. Build second roost for the cold weather, when chickens will no longer want to, or be able to roost around the edges.
*partly written in passive voice to achieve a pseudo-scientific, impersonal 3rd-person tone.
Even more hygienic and efficient than the first one, built under a treehouse at my ex-wife's house. *Built on the "Great American Steppes" (a/k/a the Great Plains) where frequent high winds, violent thunderstorms, and extremes of temperature, both high and low are all important design considerations. In order to build the pen up against this particular garage, it called for a shallow roof pitch -- that is, to accommodate the door and make it so that a tall adult could walk around comfortably. Because of the shallow pitch, and because one day the roof will potentially need to support 12" or more of snow at times in winter, 2x6 lumber was used for the rafters.

Aesthetically, it looks like a cross between gulag and dacha; this sort of just happened, and comes with the territory when you use salvaged materials. I tried NOT to make it pretty -- the coop abuts is such a non-descript, unattractive garage that a pretty coop would look out of place. About 40% of the materials were scrounged / recycled / salvaged, but with that, this 4'x6' coop, built on and in a 6'x12' pen, cost less than $500 in materials. 14-guage welded wire was selected for the pen in order to deter (and so far it has deterred) the hordes of raccoons, opossums and ferrel cats living in the area. It's in an older neighborhood with overgrown alleys, and this coop sits just half a block from a river. These factors led me to build a "Fort Apache" style chicken coop, as a way to jealously guard and protect my dear birds from so many varmints, who will continue their raids in search of such attractive, high-quality protein.
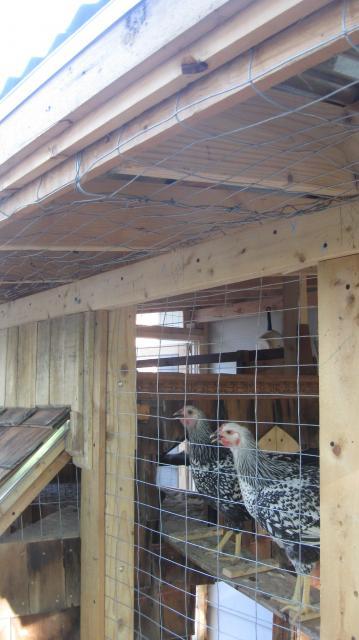
Note the cage wire wrapped under the rafters, up around the rafter tails and secured by fascia board. Ventilation plus coon-proofing. The cage wire also wraps around underneath the walls, extending approx. 2 feet into the pen, where it is staked down and buried. Other deterrent to digging animals: galvanized sheet metal, inserted to a depth of 10 inches around perimeter of pen.
Stud walls for the left and right sides were pre-built (with stud "center" equal to the width of the cage wire). Wire was pre- attached (leaving additional wire as needed at top and bottom of the wall) because this wire and its particular application called for the kind of staples that are hammered in. As minimally as I tried to build, I didn't want to have to beat up on these stick walls until after they were all tied together.

Only then were post-holes dug for the two 4x4 corner posts, along what would be the front wall. Side walls, once they were built and covered with wire (including the screen door) were lag-bolted to other 2x4s which had been previously been lag-bolted to the garage studs, to provide points of attachment for the pen. Other ends of these side walls were then lag-bolted to the 2x4s, once I had marked out and dug the holes for the corner posts. Brick clinkers were placed in the holes in such a way as to temporarily hold the 4x4s plumb, and only then was quikrete product and water dumped into the post holes. Then I temporarily tied the two side walls together with long (temporary) 4x4 braces, to keep the whole thing plumb and square.

Once the concrete had set up, another section of full-height (well, not quite; was a bit shorter than the side walls, due to the height constraints previously mentioned) stud wall was built, and attached to a center 4x4 post, which was made plumb and set in instant concrete like the cornerposts. The final section of wall was only a couple feet tall, and was designed to support the nesting area (which juts out from the pen), cantilevered against the roosting area (which is fully inside the pen and not quite two feet above the nest area). Once this short section was tied in, I put up a more substantial sill for the rafters, to which I added more support and further support still when I later framed out the coop.

I then framed out the cantilevered, split-level coop (roost and nesting area), allowing copious ventilation and a passageway between the two, as well as a separate entrance (via chicken ladder) to each "room." Once I framed out the coop, I built up a little more support under the rafters, installed the corrugated roof, then sheathed the coop proper, inside and out, with plywood, and then finally the outside with roofing tar and salvaged cedar shakes.
Wasn't quite done with siding or the inside appointments when I serendipitously acquired the start of my flock -- eight hens who'd just started laying -- from an old guy who'd bought them a few weeks earlier as pullets. Although he was too nice to say it, I think he was only giving them up because his wife wouldn't have them. He was proud of them (with good reason, these are some hearty, healthy 1/2 Rhode Island Red / 1/2 White Plymouth Rocks, who each lay at least 6 days out of 7) and he seemed sad to see them go.
Eventually I finished out the interior of the coop, and moved on to creating the "CHICKEN CONDUIT". Because I live in a rough neighborhood (for chickens, that is), it seemed a bad idea to leave them running free in the yard if I wasn't around. By making a tunnel out of welded wire (with a floor, and each section wired thoroughly to the adjoining section, the whole length of the thing), I was able to almost double the size of their secure ranging area, and give them some legitimate yard time (back to the gulag . . .)
There is a secure door between the permanent pen and the "conduit", which I close off in the evening when they've gone up to roost. Eventually, I will attach a second 16' conduit, connecting and articulating the two with a hexagonal box that will allow me to change the angle at which the sections connect, and thereby vary the ground over which the birds peck and scratch and defecate. A seemingly baroque and Byzantine way to achieve what one might achieve with a "chicken tractor," but with my ultimate flock of 12 and the need to provide for weather extremes, a larger, fixed, sheltered pen seemed essential.
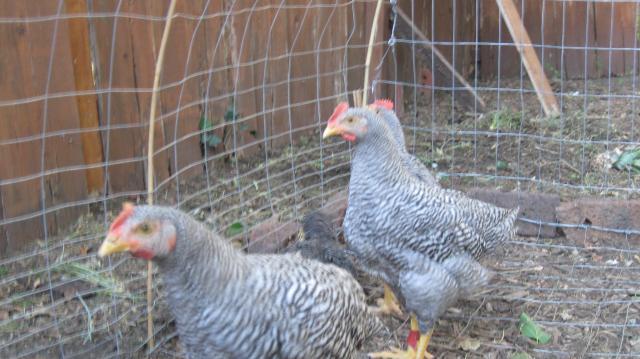
The little ones: my four barred-rock pullets. A few months before they're likely to lay.
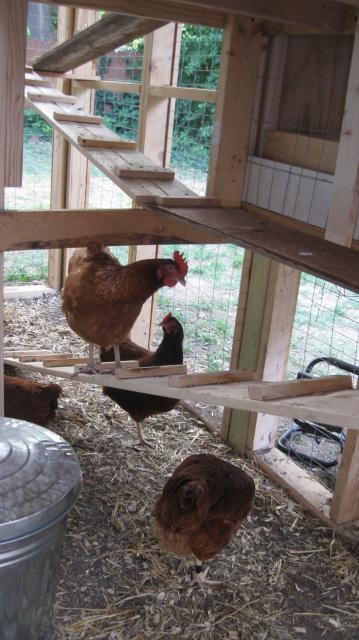
Climbing up to lay an egg . . . This particular hen shows virtually no hostility toward any of the birds, and seems to fully accept the two minority groups among the flock at large. I might have to re-name her Rodney "Why can't we all just get along?" King.
The reticent, ghastly but elegant Silver-Laced Wyandottes. They might start laying sooner if they would stop primping and preening. Their superior attitude draws more abuse from the red hens than the baby barred rocks seem to attract, even though you would expect chickens, dinosaurish as they are, to pick on the most vulnerable among them. The Wyandottes keep to themselves and have to be pushed into going outside, and rarely get down from the roost or the ladders. In the week after I got them, once I saw signs of dehydration I started letting them take their food water up where they stay. You can see the pullet in the background getting water from the plastic molcajete in the corner.
Maybe this is too indulgent and an inappropriate intervention, but the two sudden additions (first the 2 Wyandottes, then the 4 baby Barred Rocks) to my flock have been fairly uneventful. When a bird really sinks her beak into another one, beyond a passing peck, I have no compunction about squirting the aggressor with a squirt gun. Maybe that's wrong, too, but it seems to immediately modify their behavior without inspiring any fear of me. Chicken little only knows she's getting water in her face, doesn't like it, and immediately cuts out the excessive violence.
I swear, she looks like some tawdry, past-her-prime prostitute, that mess of rouge and her tattered frock. To think I traded two of those wholesome red hens for these fancy ones, who think they're better than the others and really don't seem chaste enough for this avian convent.

Original flock of eight red hens, photo taken before I plucked out two of the least distinctive-looking ones and took them away to trade for the Wyandottes. I don't really regret the trade, and for some reason, it seems important for me that I am able to readily distinguish each one of my hens from all the others.
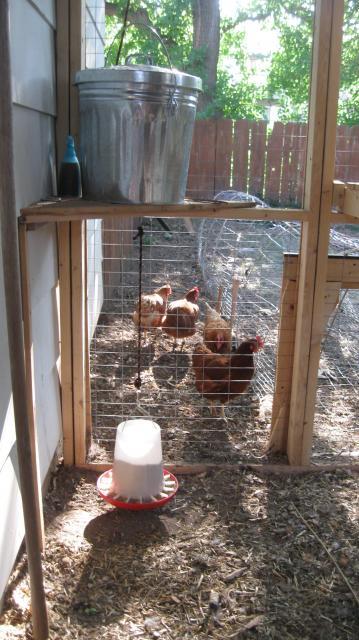
This feed bin is the kind with a locking handle -- when the handle's up, the top won't come off. And just in case it gets knocked off its ledge, it's attached to a rope that's attached to the rafters, all of this meant to catch the bin before it hits the ground or the lid can come off.
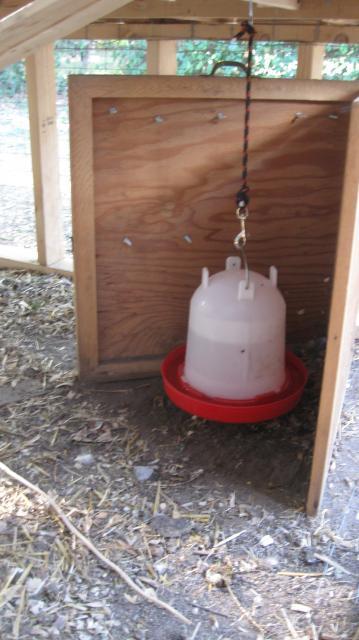
I've found that shrouding the waterer helps the water stay cleaner for longer -- fewer angles from which dirt can be kicked into it, far less likely to be pooped in, and rarely will the birds walk in it -- it's unstable and hanging, for goodness sake. Not something that Chicken Little is comfortable messing with.

The (obsessive? maybe just unusually committed) author, designer/builder/benefactor of this coop (right), along with the "Hen Superior" (left) of this devotional community of cloistered birds.
STILL TO ADD / DO to the coop:
1. Double the size of the chicken conduit / exterior run, by connecting a second section to the first, by means of a modular box that will allow re-attachment and reconfiguration at different angles. This will allow the run to be shifted over different parts of the yard, to obtain a "chicken tractor" effect, without the girls' losing the benefit of their remarkably cool, shady and secure coop.
2. As the weather gets cooler, install wintertime coop wall sections and shrouds for some of the vents.
3. Build second roost for the cold weather, when chickens will no longer want to, or be able to roost around the edges.
*partly written in passive voice to achieve a pseudo-scientific, impersonal 3rd-person tone.