Welcome to my BYC Page!
I've created this page with a focus on my coop/run, my pride and joy. I took a lot of time thinking and planning, and my efforts paid off with a great, maintenance free coop, if I do say so myself!

My Coop:
I designed the run myself, stealing good ideas from others, and combined features I liked along with many of my own ideas.
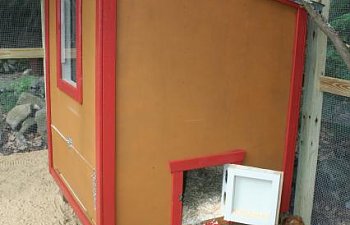
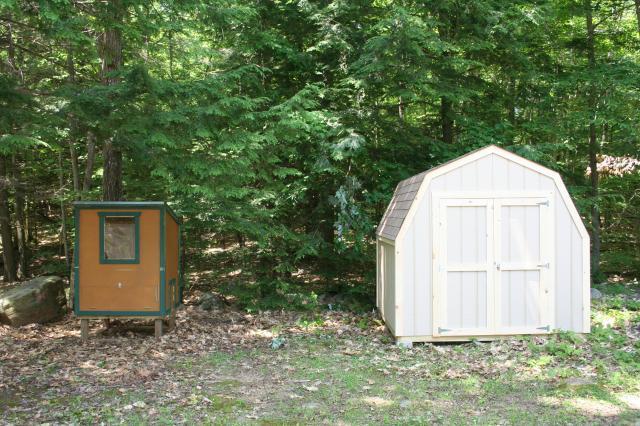
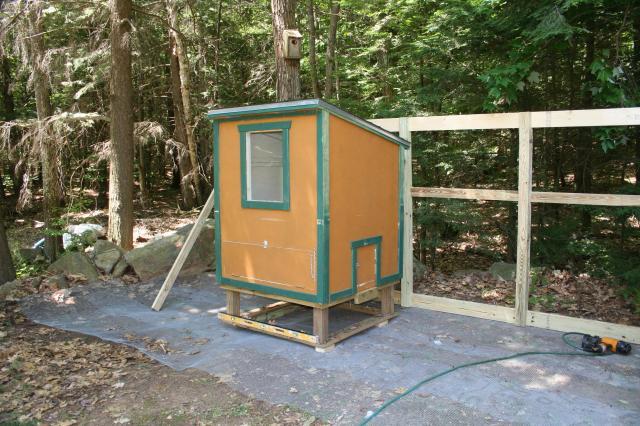
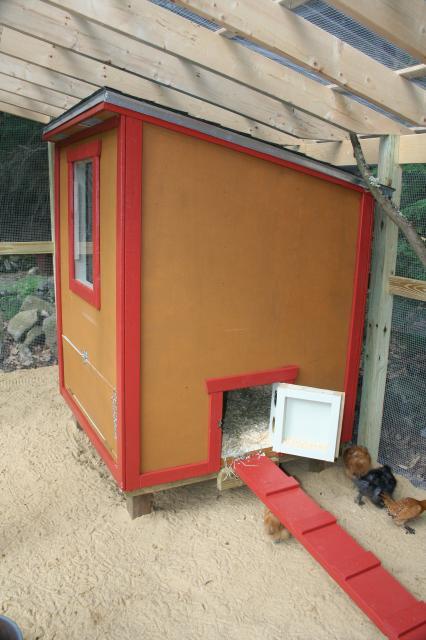
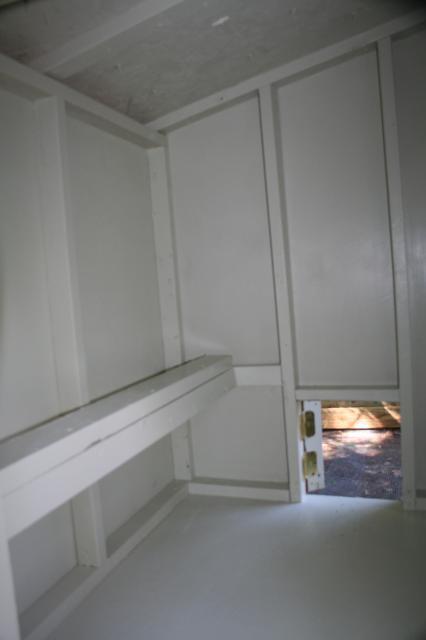
The hen house is 4’ x 4’ x 6’ ½” at its tallest point, with a shingled slant roof. I got it from Craigs’ List. It has an egg door, the chicken "pop" door and then at the side a larger door for easy access to clean. I modified the roost bar by adding a 2x4 wide side up to be more Silkie friendly, since mine prefer sitting to perching, and I also did this so their feet will stay covered in the extreme cold. It’s raised up a foot on pressure treated lumber legs, giving the chicks a fun shady place to hide and making it less pest conducive.
I sealed the inside with a heavy coat of a quality primer/paint combo for moisture resistance; ease of cleaning, and to brighten it up. I added several inches of pine shavings. I also painted the trim red. There are vents underneath both the front and back overhang of the roof.
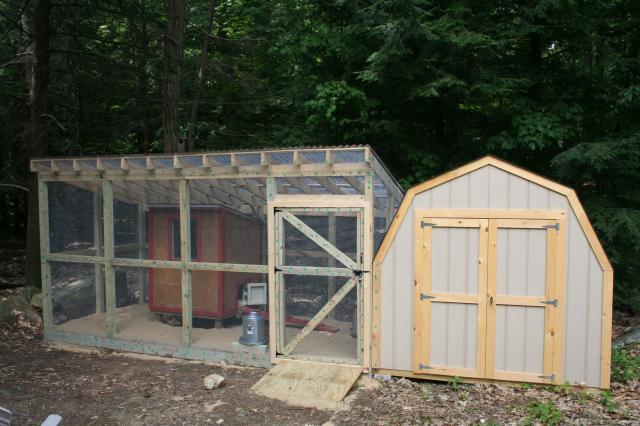
I specifically told the carpenter to build the run around the coop, not abutting it. I feel this will be much more secure, and now they will have a double barrier. Predators will have to first breach the run, and then still get into the hen house.
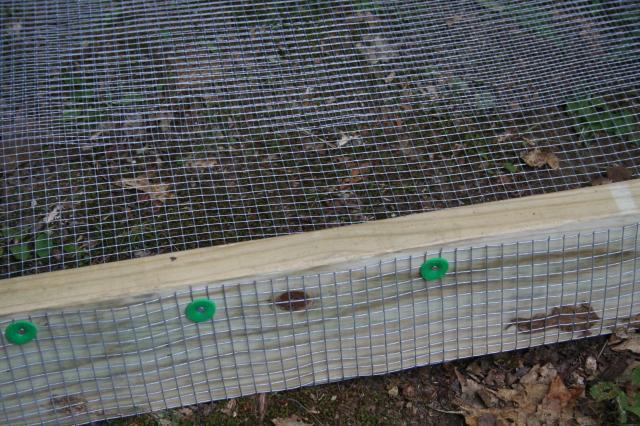
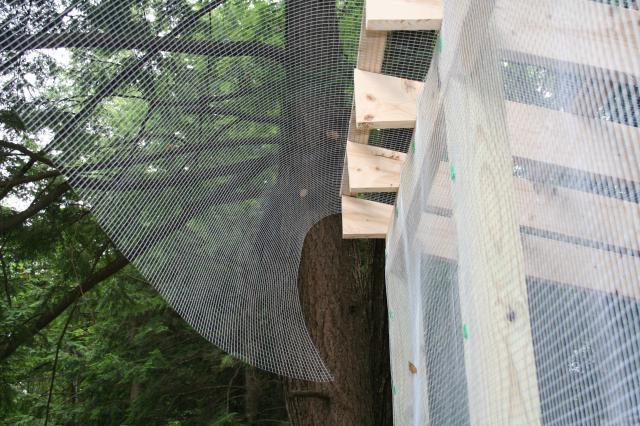
The actual run is my real pride and joy. This is where all my reading and researching came in handy. The run is 16’ long x 8’ wide, 8’ ½” tall at the front and slanting to 6’ in the back. 100% pressure treated lumber, ½” x ½” cloth all the way around. Many said that the 1/2" hardware cloth was more than needed, but you know what? I didn't want to find that out the hard way. Walls, floor, and roof; it is COMPLETELY encompassed with hardware cloth. I have a lot of predators in my location, and every single person on my road has lost chickens, turkeys, geese, etc., so I was not messing around. All attached with washers instead of just nails or screws for added predator resistance. The roof (over the hardware cloth) is clear corrugated paneling over crossed trusses for extra snow support. The clear roof will add solar heat in the cold winters & general sunlight year 'round. The high front faces the sun, letting in more light, and the low back faces the woods, so the snow will slide to the back and out of my way; less shoveling.
I ordered the gambrel shed shown in the pics at the same time and had that installed first, and had the run built up against it so that the right end of the run has a solid wall which faces the north to help block the cold north winds. The new shed also serves as my storage for grain, scratch, pine shavings & misc. chicken supplies.
I had the run door built extra wide to accommodate a wheel barrow, and to make it easy for me to walk in with buckets at my side, etc., and added a ramp at the door.
I ordered 3 yards of sand, which filled the run floor to about 7”, although it did pack slightly. A year later now, I LOVE the choice of sand. It stays nice and clean, doesn't get soggy, and raised the ground surface up several inches doesn't puddle. It's completely maintenance free.
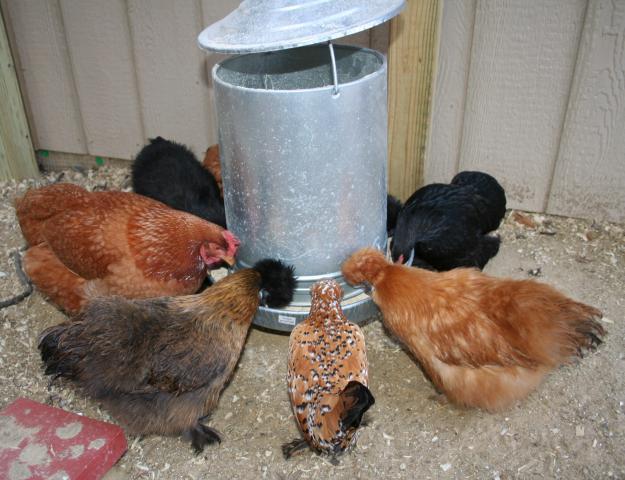
I added a big tree branch for roosting, hung their feeder from the chain just off the ground (I originally did that so mice couldn't get to the feed, but of course even mice can't get into this run!), and their waterer sits on 4x4 pt wood blocks.
Due to my FMS, I had to hire a carpenter to build it, so I can only claim credit on the design and the features, but not the sweaty labor. I did the sealing, painting, shavings, feeders, etc., but he did the major construction. He was very patient with me. I think at first he thought I was crazy for being so “particular” with my specifications (I had scale drawings that I had made), but by the end of it, he saw the result and I think he understood that it was a smart design. I didn’t get pet chickens for them to be killed by predators, so I want to know that if that happens, I will have done everything in my power to prevent it.
I only have 8 chickens, (7 Bantams: 5 Silkies, 1 Mille Fleur D’Uccle, 1 Cochin plus 1 recently rescued RIR), but I wanted the run to be generous in size because A) I can’t free range them due to local loose dogs, and B) I may add more in the future.
I am very proud of the results. I have been plotting and planning this in my head for a long time now. I’ve daydreamed about having chickens and doing this for many years.
I tried to give specs & details when possible, hoping that it might help someone else the way previous posts have helped me. Just trying to pay it forward. Thanks to all the BYCer’s who posted coop/run pics that inspired me and educated me.
The Original Thread for My Completed Coop Can Be Found Here: https://www.backyardchickens.com/forum/viewtopic.php?pid=4510624
I've created this page with a focus on my coop/run, my pride and joy. I took a lot of time thinking and planning, and my efforts paid off with a great, maintenance free coop, if I do say so myself!

My Coop:
I designed the run myself, stealing good ideas from others, and combined features I liked along with many of my own ideas.
The hen house is 4’ x 4’ x 6’ ½” at its tallest point, with a shingled slant roof. I got it from Craigs’ List. It has an egg door, the chicken "pop" door and then at the side a larger door for easy access to clean. I modified the roost bar by adding a 2x4 wide side up to be more Silkie friendly, since mine prefer sitting to perching, and I also did this so their feet will stay covered in the extreme cold. It’s raised up a foot on pressure treated lumber legs, giving the chicks a fun shady place to hide and making it less pest conducive.
I sealed the inside with a heavy coat of a quality primer/paint combo for moisture resistance; ease of cleaning, and to brighten it up. I added several inches of pine shavings. I also painted the trim red. There are vents underneath both the front and back overhang of the roof.
I specifically told the carpenter to build the run around the coop, not abutting it. I feel this will be much more secure, and now they will have a double barrier. Predators will have to first breach the run, and then still get into the hen house.
The actual run is my real pride and joy. This is where all my reading and researching came in handy. The run is 16’ long x 8’ wide, 8’ ½” tall at the front and slanting to 6’ in the back. 100% pressure treated lumber, ½” x ½” cloth all the way around. Many said that the 1/2" hardware cloth was more than needed, but you know what? I didn't want to find that out the hard way. Walls, floor, and roof; it is COMPLETELY encompassed with hardware cloth. I have a lot of predators in my location, and every single person on my road has lost chickens, turkeys, geese, etc., so I was not messing around. All attached with washers instead of just nails or screws for added predator resistance. The roof (over the hardware cloth) is clear corrugated paneling over crossed trusses for extra snow support. The clear roof will add solar heat in the cold winters & general sunlight year 'round. The high front faces the sun, letting in more light, and the low back faces the woods, so the snow will slide to the back and out of my way; less shoveling.
I ordered the gambrel shed shown in the pics at the same time and had that installed first, and had the run built up against it so that the right end of the run has a solid wall which faces the north to help block the cold north winds. The new shed also serves as my storage for grain, scratch, pine shavings & misc. chicken supplies.
I had the run door built extra wide to accommodate a wheel barrow, and to make it easy for me to walk in with buckets at my side, etc., and added a ramp at the door.
I ordered 3 yards of sand, which filled the run floor to about 7”, although it did pack slightly. A year later now, I LOVE the choice of sand. It stays nice and clean, doesn't get soggy, and raised the ground surface up several inches doesn't puddle. It's completely maintenance free.
I added a big tree branch for roosting, hung their feeder from the chain just off the ground (I originally did that so mice couldn't get to the feed, but of course even mice can't get into this run!), and their waterer sits on 4x4 pt wood blocks.
Due to my FMS, I had to hire a carpenter to build it, so I can only claim credit on the design and the features, but not the sweaty labor. I did the sealing, painting, shavings, feeders, etc., but he did the major construction. He was very patient with me. I think at first he thought I was crazy for being so “particular” with my specifications (I had scale drawings that I had made), but by the end of it, he saw the result and I think he understood that it was a smart design. I didn’t get pet chickens for them to be killed by predators, so I want to know that if that happens, I will have done everything in my power to prevent it.
I only have 8 chickens, (7 Bantams: 5 Silkies, 1 Mille Fleur D’Uccle, 1 Cochin plus 1 recently rescued RIR), but I wanted the run to be generous in size because A) I can’t free range them due to local loose dogs, and B) I may add more in the future.
I am very proud of the results. I have been plotting and planning this in my head for a long time now. I’ve daydreamed about having chickens and doing this for many years.
I tried to give specs & details when possible, hoping that it might help someone else the way previous posts have helped me. Just trying to pay it forward. Thanks to all the BYCer’s who posted coop/run pics that inspired me and educated me.
The Original Thread for My Completed Coop Can Be Found Here: https://www.backyardchickens.com/forum/viewtopic.php?pid=4510624
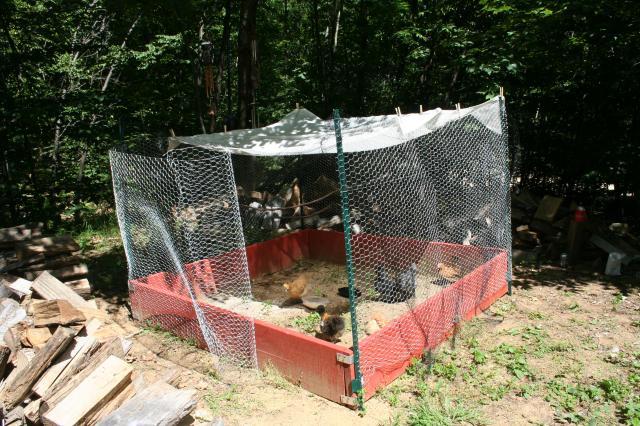
Here is a raised bed garden box that served as a "day pen" for my chicks while the coop was being built. I brought them back inside to the brooder at night until the run was finished.
Here's the shed, which I had delivered and assembled (to the left is the hen house that I bought from Craig's List. I later painted the trim red):
Here is the shed all assembled. Now I'm ready to call in my carpenter to start the run!
Inside I have metal barrels with secure lids to keep the pests out. I keep chicken supplies here.

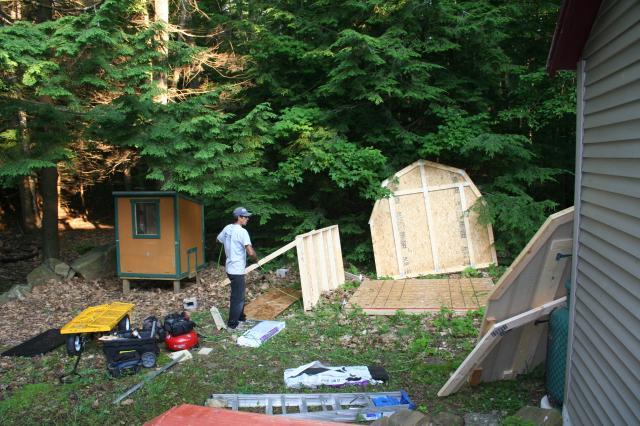
Yay! The carpenter is here. I've waited for this day for years...

I considered various options for a predator proof floor base. I decided against digging a trench perimeter around the base because I have a lot of ledge under the ground. So I had the carpenter lay out overlapping strips of hardware cloth across the entire floor, as shown:
I had the overlapping edges folded up on the outside of the run and secured with washers. No predator will be digging under this as there are NO gaps!
Same thing with the roof, the hardware cloth is folded over and secured, so even climbing predators can't get in.
I painted the trim red, filled the floor with 3 yards of sand, and added feeders (and chickens!).
Here's the inside of the hen house. I thickly coated it with a primer/sealer/paint and modified the roost bar to be wider for my Silkies. There are four nesting boxes to the right, out of view.
And the finished result!
The chickens approve of their new home...
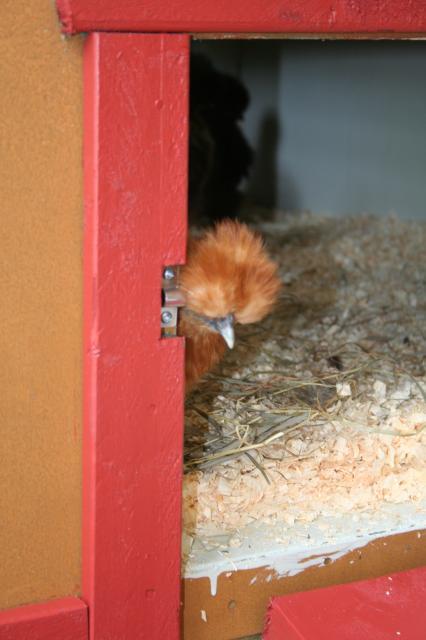
Penny peaks out from her new abode.