We started this coop as a family project when my daughter made friends with some stray chicks. Not really strays; a friend had brought them home from the fair, but her mean dad would not let her keep them under the bed. Since we already had seven indoor birds (Cockatiels and a Pionus), my daughter thought she would just bring them to our home to join the flock. However, it turned out that her mean dad (me) also would not let her keep chickens under the bed, so she had to find homes for them. Fortunately we have a lot of urban chickens in our area, so that was easy! And it motivated us to recycle her brother's old play structure into a bullet-proof coop for our own flock.
It was less a conversion and more of a salvage job, recycling almost all of the old lumber into a new design. The original structure was for climbing, just two platforms made from 2x6 lumber nailed to 4x4 posts; no walls, doors, or roof, just ladders and railings. We all took very satisfying whacks with four-pound hammers to break it down; then my son was put to work pulling nails out of the reclaimed wood, while my daughter helped put up new lumber for the rafters.
Here is the starting point, after taking the original structure down to it's 4x4 corner posts and pressure-treated 2x6 base.
I added 2x4's to make a total of eight uprights to the support rafters. The 10 year old wood was rock-hard and twisty, so it took a good while to get to this stage. Many nails just decided to make 90-degree turns half-way in, and had to be removed with a wrecking bar and a lot of force. Eventually I figured out to drill pilot holes. I later gave up on nails all together, and went for screws about half way through the project.
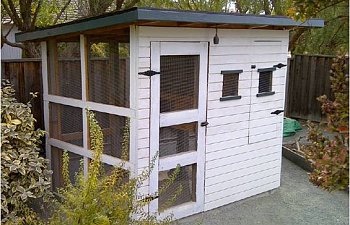
The base is 6' x 8', and the frame is 7' high at the front and 6' at the back. Because of the wider space between the 4x4's on the left, I chose to make the door on the left front side, rather than in the middle like most people would choose.
From this point on the Wichita "Cabin Coop" was my main inspiration; that design deserves a Nobel prize! The original structure was already standing on 4 inches of gravel, so I didn't need to dig down and lay blocks for a foundation. I used 1/2 inch hardware cloth all-around, including the floor. The floor and wall sections are stapled to the inside. Plastic cable-ties keep the floor sections together, and a few concrete paving tiles help hold it down. Raccoons and skunks own our yard during the night, so this is extremely important for our flock.
For the run we used fill sand from our local landscape materials supplier. I placed some old bricks I had around the edges of the floor to provide extra discouragement to digging varmints.
Roost construction
Since I had a boatload of it, the "roost" section is mostly made of reclaimed 2x6 lumber. I put on a heavy top as a second line of defense, and also to make a high shelf inside the coop. It may be ugly as home-made sin, but no raccoon is getting through this roof!
Roost and clean-out
The roost clean-out door is just the inside-width of my wheelbarrow. We can rake out and replace the straw in about 10 minutes.
I made a lean to roost from recycled 2x4's. The top pole is from our pomegranate, which got a severe haircut this summer. I think a natural pole is a more comfortable grip for our girls' feet than a flat board.
My wife wouldn't let me paint any of the inside surfaces, in case they try to eat it. Who knows what's in that paint?
View from back
I plan to paint it. The back is on the south side, and gets sunshine all day, filtered through my neighbor's pepper trees.
Bullet-proof door
Made of doubled 2x6's of course. Very heavy. My son said "Good job dad. No one is going to break into this coop, through the door."
Bird's eye view
...for the benefit of those who, through no fault of their own, are not birds.
-P.G.Wodehouse
Priming the west side and nest boxes
The nest box and roost floor are 3/4 plywood. The roof is plywood with asphalt shingles. The back (south) and the east side are screened with hardware cloth, giving our girls dappled morning sun through the shrubbery. We finished the whole front and the roost side with new rough-sawn siding, and primed it white on the outside. Some day I plan to paint it and add shutters and window boxes, but for now it has been officially declared chicken-worthy!
Raccoon-proof latch (we hope)
Our babies!
Once we had proper accommodation, we brought our babies home from the feed store. Two of them were said to be Araucanas, but I have learned from this site they are probably EE's. We love them. We also have a Barred Plymouth Rock, a Rhode Island Red, and some other Red bird with a murky background.
From front-to-back they are: Pepper Potts, Martha Mayflower, Amelia Pond, Rosey "the Rocket" Tyler (sleeping behind Amy), and Miss Cleopatra Bronte (one of the lesser known Bronte sisters). One of our old bird cages made a fine nursery, and they stayed on the kitchen table until they were ready to move outside.
First dust bath for the Big Girls!
About five weeks after they arrived.
But Rosey-the-Rocket was still too little to join in
Martha demonstrates proper roosting procedure
Martha demonstrates proper exiting procedure.
Dinner time
I like galvanized better than PVC. The pie tin is for table scraps.
Martha, Cleo, Rosey-the-Rocket, Pepper, and Amy, hunting worms
Cleo and friend
Pretty Pepper
Bottom of the pecking order.
Amy Pond: "Super-Mega Ultra-Chicken"
Top of the pecking order
Rosey
First eggs!
Laid over a very stormy November weekend when the girls had to be cooped up (for a change). We didn't expect eggs until spring...now we're getting two to four every day.