We already have one coop that was built by the previous owners. It's at the end of a very long pastured run, running parallel to our road. So it made sense to build two new coops down the road, in line with the existing coop. This way, all the of coops are close to the house, within eyesight and easily accessible. And it just looks nice to drive up the road and see "chicken coop row." We planned out the site of the two individual coops, making sure that they're not in the way of any trees and are able to get a lot of sunlight.

For the basic structure of our coop, we're essentially building two 10'x12' sheds with a single pitch metal roof. Once we have that built, we'll be able to customize it into a chicken coop. We're putting in two windows on the south side of the coop to let a lot of sunlight in. The door and a single window will go on the north side of the coop to allow for cross ventilation (a must have for chicken coops). Luckily, we replaced some of the windows and doors on our house a little wile back so we were able to use the old windows and doors for our chicken coops.
After we decided on the placement for the coops, we leveled the frames and dug out holes for each corner post. After each corner was dug, they set a piece of 1/2 inch rebar plumb in the hole and filled it with concrete. Then they drilled a 1/2 hole in the 6X6 inch pressure treated beams that will hold the coop and filled the hole with epoxy. The 6X6's then get slid over the rebar after they are cut so the tops are all level with each other. This will make a solid flat foundation for the coop.
After the posts were set, they laid the floor which is just pressure treated wood. The chickens aren't going to need anything really fancy, just something that will hold up against weather, water and varmints.
The walls get built on the ground then stood up and nailed in place. We decided to put two windows on the south side of the coop to let in lots of light and the door and another window on the north side of the coop to allow for cross ventilation.
We went with a metal roof instead of a shingled roof because we're installing a rain barrel system. Harvesting rain water from a shingled roof may leach asphalt and tar sediment into your water, which is no good for chickens. Metal roofing, however, collects a larger volume of rain water (because they are impermeable) as well as cleaner rain water.
So that last step of phase one of the chicken coop was to install the windows and door. Denny installed the windows inside the coop with hinges so we can open the windows during the summer and keep them closed and sealed during winter.
Now for phase two:
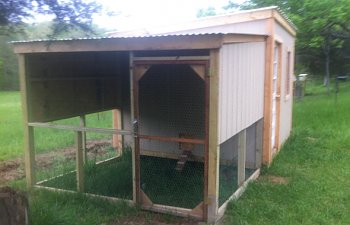
One of our favorite elements of our original coop is the outdoor coop area. A lot of our chickens like to roost in this enclosed outdoor space even through the winter. It's the perfect space for them to get some sunlight, fresh air and dust bathe even when the weather is crappy. So when we were designing our new coops, having this outdoor coop/run area was important to keep. We basically made an 8x10 extension off of the coop, put in a pop door and hung sheeting on two sides to protect the chickens from the elements.
We'll hang two roosts in this area. When it comes time to breed certain chickens, we can close the pop door, throw a rooster and hen in there and let them get to know each other.
Meanwhile, inside the coop we had to build nesting boxes. We re-designed a 5 gallon bucket nesting situation we saw online. We'll be able to have 9 nesting buckets inside the coop. The wood planks that are in front of the buckets are on a hinge, allowing them to fold down, making it easy to remove the buckets and its chicken/dookie inhabitance. Next time a hen goes broody, we'll be able to move her whole nest into a separate area without freaking her out too much.
On the opposite side of the coop we have the roosts, poop deck and built in brooder. This part of the coop is mega most favorite. The roosts are made from young cedar trees we found on the property. It gives the chickens that au-naturale, rustic vibe. So hot right now.
Underneath the roosts is the poop deck area. Chickens are basically constantly pooping. Especially when they're roosting. Now instead of cleaning out the whole coop, we can just clean out the poop deck area to keep their coop smelling fresh as a daisy. This will also save straw. We can also use the poop/bedding mix as compostable organic material for the garden.
Anyway, underneath the poop deck is the built in brooder. You guys, this is really exciting! When we have a hen go broody or have chicks we need to integrate into the flock, we can put them in the built in brooder. Momma can hatch and raise her chicks safely and the chicks can be introduced into the flock from day one. It can also double as a non chicken accessible storage area when it's not in use.
The last step is to hang the feeder and waterer, set up storage bins, give it a good paint job and build the rain barrel. But it's finished enough for the chickens to move in, which is good... because they're getting so big and we have more on the way!
Over the weekend I laid down some wood shavings and straw, threw in their temporary waterer and feeder and introduced the Marans to their new home.
For the basic structure of our coop, we're essentially building two 10'x12' sheds with a single pitch metal roof. Once we have that built, we'll be able to customize it into a chicken coop. We're putting in two windows on the south side of the coop to let a lot of sunlight in. The door and a single window will go on the north side of the coop to allow for cross ventilation (a must have for chicken coops). Luckily, we replaced some of the windows and doors on our house a little wile back so we were able to use the old windows and doors for our chicken coops.
After we decided on the placement for the coops, we leveled the frames and dug out holes for each corner post. After each corner was dug, they set a piece of 1/2 inch rebar plumb in the hole and filled it with concrete. Then they drilled a 1/2 hole in the 6X6 inch pressure treated beams that will hold the coop and filled the hole with epoxy. The 6X6's then get slid over the rebar after they are cut so the tops are all level with each other. This will make a solid flat foundation for the coop.
After the posts were set, they laid the floor which is just pressure treated wood. The chickens aren't going to need anything really fancy, just something that will hold up against weather, water and varmints.
The walls get built on the ground then stood up and nailed in place. We decided to put two windows on the south side of the coop to let in lots of light and the door and another window on the north side of the coop to allow for cross ventilation.
We went with a metal roof instead of a shingled roof because we're installing a rain barrel system. Harvesting rain water from a shingled roof may leach asphalt and tar sediment into your water, which is no good for chickens. Metal roofing, however, collects a larger volume of rain water (because they are impermeable) as well as cleaner rain water.
So that last step of phase one of the chicken coop was to install the windows and door. Denny installed the windows inside the coop with hinges so we can open the windows during the summer and keep them closed and sealed during winter.
Now for phase two:
One of our favorite elements of our original coop is the outdoor coop area. A lot of our chickens like to roost in this enclosed outdoor space even through the winter. It's the perfect space for them to get some sunlight, fresh air and dust bathe even when the weather is crappy. So when we were designing our new coops, having this outdoor coop/run area was important to keep. We basically made an 8x10 extension off of the coop, put in a pop door and hung sheeting on two sides to protect the chickens from the elements.
We'll hang two roosts in this area. When it comes time to breed certain chickens, we can close the pop door, throw a rooster and hen in there and let them get to know each other.
Meanwhile, inside the coop we had to build nesting boxes. We re-designed a 5 gallon bucket nesting situation we saw online. We'll be able to have 9 nesting buckets inside the coop. The wood planks that are in front of the buckets are on a hinge, allowing them to fold down, making it easy to remove the buckets and its chicken/dookie inhabitance. Next time a hen goes broody, we'll be able to move her whole nest into a separate area without freaking her out too much.
On the opposite side of the coop we have the roosts, poop deck and built in brooder. This part of the coop is mega most favorite. The roosts are made from young cedar trees we found on the property. It gives the chickens that au-naturale, rustic vibe. So hot right now.
Underneath the roosts is the poop deck area. Chickens are basically constantly pooping. Especially when they're roosting. Now instead of cleaning out the whole coop, we can just clean out the poop deck area to keep their coop smelling fresh as a daisy. This will also save straw. We can also use the poop/bedding mix as compostable organic material for the garden.
Anyway, underneath the poop deck is the built in brooder. You guys, this is really exciting! When we have a hen go broody or have chicks we need to integrate into the flock, we can put them in the built in brooder. Momma can hatch and raise her chicks safely and the chicks can be introduced into the flock from day one. It can also double as a non chicken accessible storage area when it's not in use.
The last step is to hang the feeder and waterer, set up storage bins, give it a good paint job and build the rain barrel. But it's finished enough for the chickens to move in, which is good... because they're getting so big and we have more on the way!
Over the weekend I laid down some wood shavings and straw, threw in their temporary waterer and feeder and introduced the Marans to their new home.