I built my original coop and run in May/June of 2012. I posted it here "Coop and Garden."
Over the past year I realized that while cute, it wasn't quite functional. I love how back yard chicken keeping has really opened my eyes to what I really need in order to house chickens comfortably and safely. So over the past few months I set out on a mission to expand the run as well as remodel the coop.
A few months ago I had a problem hen, she decided that she wanted to beat up on the lowest in the pecking order. It went above and beyond pecking order and was bullying. She lived in a dog crate for the better part of two months before I added onto the run.
Please enjoy the Before and After pictures!
Before...

About two months ago I decided that I needed to add onto the run.
Before...
I cleared the ground, dug down and added gravel for drainage.
Then it was time to cut a hole in the side of the existing run, and added a center brace.
I decided to build the frame in the garage then move it outside. I also put hardware cloth on the bottom of the frame so predators can not dig under and into the run.
I attached the new frame (4 x 4 corner posts) to the existing run. The old run was 7 feet long by 3 feet deep. The new addition added an additional 4 feet to the length and is 5 feet tall.
I then added the top rails of the run, now it's time to add the hardware cloth.
I created a door that can be pulled up or lowered down if I need to quarantine off a chicken.
I added the door.
Here is the finished run. Now I need to add the trim pieces.
The girls approve!
Here it is with the trim pieces added to tie it in with the existing coop and run.
About a month ago I decided that I wanted to remodel the coop itself. While the flowerbed is cute, it wasn't really serving any purpose and I knew that I could utilize that extra space for additional coop floor space. So I set out on a mission to decide what I wanted and then build it.
I used to have an Ertl Model Farm Set when I was a child...and I had a chicken coop on that farm that I used as my inspiration. So I designed and built the coop in the garage. I decided to build it in panels, so each wall was finished from the siding to the insulation and inner walls. After that was complete I demolished the old coop and flower bed and put up the new coop in a matter of hours.
Here was my inspiration!
Here are my plans...
I taped it out on the wall so I could get a better idea of the size.
Then it was time to cut all the 2 x 4s and assembles the walls.
I put it together so I could work on the siding.
Big, isn't it!
I painted the siding, then cut it to fit each panel.
Once realizing I cut them all correctly, it was time to cut out the windows and the doors.
Then it was time to add the insulation.")
Adding the final coat of paint to the siding.
Time to add the trim around the windows.
It was now time for demo! It's amazing how quickly it came down!
Clean slate!
Time to add the walls and attach them!
Once the walls were up and screwed together it was time to add the roof.
Not bad for day 1!
The next day I built and attached the front doors.
Again, I think the girls approved!
I made it so I could divide the coop in half with a piece of peg board. Right now I have my two older hens on one side, and the chicks on the other. And both have access to their own run.
For the side that the chicks are in, I added a door that I can open and close with a chain.
It has proved to work quite well. I'm super happy with the design and look of the coop remodel! And it is quite functional!
The final piece of the puzzle was to add the nest box. So I worked on that, and attached it in the same place it was on the old coop. But I changed the design. I made this one a "drawer."
I added a slide piece to hold the front doors closed and a "predator proof latch" to it as well.
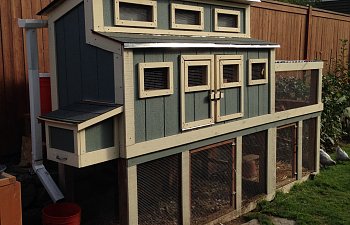
It's finally complete!
I added another latch to the side of the nest box to keep predators out as well.
I'm extremely happy with my remodel and I know that this will serve me well for many years!
I hope you enjoy it as well!!
Over the past year I realized that while cute, it wasn't quite functional. I love how back yard chicken keeping has really opened my eyes to what I really need in order to house chickens comfortably and safely. So over the past few months I set out on a mission to expand the run as well as remodel the coop.
A few months ago I had a problem hen, she decided that she wanted to beat up on the lowest in the pecking order. It went above and beyond pecking order and was bullying. She lived in a dog crate for the better part of two months before I added onto the run.
Please enjoy the Before and After pictures!
Before...
About two months ago I decided that I needed to add onto the run.
Before...
I cleared the ground, dug down and added gravel for drainage.
Then it was time to cut a hole in the side of the existing run, and added a center brace.
I decided to build the frame in the garage then move it outside. I also put hardware cloth on the bottom of the frame so predators can not dig under and into the run.
I attached the new frame (4 x 4 corner posts) to the existing run. The old run was 7 feet long by 3 feet deep. The new addition added an additional 4 feet to the length and is 5 feet tall.
I then added the top rails of the run, now it's time to add the hardware cloth.
I created a door that can be pulled up or lowered down if I need to quarantine off a chicken.
I added the door.
Here is the finished run. Now I need to add the trim pieces.
The girls approve!
Here it is with the trim pieces added to tie it in with the existing coop and run.
About a month ago I decided that I wanted to remodel the coop itself. While the flowerbed is cute, it wasn't really serving any purpose and I knew that I could utilize that extra space for additional coop floor space. So I set out on a mission to decide what I wanted and then build it.
I used to have an Ertl Model Farm Set when I was a child...and I had a chicken coop on that farm that I used as my inspiration. So I designed and built the coop in the garage. I decided to build it in panels, so each wall was finished from the siding to the insulation and inner walls. After that was complete I demolished the old coop and flower bed and put up the new coop in a matter of hours.
Here was my inspiration!
Here are my plans...
I taped it out on the wall so I could get a better idea of the size.
Then it was time to cut all the 2 x 4s and assembles the walls.
I put it together so I could work on the siding.
Big, isn't it!
I painted the siding, then cut it to fit each panel.
Once realizing I cut them all correctly, it was time to cut out the windows and the doors.
Then it was time to add the insulation.
Adding the final coat of paint to the siding.
Time to add the trim around the windows.
It was now time for demo! It's amazing how quickly it came down!
Clean slate!
Time to add the walls and attach them!
Once the walls were up and screwed together it was time to add the roof.
Not bad for day 1!
The next day I built and attached the front doors.
Again, I think the girls approved!
I made it so I could divide the coop in half with a piece of peg board. Right now I have my two older hens on one side, and the chicks on the other. And both have access to their own run.
For the side that the chicks are in, I added a door that I can open and close with a chain.
It has proved to work quite well. I'm super happy with the design and look of the coop remodel! And it is quite functional!
The final piece of the puzzle was to add the nest box. So I worked on that, and attached it in the same place it was on the old coop. But I changed the design. I made this one a "drawer."
I added a slide piece to hold the front doors closed and a "predator proof latch" to it as well.
It's finally complete!
I added another latch to the side of the nest box to keep predators out as well.
I'm extremely happy with my remodel and I know that this will serve me well for many years!
I hope you enjoy it as well!!