I looked through many of the designs on here before designing my own.
I had gone to (The Habitat for Humanity's) Re-Store and picked up two windows. A long one and a short one. This set the dimensions for the coop as bigger than 2' deep, bigger than 5'6" long.
I then swung through a home depot to check out how much plywood (way too much) might run me. I also had a feeling they would cut things to size for me. We have a little cordless drill/ saw combo that shares a battery... but i couldn't imagine getting through the posts with that.
I stopped at the contractor desk to ask questions... and perhaps i should not have led with "i used a power drill for the first time last week!" I just wanted him to know my skill level so he'd explain all the things really clearly.
I had already sketched out on paper the gist of my design. (In fairness, i was planning for my next stop to be the town library; i figured they might have some good modelling software i could use to get a representation of my idea.) While i jabbered on the guy started repeating himself in a really dis-spiriting way: "Come back when you have a drawing." "Bring me some pictures of what you want." "With a design, we can build it." I had to reply "You mean i can build it; you aren't going to do it for me, are you?"
But the tone was set. HD was on the naughty list for this project...i'd get supplies and advice elsewhere.
Next stop, the town's library. We have a mega-library-extravaganza here. It has the usual library stuff, and then there's the plus plus plus part of it which includes a 3d printer, wood burning/cutting machine thing...
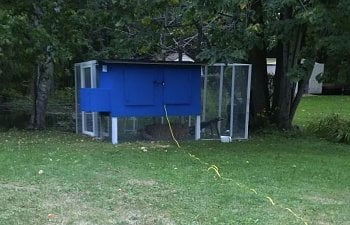
I sat down with the dude in the ideaLab and told him what i wanted to do and why i had come to the library. He thought the idea was neat and showed me a cool software (free) online called tinkercad. He oriented me to the software and i stuggled for a while at the library to get the hang of it. By the end of that evening, my coop looked like this:
By the next night, it looked like this:
Then i waffled for a bit. Should i get chickens now, just to struggle through an Ontario Winter with them straight away? Should i get pullets, chicks or eggs? Incubators that were affordable seemed to have poor reviews... and even then $50 for a 3week use seemed excessive.
I eventually stumbled upon the incubator section here and determined i could make an incubator myself. So that settled it, time to build the coop!!
I picked up supplies on Friday night, and Saturday afternoon, my Supervisor and i got to work. Luckily, he has been using tools a lot longer than i have, but he has liked many of my contributions so far too. (Like when i dug the old shelf supports out of the back of the garage in response to his question: "how are you going to attach the nesting box to the coop?"
By the first evening we had gotten this far:
We used 4'x4' treated posts for the corners; OSB (particle or chip board) for the walls. I had also purchased some thin strapping. I had picked up 1" wood screws, assorted hinges, handles, bug screening and even a rolling composter at the Re-Store Saturday afternoon.
The coop stands 6' off the ground at the rear and 5'9" at the front. It is 4' high inside at the back, 3'9" at the front. It is 7' long, 3' deep. The nesting box is a 24" x 18" opening, with the box itself a little larger at 27" x 21". This gave a little lip that might keep the nesting materials in, and it gave us something to screw the support structure into.
By Sunday evening, we had added the nesting box, doors, and an exit plank. We also added some air vent covers for ventlation. I had really wanted my windows to prop open. Unfortunately, this did not end up sitting well with the supervisor. Happily, he knew how to install windows! So, you win some, you lose some. I'll have to determine where and how i'll add more ventilation. I have a 6 year old son, and the coop is now 6' high at the rear. In order to give him a chance to collect eggs we situated the nesting box access door at the back of the box, not on top. (This was part of someone's design 'post mortem' on here, actually.)
I also assembled the rolling composter. I'll get started using it before the chickens arrive, too. Didn't snap a photo because honestly, it's a composter. (Keter brand i think).
Tomorrow is a work day for me, but the evening should include more fun, like a roof! And transporting it to the back yard! Can't wait for the long, slow and very arduous trip that will be. Without a doubt i will hurt my back at least a little
 We have a deep lot with a large natural pond at the rear. The coop is headed back near the pond so it can enjoy some shade and copious bugs.
Edit: it's tomorrow
The Supervisor put me to work painting the coop, inside and out after work. When i figure out how to add more photos... i will.
Edit 2: it's the second tomorrow. By the AM we could see it had rained overnight and the coop was a drippy mess. It will need a second coat of paint. After work this evening we set about moving the coop. i only just managed to bring it off the ground an inch or so when i was hollering to put it down. It was way too heavy for me. I flaked out from the transport-engineering process. I was terrified of hurting my back (i have two rods fused to my spine). And the supervisor was left to figure himself out. Using my garden trolly, he propped a metal ladder and bits and pieces of wood under the floor of the coop until he had just a tiny bit of lift. Then... we dragged that sucker across the lawn until it was situated in the back. It's still nightime here now, so i can't add a photo (was too dark already when we moved it).will snap one later today. The plan for today involves a piece of plywood for the roof and perhaps even shingles. There are shingles at the Re-store but we weren't sure how much we would need.
Edit 3: roof is up, shingles on, perches in, vinyl sticker floor down. Still need latches, wood chips, water/food dispensers, a ramp for the ramp and an enclosure. Since the vents look terrible and i paid a dollar for them, i may replace. Will end up touching up the paint to try to hide some of the horrendous drip marks. The rain can only be blamed for some of that though... i am not a gifted or patient painter.
Edit 4: it is day 7. My son and i got started on the ramp to the ramp tonight. Living here has it's advantages: like a constant supply of dead trees. There's always a stack of something in the fire pit (or another choice nook if it's super bulky). And we made use of materials from both spots tonight. In the bulky zone i had a few long, wide girth branches that seem to extend for an eternity. I had already cut a 7' section for the main roost, and a 3' section for the secondary roost. But that still left me a lot of branch. My son held up the pop door at a reasonable angle, and i slid the straighter branch under it until it had a good length for a gradual down slope (at a 45° turn). We marked the intersect and cut the branch to size. Using that one piece as a model, we cut another five pieces (each more gnarly then the last, sadly). So now i had 5 lengths of wood that i could gather at one end, but sadly spread apart widely at the other end. Oh well! Time for rungs! Using a drill bit to pre-open the holes i used some extra 1.5" wood screws to zip smaller, thinner segments from the pile in my wood burning patch to the cluster of 5 longer pieces. Some things i learned: charge the battery after use... or it will die inconveniently; the mosquito population is fairing well by the pond, still, this season; (thin) green wood (branches) seem to make my saw stutter to an annoying halt. The way i see it... if the ramp still looks hideous and impractical later when i'm "done" i can always remove the screws, burn the wood and start again with off cuts. The ramp in progress below:
Edit 5: it's day 8, and today was not a fun day. However, consturction of the coop gave me something to focus on while i waited for my insurance to send over a service company (busted washer on a toilet fitting had water EVERYWHERE.
So, what did i accomplish? Completed the ramp to the ramp. I threaded a few more large branches through the five main pieces, then i started weaving sticks through. I tacked many of the sticks in with short nails. Where i split the wood... well, decaying wood attracts bugs, chickens like bugs, so ilickporcupies is already winning points with her future flock. I cut another two thick pieces to give the ramp some height, and voila!
I really enjoy the view on approach towards the coop, specifically because of the ramps' profile. If it turns out later on that the chickens can't navigate it, i'll likely try threading more sticks through before i give up on it altogether.
I got my latches on! I was reading old posts about the kinds of latches people prefer and someone mentioned garden gate latches with a carabiner through the bottom. The carabiner effectively locked out racoons, but let wee ones in. Sold! I do find my size of carabiner too small for my grown up hands to work easily though. I can see a swap out in my future.
Now on to the pop door, which i decided to use as a drawbridge. I needed a way to lower and raise from within the coop (given the pop door would open into the enclosure). I drilled a hole through the pop door corner and the coop wall (the plank is oversized). Then i threaded through some mysterious hardware i acquired when i moved in. It's a long tube with threaded bits on the end. I put a pile of washers on both ends (for the test). Then, i tied some twine to the bolt assembly through the coops' hole. On the inside i played with the length and angle reqired to be able to peg a washer tied to the other end ( to hold up the door). Then i drilled another hole and fed another mysterious piece of hardware in. This one was long with a 1" threaded section at the bottom. I dug around and found two nuts that fit. One i pulled way up the top of the threading. The other i fastened to the end of the bolt outside the coop wall. That gave me a hook. Now i stress tested the assembly. I went to the pop door and gave it a wicked shaking and yanking... and the twine shredded away where i had tied it to the far end at the washer. But the washer stayed on the peg. So in theory it works... just need some light chain, perhaps...
I also had discovered that the roofing nails had protruded down into the coop. Shredded chicken was not on my menu plan so i needed an idea. Enter barnyardchickens.com. i had been thinking corks shoved onto each, but they were expensive. Trolling old posts i found that othes had nay'd the idea before and suggested rigid insulation instead. I picked up some 3/4" thick sheets today (made of styrofoam, believe it?!) And nailed that up into the ceiling in the coop and over the egg boxes.
Nailing over your head is hard. That is my excuse. For that matter, so is measuring to size.. mind the gaps!
Next stage... enclosure!
Edit 6: day 9.
It will be a busy day today, but there was time for the food dispenser. It is 7" deep at the base, 1' wide. It is 18" tall. I used osb for the bottom and back. The sides were baseboard from the re-store. They are 4.25" wide pieces; that created the depth for the refill slot. I tried to score and snap the plexi neatly, but, well... you know. I took a few mis-steps in my measuring. I'll have to figure that out later. I still need the slanted piece at the bottom to direct the flow of food out of the container. I also wanted a lid to try to keep some of the snow/rain out. We 'll see about that now.
Edit 7: day 15/16
Wow. It was time to tackle the enclosure. My supervisor bailed, so i did everything humanly possible to make the job as hard as possible...you know, since i was on my own. I started by pacing out the space i wanted to enclose. I have some decorative garden hoops in the garage that i use to keep bunnies out of my garden. I used those to mark out reasonably straight lines so that i could use a tape measure to take rough measurements. I ended up with an 11'x10' enclosure (including the space below the coop). I realized with a space that big i wouldn't want to be hunched over scurrying around 4' high "ceilings" so i used the 6' height at the rear of the coop for my height. This works well as i am 5'8". I did a terrible job of building the exterior frame. I used 1/2"x3" pine which is very bendy... and soft. I screwed that up a lot. Then the screws would crack through when i tried to move it into position for the next piece. (i had two blue bins and a ladder out for support... but seriously, no. Finally, i walked back to a neighbour i knew was friendly and begged for help. Just a few more pieces and i was set! After that, the power drill ran out of juice and i called it a night.
The next day, i got to work making the human door into the enclosure.
Then... paint. So much paint. I weighed 5extra pounds because of all the splash back when i was done. I also took the opportunity to repaint the interior and exterior. And although today called for a 40% chance of rain... so far, so good!
I am pleased i forced myself to carry on painting, it looks really sharp now.
Tomorrow, hardware cloth!!!!
Edit 8: day 17
Hardware cloth. >:[
The thin, long beams meant i couldn't hammer in my chicken netting nails without a second person to support the structure. I wailed away at it where i had posts, but it is tremendously hard work. I'll be looking for the staple gun to do the rest. I'm fully expecting to fall short with my roll as i purchased 300sqft and my coop requires sonething like 283sqft of coverage, not including waste or overhangs for the lower skirt.
Edit 9: day 22
Will this never end? Hardware cloth, pine and staples don't mix. Particularly the deeply curled inner part of the 100' roll. Sheesh. Had to recruit a friend to brace the structue while i hammered in the nails. We quickly switched roles as i swing like a girl. We temporarily broke off, and when i returned, not only had he and his daughter finished hammering the rest in place, they had run out of chicken netting nails, gone to the hardware store, bought more, and finished the job.. i need to get three more supports in place to do the roof. Stitching the hardware cloth together was brutal. I ended up moving my vertical supports so that the hardware cloth would tack neatly between two beams with some overlap.
Edit 10: i'm not done, per se, but it's day #$%!
I added chain to the pop door. I've siliconed the gap around the nesting box. I ran an 80' electric cord to the coop, set up my brinsea eco glow there. My beinsea eco glow was ordered off amazon.ca... shipped from the UK. Arrived weeks ago! Never opened it because, well busy. And that's how you lose parts. Well, that was dumb. I should have opened it.... because it had a UK plug on it! Ran around like a crazy person this AM trying to find a suitable converter so i could plug it in. (Canadian plugs look just like american plugs. Although we sometimes have one knobby straight line and a knobby-sized slot to plug it into in the wall.
Anyway, all set up, chicks are pipping, and cheeping! Just need to put overhead support and hardware cloth on the enclosure.
Edit: 11-teen-oh-three... or just 11... the chicks are so darn cute!
Got tired verrrrrry quickly of the chicks pooping in their midget bowl. Washing marbles twice a day was making me lose my marbles. So i accelerated making a chicken waterer. Nothing fancy, and i'm pretty sure i'm leaking. I'll have to address the leaks tomorrow as i ran out of daylight. The biggest question was how i would hang it in the coop for the wee ones /winter. I decided a corner shelf would do it. Used two more shelf brackets out of the garage, cut a board to fit across them and marked the nipples location based on the exposed area of the waterer.
I will try to winterize the bucket on another date.