
UPDATES: As of 2017, my town allows up to 6 chickens per acre. I have scooted the coop over to where the wire run used to be, because my air flow works better in the Summer and Winter. I have wire covered/enclosed another maybe 15' X 32' area on both sides of the greenhouse so the hens can have more room. I have moved my compost pile to become part of the outdoor run, and as of today we are back to five hens and one rooster.
Disclaimer: My coop is designed to blend in rather than stand out. Because of that, in most of the pictures the coop seems to take 2nd place to other elements, as here is the back and only side that will allow an entire picture!
Very Low Cost But Tons of Work: Recycled Coop/Greenhouse/Grape Arbor/Seating Bower
My coop “Coop De Vittle“, as with all DIY coops, is based on our own circumstances:
- Reusing/repurposing materials is a personal ideal and an intriguing challenge
- We are gardening fools
- We can have up to 6 chickens per acre
- Budget is a huge concern for us
- I prefer working with the environment instead of fighting and trying to bend it to my will
- We have brutal summers and actually get to freezing temps in the winter (North Texas)
- I wanted to hide the sight of a concrete parking lot that our property backs to
So to start, I designed and built the coop as part of a larger system of a greenhouse, bower and grape arbor. This will help to reduce sun (which motivates our building methods in Texas more than winter worries), and also cammoflages the coop to disappear into the larger structure. And it allows me to take advantage of gardening/composting plant stuff along with chicken stuff.
I put pencil to paper for weeks and read everything I could on BYC, Mother Earth, Old Farmer’s Almanac, My Pet Chicken, Foxfire books, This Old House, “Captain Google“ and anything I could get to. Then I set about collecting shipping pallets and wood and crates and nails and screws and everything else I could find. And stacked it as neatly as I could in the back yard....which point is debatable whether you ask me or ask my wife...
Believe it or not, this is basically my beginning drawing/plan:
8‘ X 12‘ total area
More run than hen house
Corrugated plastic panel over ½ the roof of hen house
Solid roofing over nesting boxes to give privacy and secure feeling for layers
Roofing overhangs to go the length of the arbor ties
Rock walls over buried wire at ground level
Fencing up the sides and across the tops to deter hawks
Railroad ties spiked into ground to screw wire onto and also stop predators
Ramps up to roosts with ‘landing platforms‘ in front of nests
Feed and water protected from poop and up off of the ground
Door that closes hen house at night
Tons of ventilation
Connection to greenhouse to share warmth
The grape arbor covers the whole shebang. It is 16‘ wide and 32‘ long with 4“X4“ posts every 8 feet along the sides. This serves to shape the arbor into four 8 foot sections (that are 12‘ wide on the inside because the arbor has an overhang on both sides). The most western section (12’X8‘) is a seating bower that is shady and buffers the coop from sight of the back alley and the neighbors yard.
At this point I don’t have the roof yet on the very front of the greenhouse (above the doors), and I used bartered corrugated panels for roofing. I used 2“ X 4“s to put up the joists. I actually bought the 2“x6“x16’s but my norm is to scrounge. The lap siding is cut to length pallet slats.
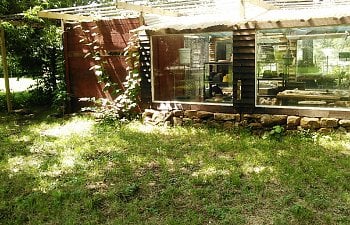
One section of the four is the hen house and chicken run (12’X8‘) for my two chickens. I thought I had three hens but Ruby had an identity crisis and was really Rudy so he went back to the farm. The two most eastern sections are greenhouse (12’X16‘). Here (with pics from various angles) is the whole piece and you may be able to make out how it sort of divides itself into four sections. The coop is the red section, third down, painted/stained as close of a match as I could to the existing workshop. The greenhouse will match when it is complete. In the pic taken from further off it‘s easier to see how the workshop back wall actually forms one side of the coop so that the chickens are sandwiched between the two other structures. This way all that is really seen from the front of the property is the gate to the run and some of the hottest summer sun is completely blocked. Some of these are before the roof is on and a couple were taken just today with the roof finally on the greenhouse.
So I made the shade structure of 2“x 6“ x 16‘ long pieces and then topped these with the shade struts. This makes a shade arbor over the entirety of all. Eventually grape vines, honeysuckle, etc. will provide shade in the summer yet still let light in during the winter.
The hen house walls and roof are made entirely from two large shipping crates, but a good portion of the roof is corrugated greenhouse panel to let in sunlight and also because I ran out of crates. So a ½ solid roof, ½ semi-translucent roof is what I worked out. The greenhouse roofing I got in a trade when I replaced my gutters. A guy wanted my old gutters (I don’t know why) and he had 11 sheets of 4‘X8‘ corrugated greenhouse roofing. So we traded and I was happy. I am unsure why he was, but he seemed satisfied...here is a picture of that being used for ½ the coop roof. It is sloped for water run off. The hen house is right at 5‘ X 8‘ while the outer run is 7‘ X 8‘. The 2nd pic is just of the east wall and plainly shows the shipping crate ambiance. Lol.
I kept the older gutter guards and am here to tell you that they work just fine as sturdy vents for the hen house. They do not rust, they let air in and they are very durable and tough. Below you can see how the old gutter guards are used on the coop backside to ventilate the hen house and also a close up of what they look like. They are about 6“ wide. I also used them over the door to the hen house as seen in the last picture here.
Maybe you notice a lot of rock. This we got from a guy my wife works with who had to clear a parcel of land. He was out of options and rock is a strong building material, so we took about 60 tons. Plus it was free. A dump truck dropped four huge piles over 6 foot tall and round. What a back-breaking chore it was for us to shift it around to where it could be used. One of my brothers is a stone mason and I have built dry stack and rubble walls before so I know how, but it is heavy, gritty and unforgiving work. Here is a picture of some of the rock that forms the bottom section of the greenhouse walls and two sides of the chicken run. There is wire running down from the sides and flat across the ground outside the run. The rock walls are built on top of the wire so a critter will have one heck of a time getting underneath or through. I still have a bit of final fill in to be done for the rock part of the greenhouse walls. One shot here shows the electric running into the hen house. The girls just step over the conduit...and poop all over it.

The entry to the run is actually an older driveway gate that is stood upright rather than the normal side-to-side fashion. Here are pictures that show this pretty well, I think. I added more tightly woven wire on the bottom ½ so the girls can’t poke their heads through or something else pull their heads through. The gate only had one hinge when I got it so I had to heat up and hammer out another from an old piece of flat stock, but it works just fine. Also please admire (lol) my extremely fancy and high tech gate latch - it is an old piece of swag lamp hardware with a couple of washers and a fat rubber grommet. If you look at the picture with the metal post you will see more of the ever useful gutter guard filling the gap between the 4X4 corner post on the left and the gate. When the chicks were little, this small gap was a concern; it is not important now except to keep other smaller animals out.
The feeder is a regular 5 gallon bucket with a 3“ elbow facing downwards inside – leaving about ½“ gap between the bottom of the bucket and the lip of the elbow. I found the idea on Backyard Chickens. The girls can easily get to the feed but there is no slinging it around and virtually no waste. The water bucket is upright on a plastic base usually used for catching plant water. There are four ½“ holes drilled at (sort of) compass points in the bucket bottom and the weight of the bucket lets water into the catching basin only as they drink. Both the water and feed are underneath the roosting board and the nest area so they are protected from poop and they are up off the ground on big flat rocks to keep them up and away from any floor debris. Take a look. Once again the shipping crate theme continues...

The roosts, ramps and platform to get to the nesting buckets are fairly straightforward. I will add that I started with quite large tree limbs (approx. 4“-5“ diameter) as perches, but ended up screwing a 2“ X 10“ onto the topmost roost because Roxy was limping and couldn’t seem to recover as long as she had to curl her feet at night. The nesting buckets are regular freebie 5 gallon buckets and I use a mixture of dried grasses, copious quantities of oak leaves, garden woody plants that are out of season and straw. I also use herbs that get broken from the plantings that my wife has: rosemary, sage, several flavors of mint and basil. There are short pieces of 4“ x 4“ square posts between the buckets so that they don‘t roll or sway as the hens wriggle around getting in or situated.
In one picture Pansy is wanting to lay an egg and I am interfering, but you can see the band of light behind her where the backside vent runs the length of the coop. You can also see the top most ladder going to the highest roost. In the other (a little blurry sorry) she gives up and goes back outside, but you can see the ramps going to the nesting boxes. There is a sapling pecan inside the coop that they love to roost behind; its leaves cover the perches and make it more private I guess. One day I will have to figure out whether to keep the tree or move the coop or something. The door grate is sunk into a trench and helps hold bedding in...a little bit.
The physical lay is the best solution I could work out. The west sun is blocked in the Summer by two huge pecan trees and a cedar, but when they lose their leaves (the pecans) in the Winter then the sunlight comes on in and that’s nice. The shadows here show a Winter sun in early afternoon. Later towards Summer, the shadows of those trees lie right across the coop and run. The shot of the chicks in the run shows very clearly how the workshop and coop and trees work together to create a shady spot.
Another building material that I used was railroad ties. I came by a few in my travels and they are used to have a place to screw the wire down and to mount the coop walls. In these pictures you can see how the railroad ties come in handy. Here are Roxy and Pansy looking from the run into the greenhouse and another of Emma (the dog) trying to pretend she isn’t really there, because she knows she’s not supposed to be staring at the chickens. The one on the left also shows a good shot of the lap siding that is used for both inner and outer greenhouse walls. The pallet boards are in some cases ripped to make them more thin as need dictated. But pallets are free too. The third picture is one taken recently, showing the finished roof on the greenhouse as seen from the chicken’s view. And the last pic here shows the bottom of the west side of the coop (shipping crate and railroad tie plus big rocks).
Below is the outside eastern wall of the coop as it mates with the southern wall of the greenhouse. This is one entire side of a huge shipping crate. The grating that you see at the left bottom of this wall goes right into the hen house where the water bucket sits; it's just another place for air flow. Pictured here also is a very roughly mounted ceramic lamp outlet and a work gang box switch on the northern coop wall which is - you guessed it! - another side of a shipping crate.
I hope this is a little bit entertaining and maybe a little bit inspirational. I have just a tad over $500.00 in the total structure and this includes $100.00 for the five large glass greenhouse panes from Habitat for Humanity, $16.00 in greenhouse doors from the same spot and almost $65.00 for the 2“x6“x16‘. I think close to $75.00 in screws, hangers and whatnot can be safely added. Subtract another $40.00 to rent a truck twice since I don’t have the wherewithal to carry boards that long. I did have to buy new wire. But at the end of the day, I calculate that the chicken part of the structure (hen house and run) was less than $75.00. Time wise this method of building is not efficient, as I had to compile and store goods as they came available and then work my design so that I could take advantage of what building materials I did have. My drawings changed over and over as my working stock fluctuated. It also just takes longer to assemble this way as boards have to be cut one at a time to fit a specific spot rather than screwing standard sized lumber together in a perfect world. If you’re in a hurry, this approach will not work well for you. But if you like to reuse material and scratch your head a lot and have more time on hand than you have finances or funding, then this style of building may be right up your alley.
If I had to do it over:
- I would make the run a little longer. It works as is because we have only two chickens and they have an 8 foot by 12 foot area all to themselves, but still.
- I would do a bit more ‘ciphering‘ (as they say around here) and alter the design so that the hen house door is somehow sheltered from driving rain. We get some terrible mixed rain and sleet storms in Northern Texas and it makes me have to replace hay/straw/leaves/whatever because, with the house door ajar, the area nearest the door gets soggy. But the rest of the coop and the perches stay dry so I’m ok in that regard and the girls can get into a dry place.
- I would try to buy new corrugated roofing panels; they get brittle with time and are a pain to work with when that happens.
- I would make a more solid joist frame for the small roof over the roosts (I can already tell that I will have to re-do this in a couple of years because I cut corners the first time).
") Thanks NorthFLChick and carlsaSC. You're both right! The rock was hard work and those silly chickens don't even appreciate it...but they do hop up there and enjoy the breeze.
Thanks NorthFLChick and carlsaSC. You're both right! The rock was hard work and those silly chickens don't even appreciate it...but they do hop up there and enjoy the breeze.") Fabulous job Nardo.
Fabulous job Nardo.