When first reading about chicken keeping a new chicken owner is certain to hear many claims that a particular method is the Absolute Ultimate in good chicken care. One of these methods is Deep Bedding.
What is Deep Bedding? How is it different from Deep Litter? Why should you choose this method? What are the drawbacks? And how do you accomplish this as a backyard chicken keeper with a small coop?
Definitions:
Deep Bedding: A dry, non-composting system where you keep adding bedding to the coop as it becomes soiled -- managing it by turning it as necessary (or getting the chickens to turn it for you) -- and clean it out only infrequently when the bedding has become both thoroughly soiled and piled up to the point of not being able to add more. Usually used above a floor in the coop but *can* be done in a covered run over dirt in a favorable climate.
Deep Litter: A moist (not wet, moist), system where the lower layers of material are actively composting while new, dry material is continually added to the top. *Can* be done on any floor surface but is most readily accomplished on a dirt floor because the dirt will seed the material with the beneficial composting organisms.
This article is about Deep Bedding, not Deep Litter.
Why choose Deep Bedding?
Reduced work. Many people say that daily scooping takes “Only a few minutes,” but I cannot see myself getting tools from storage, scooping the 4’x4’ coop floor, transporting the manure to the compost area, adding it to the pile in progress, covering it with “browns”, and returning all tools to storage in less than 10 minutes no matter how conveniently I arrange my setup.
That’s 70 minutes a week, or about 4.5 hours of work per month -- which has to be accomplished daily no matter what the weather and no matter how you are feeling. It only takes me 1-1.5 hours maximum every 6-12 weeks (or potentially even less often depending on factors I’ll explain later), to fork out my entire coop, build a new compost pile, put in fresh bedding, and put away my tools. It takes approximately 10 minutes every 10 days to 2 weeks to fluff the bedding with my manure fork and/or add a layer of fresh bedding.
Additionally, because Deep Bedding remains absolutely dry it's light and easy to handle as opposed to the heavy weight you'd have to deal with in a system that allows the soiled bedding to become damp.
The cleaning I just documented took 1 hour door-to-door, including stopping to take the photos for this article and having a text conversation with my DH. My coop is 4'x4' -- 16 square feet and the bedding was a 6-8" deep. It has been 12 weeks plus 1 day from the last cleaning. I saved a little time because it is going to rain for the next several days so I didn't water in the layers while building the compost pile but, instead, dished the top and trusted to nature to do the work. Watering compost tends to add 20-30 minutes including setting up and stowing the hose. (Some people throw the coop bedding into the run but that doesn't work for me with my current setup).
You can schedule cleanings for favorable weather and work around your schedule. My work schedule is erratic, varying from 3-5 days per week on any day but Sunday so I couldn’t keep a “clean every Saturday” type routine if I wanted to. The Deep Bedding method gives me the flexibility to schedule maintenance when I have a day off in good weather. Additionally, though it doesn’t apply to me here in the Steamy Southeast of the US, some people who experience severe freezing conditions or who have deep snow that prevents using wheelbarrows/garden carts find that winter cleaning may be impossible.
Daily chicken chores do not involve handling manure. In addition to that simple fact, I like being able to put on my muck boots to go open the coop and do the first egg check in my work clothes -- without having to dress twice before leaving home.
Additionally, if you go on vacation it’s easier to find a chicken sitter when the job doesn’t include cleaning out manure.
The coop remains absolutely bone dry. This is good for the chickens’ health and also protects wooden floors and structural elements from rot.
Free from odor and flies. The manure dries out rapidly in contact with the thick bedding. Dry manure cannot grow either bacteria or maggots.
Provides a soft landing cushion. People who keep large-breed birds such as Brahmas and Cochins are often concerned about them injuring their feet and legs jumping down from the roost.
Provides insulation for the floor and blocks floor-level drafts. This is particularly advantageous for people in severe winter areas.
Chickens like to dig and scratch. Not only does it give them something to do if they have to be confined to the coop, but you can harness chicken labor to turn the bedding for you.
Uses less bedding over the long term. The bedding is not replaced until saturated, which makes it go further and saves money.
Due to this saturation the bedding is ready to compost when taken out. Wood shavings, one of the most popular chicken beddings, don’t compost readily unless you have a quite high nitrogen level in the pile. Alternately, timing your coop cleanout with your seasons allows you to use the bedding for sheet composting in dormant garden beds. (Note: Some authorities recommend waiting 90-120 days before growing food crops in areas fertilized with animal manure).
Why NOT choose this method?
Coop not designed to use Deep Bedding. The base of the coop may be too shallow to allow enough build-up of bedding, the coop doors and pop door may not be high enough to prevent bedding spilling out, or the necessary thickness of bedding may prevent the doors from operating properly.
Chicken density is too high. If there are too many chickens for the volume of bedding, especially if the ventilation is poor and the coop base is shallow, they can produce too much manure too fast for the bedding to dry it out quickly enough to prevent odor and flies. I believe that this is the #1 factor when people say that they’ve tried Deep Bedding and had odor and/or fly problems with it.
Distaste for the idea of manure accumulating. This is the flip side of the preference for not handling manure as part of one’s daily chores. Both are emotional preferences which are entirely legitimate points of view. No one manure management system is right for every chicken owner in every circumstance.
The Big Cleanout chore is intimidating. For some people “A few minutes” daily and half an hour every week or two is a more acceptable workload than a big cleaning job quarterly, semi-annually, or annually. It could be a matter of preference or it could be a matter of physical limitations.
*May* increase the difficulty of dealing with a parasite infestation. This is difficult to analyze because so many factors combine when dealing with this kind of problem. Some people have ongoing problems that can be controlled but never fully resolved despite the strictest sanitation. Other people keep chickens on Deep Bedding or Deep Litter for decades without trouble.
Wanting straight manure for immediate composting. If you are actively managing hot compost piles in constant rotation it makes sense to keep up an even, steady supply of nitrogen-rich manure rather than having intermittent bursts of input.
How Do I Use Deep Bedding in a Small Coop?
Once you have considered the benefits and disadvantages of Deep Bedding and decided that you want to try it what do you need to know in order to succeed? Using Deep Bedding is easy in a large, walk-in coop where you have plenty of room to work and can bring in powered equipment if you have it but with the right design and the right tools it’s just as easy in a small coop.
First, Consider the Design of Your Coop
You need to have enough room to actually accumulate a deep layer of bedding. This might sound obvious, but there can be some confusion about the definition of “deep”.
Some coops, especially the small pre-fabs, only allow you to spread a couple inches of bedding -- just enough to catch the manure and prevent it from sticking to the floor -- before it starts spilling into the nestboxes, out the pop door, and/or out the access door.
Some very ill-designed prefabs have the roosts so low that a truly deep layer of bedding would bury them.
I personally can accumulate 6-8” before I can’t pile up any more and have to clean it once it’s been soiled. This level is below my nest boxes and below the low vent window but does spill a little from the pop door and access door.
If you have less than 6” for the bedding to accumulate you will probably have trouble going more than about 6 weeks -- though this will depend on your climate, your ventilation, and your chicken density.
Tip: If your door sills are too low so that bedding spills out but the pop door/man door are large enough, you can secure a board across the lower part of the door to deepen the base.
Ventilation is always critical for chickens’ health and well-being but really excellent ventilation is necessary for Deep Bedding to do its job of drying out the manure quickly enough to prevent odor and deter flies.
Warm, moist air rises and needs to be able to escape at the top of the coop. Lack of ventilation at roof-peak level traps both the warm, moist air and the ammonia -- causing your coop to become damp and stinky. There is really no bedding or manure management system that can compensate for bad ventilation. If you are trying Deep Bedding and find that your coop still stinks take a good look at your airflow.
You want about 1 square foot of permanent, 24/7/365 ventilation per adult, standard-sized bird and you want that to be located as close to the roofline as possible. I have a monitor roof on my coop. Many people use soffit vents with a ridge vent or gable vents. Others use some variation of clerestory windows.
In a warm climate or during the summer it’s beneficial to have supplemental ventilation lower down -- just don’t install those windows so low that the deep bedding spills out.
So, you have a deep enough base and adequate airflow,
What Bedding Should I Use?
There are few things that backyard chicken keepers debate over with more passion than the choice of bedding for their coops. From old-fashioned straw to the newly-available industrial hemp, from the universally-available pine shavings to local favorites like rice hulls and pine straw, every possible bedding has its advocates and its detractors.
It’s not within the scope of this article to weigh in on this issue. Any dry, non-toxic, organic material can work -- some better, some more poorly, some meeting one person’s needs while failing to meet another person’s needs. I suggest that you start with whatever is readily-available at a reasonable price and see how it works for you in your circumstances. I personally find that a mix of different materials and textures is better than any one bedding alone because such a mix better resists packing and matting.
Note: Straw, dried grass clippings, and fall leaves seem to be the most prone to packing and matting when used alone.
What Tools Do I Need?
The main difference with this system in a small coop is that you will not be able to use power tools to assist you in handling the bedding. However, in a small coop it will not be difficult to manage things with hand tools. As a small woman with arthritis in my wrists I find it absolutely critical that my tools be light, handy, and well-made. Don’t be afraid to stand there in the farm store or the home improvement store shoveling, turning, and otherwise putting the tools through the motions to make sure that you’re getting something you can work with over the long term.
You need a manure fork and/or a square fronted shovel of some type. For my 4’x4’ coop I couldn’t use a big barn shovel if I had one so I use a D-handled garden spade. I use the fork to fluff and turn the bedding when doing maintenance and to move the majority of the bedding when it’s time to clean out. The spade is useful for getting the last bits out of the corners, especially the finer particles that sift between the tines of the fork.
You also need some kind of wheelbarrow or garden cart that is a good size to maneuver in your area and that will hold a reasonable amount of bedding so that you don’t have to make too many trips. I used to have a small, plastic wheelbarrow because I’m not strong enough to use DH’s big, metal one but this past summer DH bought me a Gorilla Cart, which is so easy to move that my 5yo granddaughter can pull it around on flat ground. If you have room for it, get a cart you can hitch to your riding mower.
It’s also helpful to have some kind of container available for moving moderate-sized amounts of shavings from the big bag in your storage shed to the coop. I find a 5-gallon bucket the handiest for that purpose.
An old broom reserved for the coop can also be useful and you will probably want to wear a mask against the dust.

How Do I Do It?
I personally start a cycle with 3-4” of large-flake pine shavings as a base layer. Sometimes I put some agricultural lime and/or wood ashes down on the floor of the coop before I begin. This is less about the chickens’ well-being or odor prevention than it is about balancing the pH of the eventual compost and is absolutely unnecessary for any chicken-keeping reason. Sometimes I use a little pine straw, dried grass, or fall leaves in this layer along with the shavings, especially if I was raking them up anyway.
This lasts for several weeks, possibly up to a month in cool, dry weather, without need of much attention beyond either fluffing it with the manure fork after a week or throwing a handful of scratch into the coop to encourage the chickens to turn it for me.
My next layer is most often something other than shavings, usually pine straw (the shed needles of Longleaf and Loblolly pines), which is free for the raking on my property, or dried grass clippings, also free for the raking. Maybe a mix depending on what I have handy. Maybe just shavings if the weather has been wet so that I don’t have anything dry to rake out of the yard. Whatever I use, I first use my manure fork to fluff up the existing bedding and then put down a couple inches.
Every couple weeks or whenever the coop seems to need it I put in more bedding with at least half the volume being pine shavings. The current mix, started in this thread and seen at 9 weeks old in this thread, has pine shavings, pine straw, and, most recently, a couple flakes of straw from when the ties broke on a bale that had been meant as a wind baffle for the run. I’d initially intended to clean it out last week when I had several days off in a row but it rained heavily for over a week with only one clear day so I put it off and planted my peas on that day instead.
I cleaned it today, at 12 weeks, which is pretty good considering that I'm keeping 5 hens in a coop meant for 4 and that it’s been a wet winter.
Which brings us to the next question,
How Do I Know it’s Time to Clean it Out?
There are several ways to decide this.
First, you can set a day based on your schedule, which is what I tried to do before the weather thwarted me. I’m flexible about this and always evaluate the coop conditions as the calendar date approaches, but generally aim for 12 weeks in cool, dry weather and 8 weeks in hot, wet weather.
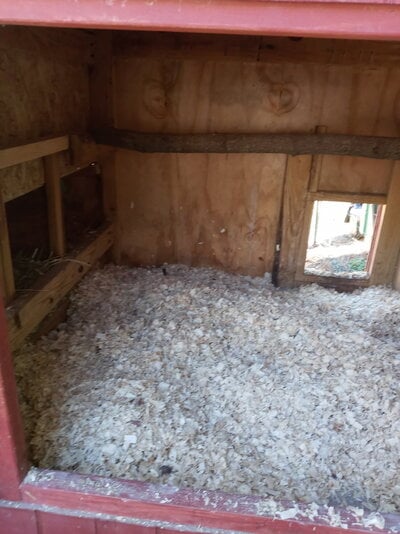
Second, you can visually evaluate the manure-to-bedding ratio and decide if the level of soiling is acceptable or unacceptable. If you’re composting your bedding you actually need a certain level of manure or the bedding, especially shavings, will take a long time to break down.
You can see here that this bedding -- though still odorless, dry, and fluffy -- is thoroughly soiled.
Third, you can use your nose. If the coop develops an odor that isn’t solved by adding more bedding (or if the bedding is already as high as it can go), it’s time to clean.
Additionally, you should do spot cleaning if:
The coop gets wet. Sometimes things happen. Your chickens overturn their waterer. You get a storm that defeats your roof overhangs with sideways rain. Snow and ice build up a dam that diverts water into your vents. You have a failure in your roof or walls.
Wet chicken bedding stinks to high heaven. Sometimes you can just scoop out the wet spot, fix the cause and move on. Sometimes you have to clean out the entire thing.
The bedding becomes crusted with manure. This is most likely to happen under the roost and is most likely when weather, illness, or other events have prevented you from getting out there to fluff the bedding or encourage the chickens haven’t kept it turned for you. You are probably better off scooping out the crust than trying to blend it into the rest of the bedding.
How Much Cleaning Does it Need?
If it seems to need it, use your old broom to knock any cobwebs down off the ceiling/walls and to brush the dust off the hardware cloth that covers your vents. Then fork and/or shovel out as much bedding as you can. I take it down to the floor but don’t attempt to clean out every last particle.
This is a good time to inspect the structure, especially if you’ve had storms. Check for stains that could indicate water intrusion and look for insect damage. Sometimes you might find a splinter, a popped nail, or something else that needs attention, but usually it’s fine to just start adding bedding for a new cycle.
Today I started with 6-8" of thoroughly soiled bedding:

I carried off two carts, shoveling it out well, but not attempting to remove every last shaving and grain of sand:
Made my compost pile:
Dumped in about half a bale of coarse-flake shavings (the chickens will spread it for me):
I had everything finished and my tools put away in an hour.
When I need to add more bedding it usually takes about 10 minutes to toss in a 5-gallon bucket of shavings or a few forks of pine straw or dried grass clippings.
Is There Anything Else?
No, it actually is that simple. Dry bedding, piled up thick in a well-ventilated coop, keeping your set-up dry and odor-free with less work and less bedding overall.