[FONT=georgia,palatino]
 We started our coop in January 2010. The weather was lovely, as you can see from the t-shirt clad work crew (DH&DS). Unfortunately, the weather didn't hold. Despite lots of snow and rain and the resulting muck, we're still on track to get our chickens in February.[/FONT]
One of the previous owners of our house had started a big platform in the back yard as the foundation for a huge workshop. He never finished the project and the plywood floor has been deteriorating ever since. We've been in the house for two years and hadn't quite figured out what to do with the platform until, that is, I got a wild hare to become another suburban chicken keeper.
My long suffering husband reluctantly agreed to build a coop for me, and the research began. We wouldn't be where we are now if it weren't for all the information, tips and advice I've gotten from the great folks at BYC. I decided that we'd need a walk-in style coop to make cleaning seem less daunting. I also liked the idea of being able to be inside the coop with another person if we needed to tend to a sick or injured bird. And finally, I figured if the whole chicken thing didn't work out, we'd end up with a great tool shed.
We live in Durham, NC and are fortunate in that the city recently passed an ordinance allowing city folks to keep up to 10 hens (no roosters) on their properties. The permitting procedure was pretty straightforward and the requirements are very reasonable. The only issue we had was deciding how best to cover the run. I would have preferred hardware cloth for the run covering, but the ordinance requires 14 gauge wire, so we had to double up, using welded wire fencing plus a two foot band of hardware cloth along the bottom of the run.
Although we're technically in the city, we live in a heavily wooded area that backs up to several tracts of research forests and we've got lots of wildlife running through the yard. We recently ended a longstanding battle with a group of raccoons that visited our laundry room nightly to feast on dry cat food. We finally won that battle by raising the height of the cat door and cladding the house with aluminum flashing - it's ugly, but it does the trick. We've also had a couple of foxes in the yard and some opossums. Don't even get me started on the deer..... At least deer don't prey on chickens. I hope.
We settled on a simple coop design - a 7'x8' structure with a shed roof and an attached run. Because we've got so many predators here, we've covered the entire run. We extended the roof on the coop to shelter a portion of the run from rain and sun. Because of our location, I think the greatest weather challenge our chickens will face will be the heat. We tried to design the coop with that in mind, we'll see how we've done in July.
I'd originally wanted to scavenge our local freecycle and Craigslist for building materials, however, we just didn't have the time. Our chickens are coming from a friend who wanted to downsize and she wanted them gone, gone, gone. So off to Lowe's it was. We've got both HD and Lowe's nearby, but Lowe's is my favorite. We drew up our plans on graph paper that I printed from a free online site, and then we set about calculating the materials we'd need. DH did most of the materials calculations since he'd be the one doing the actual building. I'm just the helper. You know how it goes..."hand me my hammer, my nails, my pencil, my screws, another few shingles" and the list goes on. I'm also kind of good at coming up with solutions to those problems that invariable come up during construction like "oops... the hole for the door is a wee bit too small". Together, we make a pretty good team.
The great thing about getting all of our materials from one place was that I was able to go online and put (almost) everything I needed in the shopping cart, and then print out the list. I took that to the project desk at Lowes and they had all the information they needed to put an order together. Then we went through the store and picked out the other things we'd need that I wasn't able to find online. Those got added to the order and presto - we were done. And the absolute very best part...I paid them $60 to deliver it all to my door. They unloaded it and put it exactly where we wanted it. Yippee! That stuff was heavy, and I'd been dreading the thought of trying to load and unload it all. Oh, my aching back! Best $60 I've spent in a long time. And I should also say, all the lumber we got was great. We had been worried that if we didn't sort through it, we might get some lesser quality wood, but that wasn't the case at all.
Although the plywood on the existing platform had pretty much disintegrated, the underlying structure was in tip-top shape. We were good to go. We used two sheets of 3/4" plywood for the flooring. It's resting on 16" on center beams. The floor is nice and sturdy. DH framed the all the walls using 2"x4"s on the platform and then we put them up one by one. The diagonal 2"x4"s were nailed on to give the structure some additional support until we got the siding on.
Next were the 10 foot 2"x 6" rafters that would support the roof. In the photo on the right we've got about half the rafters up. The others had to wait until we'd sunk the posts that would support the roof over the run. We used these neat brackets to attach the rafters to the walls. I'm sure folks that do lots of construction know about them, but they were new to me and I was pleased at how easy they make putting up the rafters. Our roof overhang could have been longer and we might regret not having more, but we designed it like this to get away with a bit less plywood on the roof. We've got to use an umbrella to get out to the coop if it's raining anyway, so we figured it really didn't matter if we had an overhang we could stand under.
The roof looks a bit crooked in this picture, but it's really not. Just a funny camera angle, I guess. Up until this point, the weather had been holding up. We got the plywood and the roofing felt on before the rain came. We used 30# roofing felt and your regular run-of-the-mill shingles. All nailed by hand with roofing nails and a mighty arm. DH snapped a chalk line for every row of shingles because it was his first attempt at roofing and he really didn't want to have to do it over. I think it turned out great. And he only cut the tip off of one of his fingers.
DH built the roof following the advice in a book on sheds by Black&Decker. I think I picked it up at Lowe's too when we were still in the planning stage. It showed in what order to put on the drip edge and fascia and all that jazz. I didn't concern myself with that stuff too much. Remember, I'm just the handy helper.
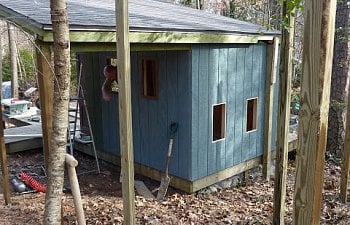
As far as siding goes, we chose to go with the T1-11 plywood sheets. They were easy to work with and look fine. The siding is screwed, not nailed. Lots and lots of screws were used to put up the siding. It's not going anywhere, that's for sure.
Trying to figure out what to do about windows was kind of a pain. We looked at windows at Lowe's. $$$ And at our local Habitat store. Not as pricey, but nothing we could easily use. Ultimately we decided not to frame in windows during construction and to worry about it later.
Right now we've got two windows on the north side of the coop under the roof and two windows on the west side of the coop at the height of the lower roost. Because we expect heat to be a bigger issue than cold, we haven't put windows on the east or south sides of the coop. One of the north facing windows is far enough away from the roost that it could be left open in cooler - but not cold - weather. The others are built near the roosts on purpose so that they can be left open when it's warm so that the chickens will be able to catch the breeze blowing through.
Both ends of the roof are open to provide constant ventilation. Our goal was to have a coop that wouldn't be drafty but that would allow for plenty of breeze when needed. The other advantage to not placing windows on the south and east sides of the coop has to do with the coops location on the deck. We'll put some tables and chairs on the deck when we're finished with construction and I think we'll be pleased that any smelly chicken poop odors will waft out and away from the sitting area. Just a thought.

One of the previous owners of our house had started a big platform in the back yard as the foundation for a huge workshop. He never finished the project and the plywood floor has been deteriorating ever since. We've been in the house for two years and hadn't quite figured out what to do with the platform until, that is, I got a wild hare to become another suburban chicken keeper.
My long suffering husband reluctantly agreed to build a coop for me, and the research began. We wouldn't be where we are now if it weren't for all the information, tips and advice I've gotten from the great folks at BYC. I decided that we'd need a walk-in style coop to make cleaning seem less daunting. I also liked the idea of being able to be inside the coop with another person if we needed to tend to a sick or injured bird. And finally, I figured if the whole chicken thing didn't work out, we'd end up with a great tool shed.
We live in Durham, NC and are fortunate in that the city recently passed an ordinance allowing city folks to keep up to 10 hens (no roosters) on their properties. The permitting procedure was pretty straightforward and the requirements are very reasonable. The only issue we had was deciding how best to cover the run. I would have preferred hardware cloth for the run covering, but the ordinance requires 14 gauge wire, so we had to double up, using welded wire fencing plus a two foot band of hardware cloth along the bottom of the run.
Although we're technically in the city, we live in a heavily wooded area that backs up to several tracts of research forests and we've got lots of wildlife running through the yard. We recently ended a longstanding battle with a group of raccoons that visited our laundry room nightly to feast on dry cat food. We finally won that battle by raising the height of the cat door and cladding the house with aluminum flashing - it's ugly, but it does the trick. We've also had a couple of foxes in the yard and some opossums. Don't even get me started on the deer..... At least deer don't prey on chickens. I hope.

I'd originally wanted to scavenge our local freecycle and Craigslist for building materials, however, we just didn't have the time. Our chickens are coming from a friend who wanted to downsize and she wanted them gone, gone, gone. So off to Lowe's it was. We've got both HD and Lowe's nearby, but Lowe's is my favorite. We drew up our plans on graph paper that I printed from a free online site, and then we set about calculating the materials we'd need. DH did most of the materials calculations since he'd be the one doing the actual building. I'm just the helper. You know how it goes..."hand me my hammer, my nails, my pencil, my screws, another few shingles" and the list goes on. I'm also kind of good at coming up with solutions to those problems that invariable come up during construction like "oops... the hole for the door is a wee bit too small". Together, we make a pretty good team.
The great thing about getting all of our materials from one place was that I was able to go online and put (almost) everything I needed in the shopping cart, and then print out the list. I took that to the project desk at Lowes and they had all the information they needed to put an order together. Then we went through the store and picked out the other things we'd need that I wasn't able to find online. Those got added to the order and presto - we were done. And the absolute very best part...I paid them $60 to deliver it all to my door. They unloaded it and put it exactly where we wanted it. Yippee! That stuff was heavy, and I'd been dreading the thought of trying to load and unload it all. Oh, my aching back! Best $60 I've spent in a long time. And I should also say, all the lumber we got was great. We had been worried that if we didn't sort through it, we might get some lesser quality wood, but that wasn't the case at all.
Although the plywood on the existing platform had pretty much disintegrated, the underlying structure was in tip-top shape. We were good to go. We used two sheets of 3/4" plywood for the flooring. It's resting on 16" on center beams. The floor is nice and sturdy. DH framed the all the walls using 2"x4"s on the platform and then we put them up one by one. The diagonal 2"x4"s were nailed on to give the structure some additional support until we got the siding on.
Next were the 10 foot 2"x 6" rafters that would support the roof. In the photo on the right we've got about half the rafters up. The others had to wait until we'd sunk the posts that would support the roof over the run. We used these neat brackets to attach the rafters to the walls. I'm sure folks that do lots of construction know about them, but they were new to me and I was pleased at how easy they make putting up the rafters. Our roof overhang could have been longer and we might regret not having more, but we designed it like this to get away with a bit less plywood on the roof. We've got to use an umbrella to get out to the coop if it's raining anyway, so we figured it really didn't matter if we had an overhang we could stand under.


As far as siding goes, we chose to go with the T1-11 plywood sheets. They were easy to work with and look fine. The siding is screwed, not nailed. Lots and lots of screws were used to put up the siding. It's not going anywhere, that's for sure.
Trying to figure out what to do about windows was kind of a pain. We looked at windows at Lowe's. $$$ And at our local Habitat store. Not as pricey, but nothing we could easily use. Ultimately we decided not to frame in windows during construction and to worry about it later.
Right now we've got two windows on the north side of the coop under the roof and two windows on the west side of the coop at the height of the lower roost. Because we expect heat to be a bigger issue than cold, we haven't put windows on the east or south sides of the coop. One of the north facing windows is far enough away from the roost that it could be left open in cooler - but not cold - weather. The others are built near the roosts on purpose so that they can be left open when it's warm so that the chickens will be able to catch the breeze blowing through.