I am a small-time homesteader in Barnesville, Georgia and have been trying to become less and less dependent on "the grid" for almost two years. I have been skeptical though as I have little experience in most homesteading ventures and rely heavily on personal contacts, books, websites, etc. to begin new adventures.
This did not stop me however from jumping headfirst into owning laying hens and building a coop that would maintain the integrity of our house, land, and the chickens themselves. I used a few different ideas and other coops to get me started and then I went from there using my prior construction knowledge. After about 4 weeks of weekend hours as well as 100% recycled and repurposed materials I introduced four hens to the "Coop de 'Ville."

Image 1: This was the spot I chose for the future coop. It receives direct sun about 60% of the day and is on a bit of a hill. I knew I would have to clear the brush and then lay down some dirt in order to level it out some for construction.
Image 2: 100% of the materials used in the construction of the coop were recycled or repurposed. I took out a small classifieds ad in the the local newspaper asking for any old wood, unwanted building materials, or aged lumber. I got a lot more than I expected and it made for some excellent raw materials. I did cheat a bit and use a pneumatic nail gun rather than the old hammer and nails.
Image 3: I framed the coop up as I would a house or other living structure. The wall studs are on 16" spacers and I build corner beams for extra strength. The posts are buried roughly 18" in the ground and are nothing more than 4"x4" treated wood posts. After the main house was framed up (5 feet 5 inches high at its tallest) I began to lay on the siding which was 85 year old white pine hardwood.
Image 4: You can see from this view how I sided the coop. After all the siding was up on one side I simply used a circular saw to cut off the ends. Those ends were later used to patch areas and for other smaller projects I had laying around unfinished.
Image 5: I left opening for two windows. Even chickens need a view! The windows were recovered, old, single pane windows that were perfect for this application.
Image 6: Here are the windows once laid in.
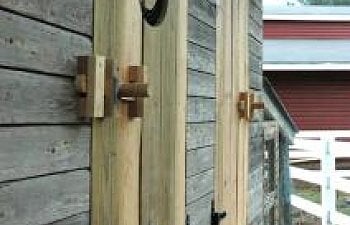
Image 7: I added a couple of doors to help in cleaning the coop. They are about 2.5 feet off the ground so the use of steps was absolutely necessary. The hinges are standard gate hinges and the door fasteners are made from some old 1"x2" and a dowel. I did decided to give it that "'ol country feel" and put in a crescent moon. That is backed with hardware cloth so the hens can't hurt themselves or maybe even fly out.
Image 8: I started protecting the hens by adding fence to the bottom portion of the run. It is buried 8" into the ground so nothing can really dig or climb under. I then (not shown) wired poultry netting from the fencing to the lean to and lower coop. This provides 100% protection for the girls.
Image 9: The beds are made of milk crates with the front cut out and gently sanded so there are no jagged edges. I also used two branches to make perches. I have since added hay to the floor and a water container.
There are more pictures available showing more detail on my Flickr page.
This did not stop me however from jumping headfirst into owning laying hens and building a coop that would maintain the integrity of our house, land, and the chickens themselves. I used a few different ideas and other coops to get me started and then I went from there using my prior construction knowledge. After about 4 weeks of weekend hours as well as 100% recycled and repurposed materials I introduced four hens to the "Coop de 'Ville."
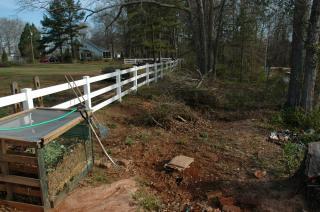
Image 1: This was the spot I chose for the future coop. It receives direct sun about 60% of the day and is on a bit of a hill. I knew I would have to clear the brush and then lay down some dirt in order to level it out some for construction.
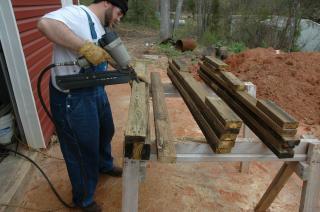
Image 2: 100% of the materials used in the construction of the coop were recycled or repurposed. I took out a small classifieds ad in the the local newspaper asking for any old wood, unwanted building materials, or aged lumber. I got a lot more than I expected and it made for some excellent raw materials. I did cheat a bit and use a pneumatic nail gun rather than the old hammer and nails.
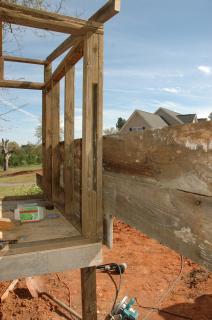
Image 3: I framed the coop up as I would a house or other living structure. The wall studs are on 16" spacers and I build corner beams for extra strength. The posts are buried roughly 18" in the ground and are nothing more than 4"x4" treated wood posts. After the main house was framed up (5 feet 5 inches high at its tallest) I began to lay on the siding which was 85 year old white pine hardwood.
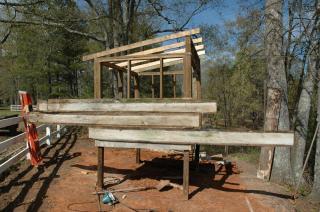
Image 4: You can see from this view how I sided the coop. After all the siding was up on one side I simply used a circular saw to cut off the ends. Those ends were later used to patch areas and for other smaller projects I had laying around unfinished.
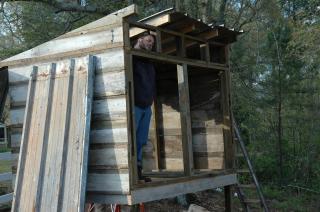
Image 5: I left opening for two windows. Even chickens need a view! The windows were recovered, old, single pane windows that were perfect for this application.
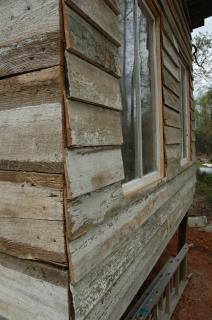
Image 6: Here are the windows once laid in.
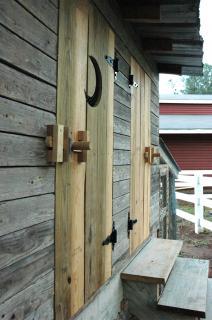
Image 7: I added a couple of doors to help in cleaning the coop. They are about 2.5 feet off the ground so the use of steps was absolutely necessary. The hinges are standard gate hinges and the door fasteners are made from some old 1"x2" and a dowel. I did decided to give it that "'ol country feel" and put in a crescent moon. That is backed with hardware cloth so the hens can't hurt themselves or maybe even fly out.
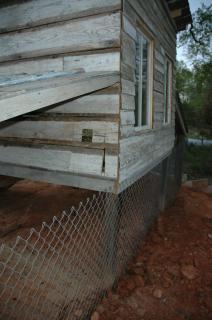
Image 8: I started protecting the hens by adding fence to the bottom portion of the run. It is buried 8" into the ground so nothing can really dig or climb under. I then (not shown) wired poultry netting from the fencing to the lean to and lower coop. This provides 100% protection for the girls.
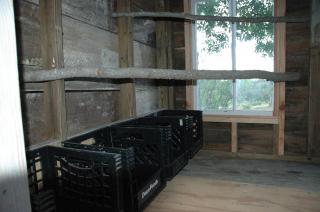
Image 9: The beds are made of milk crates with the front cut out and gently sanded so there are no jagged edges. I also used two branches to make perches. I have since added hay to the floor and a water container.
There are more pictures available showing more detail on my Flickr page.