Started things off by placing 4x4 posts for the 10X6ft. footprint, since I don't have a level spot to place coop
 Birds helping with leveling
Once leveled using boards that will become part of the frame, I cut off the posts so I'd have a level base to place framing on
Front and back frames. Cut notches keep things nice and flat for eventual 1/2" HW cloth and siding application.
Frame and roof rafters up
Birds helping with leveling
Once leveled using boards that will become part of the frame, I cut off the posts so I'd have a level base to place framing on
Front and back frames. Cut notches keep things nice and flat for eventual 1/2" HW cloth and siding application.
Frame and roof rafters up
 I used Ondura roofing, which is fairly easy to cut and work with. Used nails specifically for this roofing. Would have preferred screws, but they weren't available at my HW store. I found you can add the rubber washer to 2" screw and things go together much more nicely; that was on the nesting box roof that i realized that though.
Framing in the window and coop
1/2" HW cloth all around and siding starting. I buried roughly 2 ft. of HW cloth horizontally out at ground level and buried it. Not terribly deep, but 2ft. is a far ways to dig over and hopefully i notice that before they make it all the way in.
Finishing off the closed coop. 1x4 wood for the door frames. will eventually use same for all trim to make it look nice.
Door on. Kind of high until I get the deck in. I used wine corks to cover all exposed roofing nails.
Feeders hung with chain. ramp attached with hinges. used decking for the ramp, with 1x2 for the steps.
Again, used hinges to attach the roosts for easy access to clean.
Gotta add a little style and perches for the chickens
Deck started. Inspection day. Inspectors name is Dash.
Dash would prefer I didn't finish; she seems to like it at this stage.
They approve of the added potted plants
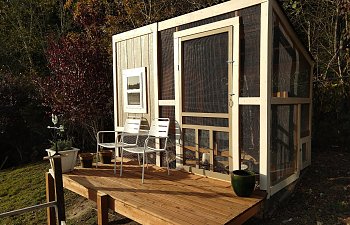
Final product. painted to match the house.
View of nesting box and storage access. As well as the old modified factory coop.
I used Ondura roofing, which is fairly easy to cut and work with. Used nails specifically for this roofing. Would have preferred screws, but they weren't available at my HW store. I found you can add the rubber washer to 2" screw and things go together much more nicely; that was on the nesting box roof that i realized that though.
Framing in the window and coop
1/2" HW cloth all around and siding starting. I buried roughly 2 ft. of HW cloth horizontally out at ground level and buried it. Not terribly deep, but 2ft. is a far ways to dig over and hopefully i notice that before they make it all the way in.
Finishing off the closed coop. 1x4 wood for the door frames. will eventually use same for all trim to make it look nice.
Door on. Kind of high until I get the deck in. I used wine corks to cover all exposed roofing nails.
Feeders hung with chain. ramp attached with hinges. used decking for the ramp, with 1x2 for the steps.
Again, used hinges to attach the roosts for easy access to clean.
Gotta add a little style and perches for the chickens
Deck started. Inspection day. Inspectors name is Dash.
Dash would prefer I didn't finish; she seems to like it at this stage.
They approve of the added potted plants
Final product. painted to match the house.
View of nesting box and storage access. As well as the old modified factory coop.