Everything you Need to Know About Raising Baby Chicks!
Baby chicks are very cute and cuddly, but when it comes to caring, most uninformed/mislead owners who just get chicks for their kids on Easter or get them because they think they will be easy to take care of and just put them on the lawn in the freezing cold,
 don't know how to properly take care of chicks. In this article, I will teach you everything I know, and I know a lot, about raising chickens, from 1 day old to 6 weeks old.
Picture by @Minidinochickens
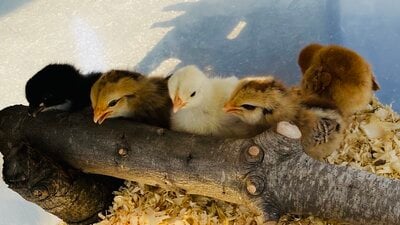
The Brooder
You will most likely want to use a brooder if you are reading this. You don't need a brooder if you let the mamma hen raise them, but a brooder is the most common and best way for beginners. A brooder is a box, cage, or container to raise baby chicks in. Your brooder can be anything from a cardboard box to an intricately designed wood and hardware cloth contraption. You should also add a top to your brooder after about 2 weeks because the chicks will start to try to fly out! Yes, they grow fast! Something you should add inside your brooder are food, water, pine shavings/bedding, small sticks and branches, toys, a little box inside your brooder box,
 a heat lamp, and maybe a heat plate. There are more things you can add and I will go deeper into the subject of most of these things, but for now, this is good. Another thing I want to add is that your brooder should be big enough so your chicks can get away from the heat source if they are too hot. If not big enough, chicks could die from overheating.
Picture by @FuzzyCritters
Pine Shavings/Bedding
Pine shavings are the most commonly used bedding for the brooder but you can use other things such as rabbit bedding, newspaper, paper towel, clean sand, and more. These all work, but as I said, pine shavings work the best for most people and are most common. The reason why I say pine shavings instead of wood shavings or something like that is because some wood shavings are toxic to chicks. The main wood to avoid when raising and keeping chickens is cedar. Cedar is very toxic to chickens. By themselves, cedar shavings may not cause problems, but they may affect chickens' respiratory system enough to stress them and make them more susceptible to other diseases that may be around. So, DO NOT use CEDAR shavings or anything cedar in your coop or brooder. It will hurt your chickens.
When you put down your bedding, you want to cover the whole bottom of the brooder with about an inch of the stuff. If using a plastic box for your brooder, you may want to put down paper towels, a cloth, or some newspaper before the bedding so the chicks don't slip on the plastic. If you don't put down paper towels, or some sort of non-slippery material, the chicks could get leg problems.

Picture by @BuckeyeAmy69
Heat Source
A heat source is needed for chickens from day one until up about 6 weeks of age. Baby chicks, without a mamma hen taking care of them, cannot provide enough heat to survive in most climates, so they need an artificial source of heat. For your heat source, you can use a few things. One, which is very popular and works great is a heat lamp and two, which acts like a mamma hen is a heat plate. There are more heat sources you could use, but they are not as common and/or don't do the job as well. If you use a heat lamp do not use a Teflon or PTFE bulb because this is very toxic to chickens and will kill them if you do. A heat source is there to regulate the heat of the brooder, to high, chicks overheat, to low, chicks "freeze." The way most people do it is to start at 95°F for the first 2 weeks, then every week after that lower the temperature by 5°F. This is the rule to go by but if you see your chicks huddled in the corner of the brooder farthest from the light, that probably means that they are too hot and you should lower the temperature, and if they are all huddled directly under the heat lamp, that probably means they are too cold and you should higher the heat. This does not apply when you first put them in the brooder.
Picture by @GermanKennhuhn
Feeding and Watering
Feeding and watering your chicks is a must. There are many kinds of feed you could feed them and organic feed is a very good choice, but that is my opinion and you can choose however you want; just remember, if you don't feed them organic feed you won't get organic eggs and/or meat. The feed I use is Tractor Supply Nature's Best Organic Chick Starter/Grower Crumbles, 40 lb. You can feed this feed up until egg-laying but it is a little pricey. You can feed your feed and nothing else (AT ALL) up until they switch feeds or need to be fed other things like oyster shells, but if you want to feed them little table scraps, grass, or some treats, you have to put in chick grit so they can eat that at their own will. You need to supplement grit because when they eat things other than feed, they have no way to digest it; the grit smashes up their food like our stomach does our food. We have pretty much covered feeding your chicks, now it is time for the watering part. You may be thinking, "What do I need to learn about watering, it seems simple?" or "Can't I just put out some water and they will drink it?" the answer is maybe. I say maybe because it can be simple and you can just put out water, they may not drink it and die and it is actually a lot of work, even though you may not believe me until you raise some chicks of your own. So why is it so complex? Well first, right when you get your chicks, you have to dip their beaks in the watering container. You don't have to do all if you have a big bunch, but you shout do the majority of them. Dipping their beaks lets them know where the water is. If you don't dip their beaks, they won't be able to find the water. Also, if some do it and start drinking and other chicks see, then they will follow and start drinking too, this is why you don't have to dip all of their beaks. Instead of feeding your chicks just plain water when they arrive, for the first few days, you can give them mediated water that has supplements and probiotics to help your chicks get strong after their long journey if they got shipped. If you give them medicated water, you should also provide normal water so they can pick. Also, you should be changing your chick's water daily or more because their water "goes bad." When chicks are done drinking or just playing around the waterer, they kick in bedding. This is a very big hassle and very annoying because whenever they do this, you have to change the water with clean water. A way to lessen the bedding in the water is to raise it by putting it on a brick or something like that, but a better way I think is to hang it. This sort of connects to the feed too, like kicking it around. When chickens eat, out of habit, they scratch at their food, chicks do this too. This is a big waste of food because when they scratch, a bunch of feed some out. Another good way to hamper the constant feed on the ground is to get a good feeder where it is hard/impossible for them to scratch at their food. This means fewer feed costs and less cleaning up.
Picture by @MFRcoop
Disabled Chicks
If your chick is disabled or has a problem, do not cull. (If you did not know, cull means to remove from the flock.) There are ways to fix many disabilities. Some disabilities include curled toes, splayed legs, pasty butt, crossed beak, and more, but they are not as common and I will not be talking about them. Problems in a chicken are part of raising poultry, a challenge. What fun is raising chickens if there are no challenges? Let's start on the first chick disability, curled toes. Curled toes look like this...

Picture by @MGG
Curled toes is when a chick has curled toes (who knew) and they won't straighten. Some ways to spot this problem is if they are hobbling and if they have curled toes. To cure this problem, you could tape their feet, so they look like they have webbed feet or are a duck! Here is an article on how to do it (video and pictures included!) The next chick's disability is splayed legs. Splayed legs look like this...

Picture by @Farmer Connie
Splayed legs is when a chick's legs are "bent" or positioned to the sides so it looks like they are doing a split. They will not be able to walk and just lying on their stomach. To fix it you have to find a way to pull the chick's legs back into place and stay there. Here is an article on how to do it (includes a lot of pictures.) The next chick deformity is pasty butt. Pasty butt looks like this...
Picture by @Chickenhappy8708
Pasty butt or chick pasting up is a common reason for a sick baby chick, most often caused by stress. This is a condition where droppings stick to a chick's vent area, preventing the excretion of waste. It can also be because of chicks eating pine. This is a very common problem in chicks and can happen multiple times, it is not a one and done, it will probably come back. This means you have to check for it a lot mainly from between 1 day old - 3 weeks old. There are many ways to treat it but the best one is gently wiping the chick's butt with a warm cloth until it all comes off. Here is an article on how to do it. The last disability that is common in young chicks is crossed beak. Crossed beak looks like this...

Picture by @tsperry88
Crossed beak is a condition in which the top and bottom beaks do not align properly. It can be caused by genetics or the bird's inability to maintain the beak's length and shape by normal honing on rocks or other hard surfaces. Most of these chicks who have crossed beak adapt and thrive. The isn't really a way to treat crossed beak, but you will have to pay more attention to that bird and give it extra care. When they get older you can try sanding down the beak, but the best way is just for your chicken to adapt. Here is an article on caring for a chicken with crossed beak.
Thank you for reading and I hope you learned something new!

")