Living in Mobile, AL I worried most about the effects of high heat and humidity on our girls. Especially should they stuck in the house for a while during the daylight hours in August! Our flock is intentionally small; only six birds that we picked up at TSC. Knowing that we would always have a small number, I started looking around for a small, compact design; one that was light in weight and allowed for maximum air flow. I liked the idea of a chicken tractor and the efficiency of the triangular cross section. I studied dozens of photos and blueprints.
Then I tossed out most everything and struck out on my own.

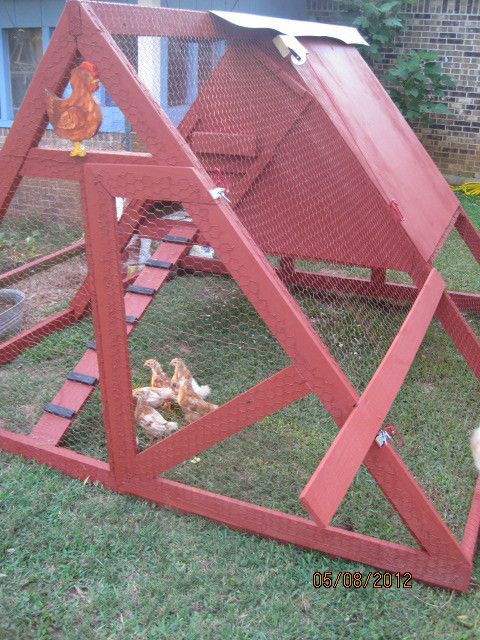
I spent one of my innumerable sleepless nights drawing and as soon as Lowes opened I was in the door. The final design was to be of a triangular cross section eight feet wide, eight feet long, and some five and a half feet tall at the peak. From the ground up to approximately 2.5 feet the entirecoop tractor was to be open to allow free access to the grass. The rear 'half' would incorporate a raised coop with a sliding door, two nesting boxes, peak & ridge vents, and a reinforced wire floor some four and a half feet square. A cleated ramp would allow access to the ground level and raised perches would allow comfortable roosting. Counting the square footage of the upper house and the square footage of the 'yard' below, there is adequate space for this small flock, methinks.
One side of the coop was hinged near the top to allow full access for cleaning. In order to prevent blowing rain - and we have a lot of it - from entering through the peak & ridge vents, and the hinged upper portion of the side I added a six foot section of a rubber-type ridge cap extending beyond both ends. For further protection I drew from my Living History experience and prepared a strip of heavy weight, old fashioned pillow ticking which was painted on both sides, working the paint in thoroughly making it 'waterproof', yet flexible. This was then attached over the junction of the lifting side and the coop - hinges & all. It blended right in with the rest and is hardly noticeable. Best of all - it works! This opening side has two latches holding it shut tight.
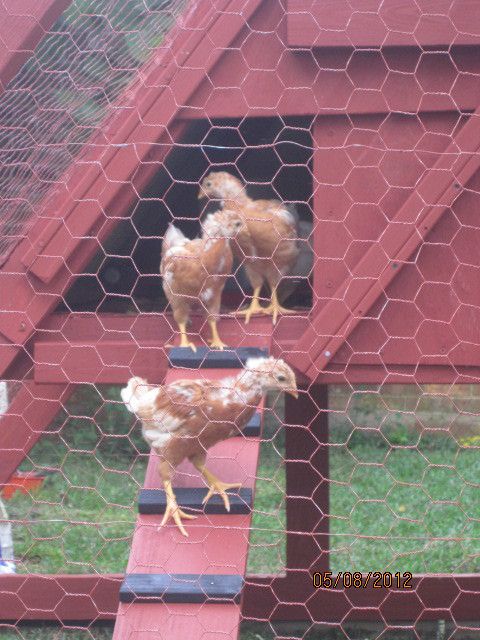
The bird entry door was made to be a simple 'slider' that moves on a roughly 30 degree slope via a paracord line and a single pulley mounted outside of the wire. The rails for the sliding door are made of treated 1x2's. I sanded the insides of the rails and then sealed them heavily in hopes of avoiding a future sticking issue. A short section of treated 2x4 was added to the door itself as a counterweight of sorts. Between the odd angle, the weight, and how the bottom of the door fits into a naturally formed groove in the materials, even should a marauding raccoon get past our Great Danes and through the chicken wire I doubt he'd have a heck of a lot of luck in getting into the house, (They are sneaky little devils, though...) You can just see the 2x4 counterweight on the sliding door in this photo. The girls were in the tractor for the first time and were trying to decide if the crazy looking machine was safe. I don't blame them!
The floor of the chicken house was made by dividing the floor with two 2x3s over which was laid a very heavy 'hog wire' salvaged from an old grape arbor. After the heavy wire was securely attached around the edges and to the cross members, a covering of half inch sand screen (hardware fabric) was tied to it using UV resistant zip ties. My beloved wife, Beth, performed this duty from underneath at great expense to herself in pain (blown lumbar disc) so that the locking nubs would all be facing down and away from the birds. The completed floor is surprisingly strong and holds my 240 pound weight without the slightest whimper. (You can see a portion of the wire floor through the bird door in the 1st photo in this post.) The screen floor in conjunction with the peak & ridge vents allows a very good flow of fresh air even with the bird door and the side access closed tight. I know. Had one of my sons seal me in the thing on our first 85+ degree, high humidity, afternoon. No problems! Of course, winter does come eventually and sometimes we even get a little freezing weather. That's where having the entire side open for cleaning has an added benefit. A cut-to-fit sheet of sealed plywood can be laid in over the wire effectively closing off all of that floor ventilation. Hooks were added to the 2x4 ridge inside the house to hold a protected heat lamp and the peak vent over the nest box end has an opening to allow the passing of an extension cord should the need arise for additional heating.
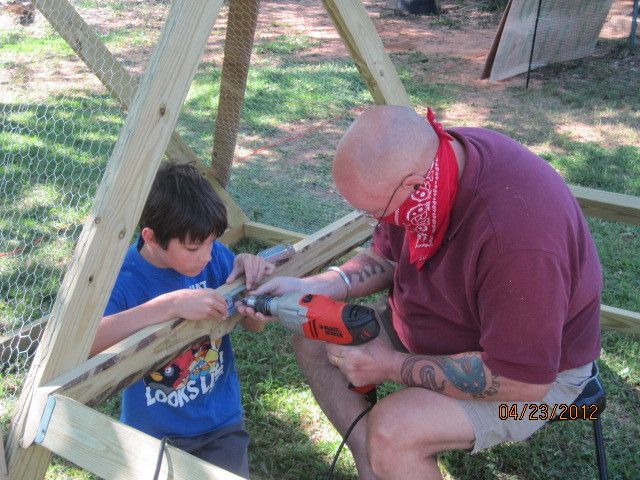
As a side note, building stuff like this is a great chance to get the kids away from the electronics and into the sunshine & fresh air. There is no way I could have done this without their help & at one time or the other all of them pitched in on the project. Below is a shot of one our fraternal twins, Anthony, lending a helping hand...or two.
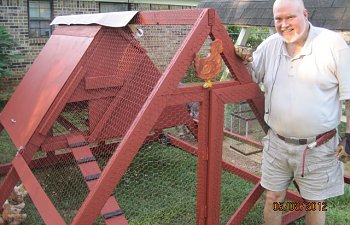
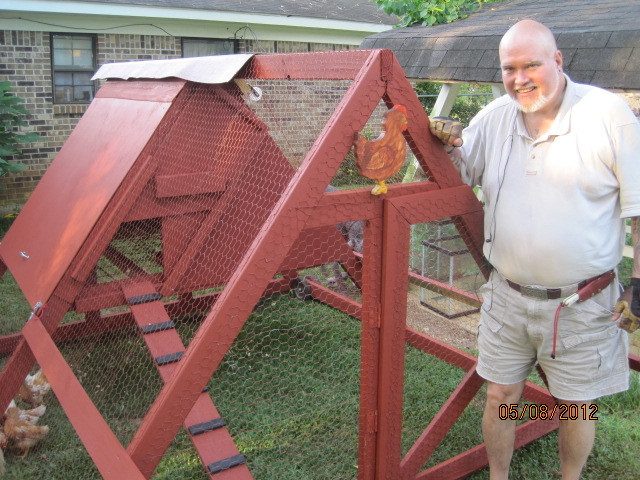
Two treated 1x4s add wire tacking points along both sides of the 'yard' portion of the tractor and extend 18 inches beyond. Tomorrow (as soon as I find my 1.5 inch spade bit) I'll drill through these near the ends and more than half way down to allow the pass-through of a section of pipe to act as a handle when the tractor needs to be moved. It can then be removed to allow access to the 'human door' on the end should we need to get into the yard portion. One half of the portion of the end, (Underneath the wooden chicken in the photo below), opens as a door and is latched with two hasps to increase strength and prevent dogs from 'nosing' their way into the yard. Nope, no locks. Locks are for honest people - my Great Dane guard dogs are for thieves (And take it from the last guy who tried to steal from my yard, boy, do they find thieves to be tasty! )
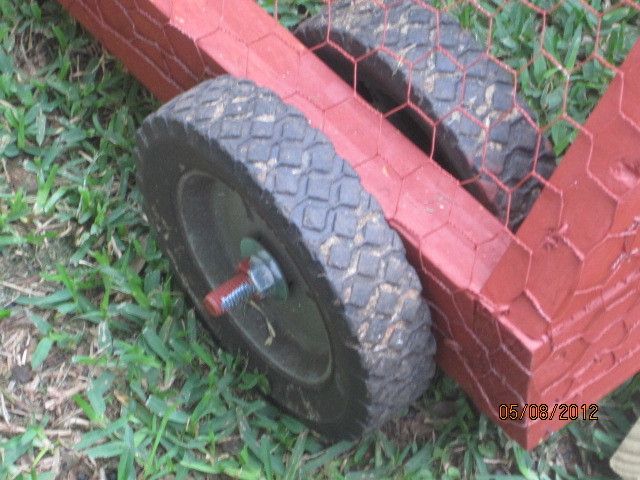
One issue I kept noticing in YouTube videos and in articles was that many folks have trouble with their seven and eight inch lawn mower wheels 'splaying out' when they move the tractor around the yard. Especially when making turns.I solved this issue by simply adding two more wheels. One on the inside of the base 2x4 and one on the outside. A half-inch diameter six-inch bolt acts as a common axle. (See photo) On my next trip to Lowes I'll pick up two more nuts to act as 'jam nuts' to prevent loosening, but so far the dab of paint has worked fine. Our back yard is anything but level. Holes, ruts, roots, you name it. My son and I rolled this tractor over every place it would fit and the wheels remained true. Sure, there are two more wheels to come up with, but if like me you have an old lawn mower you've been meaning to haul off then you're in great shape! Splaying problem solved.
*IF* there is any issue with my wheels, it is that I think that I set them to low thereby raising that end too high and possibly allowing for an escape - or an invasion by a house cat. The gap is currently almost three inches. I have two ideas on solving the issue: 1) I can drill another axle hole slightly behind and higher than the current one, lowering the frame, or 2) I can add a flexible material around the base on that end, (the handle end sits directly on the ground), sealing the gap and still allowing maneuvers over landscape obstacles like roots. For now I've tacked a thin board over the gap, but I'd appreciate your thoughts.
04/29/2013 NOTE: On another run to Lowe's I discovered the really cheap four-inch 'cove molding' at about $1.25/four foot length. I took a a pair of shears and cut it into one inch strips width-wise to within an inch of the top. This was then screwed over that gap between the lower rail and the ground using sheet rock screws and fender washers. Being the cheapest cove molding I could buy it is very flexible and the 1 in. wide 'fingers' fill in any gaps caused by uneven ground. After several months I can say our little problem is solved! No escapes, no invasions... and six eggs a day!
There is still work to be done. Some touch-up painting (red barn paint) where I've added things and the nest boxes I'm building are modular and must be set in though the braces are in place. (Yes, they are to be accessible from outside the coop.) Also to come are spring steel clamps for the pull handle to rest in when not in use, jam nuts for the axles, a gravity-fed watering system going both inside and out, and possibly a feeder as well, and perches in the yard section - both high & low and one under the coop so they can escape the sudden showers without climbing back inside. My daughters want white slats added to make it look more "barn like" and my oldest girl (an artist) is determined to paint a chicken themed mural on it somewhere.
Frankly, I'm more than pleased. First off, I'm no carpenter. I always tend to over-engineer things and may have here. It isn't nearly as heavy as it looks, though. One person will be able to move it freely once the crossbar handle is in place. My spine is wrecked (disabled Veteran), but I think I'd be able to move it alone if required. Secondly, none of us has any *real* experience with chickens. Exotic animals, yes. Cats & dogs, yes. Barnyard fowl? A great big NO! Of course we didn't have any experience with exotics when we opened our exotic animal rescue, either. That turned out alright & I suspect this will, too. Both are labors of love. Oh yeah! I should add that while many of our rescue animals are carnivores, like the python below, no chickens are being raised as snake food. Eggs for my wife's pet Savannah Monitor, yes. I don't eat meat much anymore and never was a huge fan of chicken to start with, but I *love* fresh eggs and.....
...so do my kids!
More photos of the details of our chicken tractor will be added after sunrise. Until then,
Thanks for reading!
Bull*
Then I tossed out most everything and struck out on my own.

I spent one of my innumerable sleepless nights drawing and as soon as Lowes opened I was in the door. The final design was to be of a triangular cross section eight feet wide, eight feet long, and some five and a half feet tall at the peak. From the ground up to approximately 2.5 feet the entire
One side of the coop was hinged near the top to allow full access for cleaning. In order to prevent blowing rain - and we have a lot of it - from entering through the peak & ridge vents, and the hinged upper portion of the side I added a six foot section of a rubber-type ridge cap extending beyond both ends. For further protection I drew from my Living History experience and prepared a strip of heavy weight, old fashioned pillow ticking which was painted on both sides, working the paint in thoroughly making it 'waterproof', yet flexible. This was then attached over the junction of the lifting side and the coop - hinges & all. It blended right in with the rest and is hardly noticeable. Best of all - it works! This opening side has two latches holding it shut tight.
The bird entry door was made to be a simple 'slider' that moves on a roughly 30 degree slope via a paracord line and a single pulley mounted outside of the wire. The rails for the sliding door are made of treated 1x2's. I sanded the insides of the rails and then sealed them heavily in hopes of avoiding a future sticking issue. A short section of treated 2x4 was added to the door itself as a counterweight of sorts. Between the odd angle, the weight, and how the bottom of the door fits into a naturally formed groove in the materials, even should a marauding raccoon get past our Great Danes and through the chicken wire I doubt he'd have a heck of a lot of luck in getting into the house, (They are sneaky little devils, though...) You can just see the 2x4 counterweight on the sliding door in this photo. The girls were in the tractor for the first time and were trying to decide if the crazy looking machine was safe. I don't blame them!
The floor of the chicken house was made by dividing the floor with two 2x3s over which was laid a very heavy 'hog wire' salvaged from an old grape arbor. After the heavy wire was securely attached around the edges and to the cross members, a covering of half inch sand screen (hardware fabric) was tied to it using UV resistant zip ties. My beloved wife, Beth, performed this duty from underneath at great expense to herself in pain (blown lumbar disc) so that the locking nubs would all be facing down and away from the birds. The completed floor is surprisingly strong and holds my 240 pound weight without the slightest whimper. (You can see a portion of the wire floor through the bird door in the 1st photo in this post.) The screen floor in conjunction with the peak & ridge vents allows a very good flow of fresh air even with the bird door and the side access closed tight. I know. Had one of my sons seal me in the thing on our first 85+ degree, high humidity, afternoon. No problems! Of course, winter does come eventually and sometimes we even get a little freezing weather. That's where having the entire side open for cleaning has an added benefit. A cut-to-fit sheet of sealed plywood can be laid in over the wire effectively closing off all of that floor ventilation. Hooks were added to the 2x4 ridge inside the house to hold a protected heat lamp and the peak vent over the nest box end has an opening to allow the passing of an extension cord should the need arise for additional heating.
As a side note, building stuff like this is a great chance to get the kids away from the electronics and into the sunshine & fresh air. There is no way I could have done this without their help & at one time or the other all of them pitched in on the project. Below is a shot of one our fraternal twins, Anthony, lending a helping hand...or two.
Two treated 1x4s add wire tacking points along both sides of the 'yard' portion of the tractor and extend 18 inches beyond. Tomorrow (as soon as I find my 1.5 inch spade bit) I'll drill through these near the ends and more than half way down to allow the pass-through of a section of pipe to act as a handle when the tractor needs to be moved. It can then be removed to allow access to the 'human door' on the end should we need to get into the yard portion. One half of the portion of the end, (Underneath the wooden chicken in the photo below), opens as a door and is latched with two hasps to increase strength and prevent dogs from 'nosing' their way into the yard. Nope, no locks. Locks are for honest people - my Great Dane guard dogs are for thieves (And take it from the last guy who tried to steal from my yard, boy, do they find thieves to be tasty! )
One issue I kept noticing in YouTube videos and in articles was that many folks have trouble with their seven and eight inch lawn mower wheels 'splaying out' when they move the tractor around the yard. Especially when making turns.I solved this issue by simply adding two more wheels. One on the inside of the base 2x4 and one on the outside. A half-inch diameter six-inch bolt acts as a common axle. (See photo) On my next trip to Lowes I'll pick up two more nuts to act as 'jam nuts' to prevent loosening, but so far the dab of paint has worked fine. Our back yard is anything but level. Holes, ruts, roots, you name it. My son and I rolled this tractor over every place it would fit and the wheels remained true. Sure, there are two more wheels to come up with, but if like me you have an old lawn mower you've been meaning to haul off then you're in great shape! Splaying problem solved.

04/29/2013 NOTE: On another run to Lowe's I discovered the really cheap four-inch 'cove molding' at about $1.25/four foot length. I took a a pair of shears and cut it into one inch strips width-wise to within an inch of the top. This was then screwed over that gap between the lower rail and the ground using sheet rock screws and fender washers. Being the cheapest cove molding I could buy it is very flexible and the 1 in. wide 'fingers' fill in any gaps caused by uneven ground. After several months I can say our little problem is solved! No escapes, no invasions... and six eggs a day!
There is still work to be done. Some touch-up painting (red barn paint) where I've added things and the nest boxes I'm building are modular and must be set in though the braces are in place. (Yes, they are to be accessible from outside the coop.) Also to come are spring steel clamps for the pull handle to rest in when not in use, jam nuts for the axles, a gravity-fed watering system going both inside and out, and possibly a feeder as well, and perches in the yard section - both high & low and one under the coop so they can escape the sudden showers without climbing back inside. My daughters want white slats added to make it look more "barn like" and my oldest girl (an artist) is determined to paint a chicken themed mural on it somewhere.
Frankly, I'm more than pleased. First off, I'm no carpenter. I always tend to over-engineer things and may have here. It isn't nearly as heavy as it looks, though. One person will be able to move it freely once the crossbar handle is in place. My spine is wrecked (disabled Veteran), but I think I'd be able to move it alone if required. Secondly, none of us has any *real* experience with chickens. Exotic animals, yes. Cats & dogs, yes. Barnyard fowl? A great big NO! Of course we didn't have any experience with exotics when we opened our exotic animal rescue, either. That turned out alright & I suspect this will, too. Both are labors of love. Oh yeah! I should add that while many of our rescue animals are carnivores, like the python below, no chickens are being raised as snake food. Eggs for my wife's pet Savannah Monitor, yes. I don't eat meat much anymore and never was a huge fan of chicken to start with, but I *love* fresh eggs and.....


...so do my kids!

More photos of the details of our chicken tractor will be added after sunrise. Until then,
Thanks for reading!
Bull*