So my main goals for this coop were:
cheap, let me use deep litter method, easy to clean, light-weight so I can move it if needed, and give me more space so I can expand my flock.
I shopped around on Craigslist and got some free pallets, two of which were incredibly heavy, so I set them aside for another project.
DAY 1:
One of the pallets was set up well to be the front and I removed sections to make the entrance to the coop (one on right)
I also had one that already looked ready to add on nest boxes (one on left)
The middle pallet would be my base, I removed a bunch of the slats to further reduce the weight. The bottom pallet was 44"x44"
The 2 for the front and back were 48'X36 (front) and 48"x30 (back)
So my top pieces are longer than the base! more on that in a bit...
Here is the base stripped down and on concrete blocks. I decided to use a plywood base over the pallet and I cut it 52"X44" so it would make the base pair up with my front and back pieces. Going to Lowes I spent ~$120 on plywood, bead board, 2"x1" pine furring strips, hardware cloth, hinges, a linoleum piece and galvanized screws and nails
I used some of the hardware cloth at the top of the front for lots of ventilation and cut the bead board for the entrance. I nailed the plywood base to the pallet and then used a staple gun to attach the linoleum to the base prior to attaching the front and back.
You can see here how the plywood overhangs the pallet, I made the overhang match up with the front on one side and the extra overhang on the other side. The left side will be the side I have hinged for clean out and access.
here it is with front and back attached over the linoleum. The side piece is there for ref but is not attached.
****Side note here.****
I should have cut the plywood base even bigger (52" by 56") to give myself a base for the nest boxes, instead I now need to build the entire box. I kept one of the base boards on the pallet to be the front of the nest box and to keep the eggs in.
I used the 1"x2" strips to create the base for the nest boxes, I decided to use the planks I pulled from the pallets across the strips. Getting dark so I had to pack up for the day
Day 2:
Here is the nest box partially framed out. Had to make another trip to Lowes to get another sheet of beadboard ($18) and some shorter screws
to prevent water entering nest boxes at the hinge of the nest boxes, the roof will overhang the hinged area. (update)I have had no problems with the nest boxes getting wet.
Side note
Chickens kept me company the whole time and even the circular saw did not scare them away. They were busy digging chicken holes in the pine straw and I had to shoo them out of the coop while I was working on it.
Finished nest boxes! Next up frame roof and add sides!
DAY 3:
got the angles set up for the roof with a 8 degree angle. the plywood here is just checking that I got the measurement. This coop will have a ton of ventilation. In the Hampton roads area we don't get very cold often.
more ventilation on the sides and support for side/door in.
Random pics of the chickens digging chicken holes in the pine straw, which keeps my lawn nice because they spend 90% of their time in the pine straw.
First side on with cutout for door...and I am out of time for the day as my girls wake up from nap time!
DAY 4:
I hate doors, I intensely dislike hinges and trying to get doors level. I would pay $200.00 for some one else to make and hang a door for me!!!!!
so with that said, and some blood and cursing later....
door, latch and hinges somewhat installed grrrrr......
(update) the door still does not quite shut quite right, but it works.
nesting bars installed and screwed down, old 2X2's from deck install. I took 2 2x2's and placed them together so a total of 4 used.
both sides on, still need to attach roof, and shingle it (leftovers from house). had to make another trip to lowes for a bigger piece of plywood for roof. So my total for the coop is ~$180.00. also debating a automatic door which will def increase the cost (however might be worth the extra sleep!!)
DAY 5-8 only been able to work on it for an hour or 2 at a time
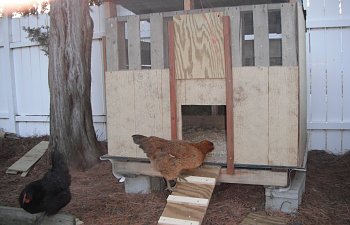
See all construction mess! roof on, shingled, used more 2X2's from deck and my router to make runners and used plywood for the door. I used scratch to lure the chickens in, however I ended having to carry all into the coop since they tried roosting on the old coop vice using the new coop.
Astrolorps were very determined to not lay eggs in new coop once I closed up the old coop. they spent 2 hours desperately trying to break into the old coop before giving in and laying in the new coop!!
Using scratch to lure them to the new coop.
Basically done, just need to paint...that will be interesting because my 4 and 5 yo want to help. Will wait till it warms up a bit to paint it. (Feb 2013)
I opted not to have a run for a couple of reasons...
The chickens love the pine straw that is 20% of my yard
we have a large deck they love to go under for shelter and bugs
the deck and the trees provide good shelter from predators
we have six foot fences and understanding neighbors
(when one of the Astrolorps got into the neighbors yard, he filmed as his wife chased said chicken all over the yard, he said his journalistic integrity prevented him from helping. when they let me know about it he fell on the ground laughing when I called the chicken, and the chicken ran up and sat on my feet to get picked up!)