This Coop project started as a passing discussion with my wife and in hopes of swaying her to allow us to raise chickens. Of course I had to promise the chickens were egglayers and not for the table. I always had this idea in the back of my mind to resurrect something that we had done many years ago on a much smaller scale. We had owned few chickens in the past when our sons were preteens and our daughter a toddler. As parents, we wanted our children exposed to the responsibilities of learning to care and raise animals in order to connect with nature and give them a better understanding of our environment besides staring into the abyss. I recall when I was 7 and 8 years old I had a rabbit, a few pigeons, and a cockrell. My grandfather who had immigrated from Italy, believed in the common practice of his era that animals were raised in their backyard for food and not as pets. To my despair all of my pets ended up on the table. I eventually overcame the trauma and learned that food does not come in boxes or wrapped in neatly plastics containers. It was a difficult lesson to understand at that tender age, but we persevere and learn much from our experiences.
Once the decision was made and of course with my wife's concurrence, I carefully looked over our property and found an area to build the coop. It was decided that our tool shed, having been built in a ideal location that already had a compound housing tortoises, would make an excellent addition; a nice structure for a lean-to hen house. I developed a plan in my mind and sketched it roughly on paper. It wasn't a fancy CAD design, but simply scratched out on a piece of paper so I had something to go by and come up with a list for building material. The plan had to include a very strong concrete foundation to discourage our nasty Formosan ground termite problems and possibly high winds. The design required a 10 x 4 feet base built up with rebar reinforced concrete footing (8 bags of 80 lbs quickrete), and (13) 4 x 8 x 16, (4) 8 x 8 x 8 hollow tiles filed with concrete (it's not going anywhere). The inside area would consist of a dirt floor covered with 1/2" welded wire. I introduced earthworms to the built-up composted soil before applying welded wire. The thought and purpose of adding worms is to breakdown the waste and other organic material, reduce smells, and the welded-wire was to keep the chickens from consuming the hardworking composting worms.

Rough plans that were drawn. It helped me formulate what I needed to do so I
can minimize my errors.
The center section was dug out and replaced with composted
rich soil.
I had to buy a few 4x4x8 corner supports, 2x6 rafters and ledger, 2x4 rafters and sill, 2x3 purlins, 1x3s, and 1x2s, 4 polycarbonate corregated roofing sheets and associated horizontal closure plastic strips, 7 anchor bolts for the sill, various sizes of stainless steel fasteners and washers, rust proof nickel staples, 6 joist hangers, 4 lag bolts, . Additionally, I purchased a 5/8" sheet of non-treated plywood to construct the nesting boxes. The nesting box design was gathered from researching the internet (the website is noted below). The rest of the lumber was recycled material obtained from a community playground project that I provided oversight in its reconstruction. There was a large gazebo which was also being refurbished. The retrieved timber was 2x3x10 weathered cedar. The contractor had removed the10 feet railing sections and he was going to dispose the material at the local landfill.
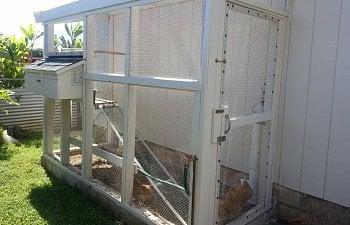
Corrugated Polycarbonate Roof provides for lots of sun
and moon light.
Open to the balmy tropical climate.
Ramp is made with 3/4" PVC pipe and coated 1/2" welded-wire.
Used plastic ties to secure welded-wire. Star fruit perch above the
nesting boxes and a cedar board below. The hens graduated
to the top perch as they matured.
Added this folding 1x2 screen for wind protection and to give the
hens a sense of security when they roost on the top perch.
I may build a screen for the below section.
Folding 1x2 screen can be opened and secured to the tool shed.
Nesting box, outside view.
Nesting box inside view.
Drew this out on paper using the plans as noted above. I transferred the dimensions
on to the plywood.
Coop Door. Waterline and spigot extended to the corner
in order to attach automatic waterer.
Barely make out the water pressure valve and nipples.
The 4" PVC automatic feeder
Latches to secure the door. I wouldn't want my BOs to be
kidnapped by a chicken knapper.
Lots of room for the birds to forage and chase each other.
Enclosed by CMU walls.
Chainlink fence reinforced with corrugated sheetmetal.
Living in harmony.
Once the decision was made and of course with my wife's concurrence, I carefully looked over our property and found an area to build the coop. It was decided that our tool shed, having been built in a ideal location that already had a compound housing tortoises, would make an excellent addition; a nice structure for a lean-to hen house. I developed a plan in my mind and sketched it roughly on paper. It wasn't a fancy CAD design, but simply scratched out on a piece of paper so I had something to go by and come up with a list for building material. The plan had to include a very strong concrete foundation to discourage our nasty Formosan ground termite problems and possibly high winds. The design required a 10 x 4 feet base built up with rebar reinforced concrete footing (8 bags of 80 lbs quickrete), and (13) 4 x 8 x 16, (4) 8 x 8 x 8 hollow tiles filed with concrete (it's not going anywhere). The inside area would consist of a dirt floor covered with 1/2" welded wire. I introduced earthworms to the built-up composted soil before applying welded wire. The thought and purpose of adding worms is to breakdown the waste and other organic material, reduce smells, and the welded-wire was to keep the chickens from consuming the hardworking composting worms.
Rough plans that were drawn. It helped me formulate what I needed to do so I
can minimize my errors.
The center section was dug out and replaced with composted
rich soil.
I had to buy a few 4x4x8 corner supports, 2x6 rafters and ledger, 2x4 rafters and sill, 2x3 purlins, 1x3s, and 1x2s, 4 polycarbonate corregated roofing sheets and associated horizontal closure plastic strips, 7 anchor bolts for the sill, various sizes of stainless steel fasteners and washers, rust proof nickel staples, 6 joist hangers, 4 lag bolts, . Additionally, I purchased a 5/8" sheet of non-treated plywood to construct the nesting boxes. The nesting box design was gathered from researching the internet (the website is noted below). The rest of the lumber was recycled material obtained from a community playground project that I provided oversight in its reconstruction. There was a large gazebo which was also being refurbished. The retrieved timber was 2x3x10 weathered cedar. The contractor had removed the10 feet railing sections and he was going to dispose the material at the local landfill.
Corrugated Polycarbonate Roof provides for lots of sun
and moon light.
Open to the balmy tropical climate.
Ramp is made with 3/4" PVC pipe and coated 1/2" welded-wire.
Used plastic ties to secure welded-wire. Star fruit perch above the
nesting boxes and a cedar board below. The hens graduated
to the top perch as they matured.
Added this folding 1x2 screen for wind protection and to give the
hens a sense of security when they roost on the top perch.
I may build a screen for the below section.
Folding 1x2 screen can be opened and secured to the tool shed.
Nesting box, outside view.
Nesting box inside view.
Drew this out on paper using the plans as noted above. I transferred the dimensions
on to the plywood.
Coop Door. Waterline and spigot extended to the corner
in order to attach automatic waterer.
Barely make out the water pressure valve and nipples.
The 4" PVC automatic feeder
Latches to secure the door. I wouldn't want my BOs to be
kidnapped by a chicken knapper.
Lots of room for the birds to forage and chase each other.
Enclosed by CMU walls.
Chainlink fence reinforced with corrugated sheetmetal.
Living in harmony.