I had been kicking around the idea of raising my own chickens to have fresh yummy eggs on hand all the time and I decided that this year was going to be the year. well after we finally thawed out from our winter for the ages here in SE Michigan, I finally got myself some chicks and I was keeping them in an old horse water tank that had been kicked and had a crack in it that leaked, but it worked well enough to keep chicks in it. However it soon became apparent that I needed to get something of a coop together to keep my six girls in as they quickly grew and it started to get crowded in the tank. So, after doing some research, I decided to build me a chicken tractor to keep my girls in all happy.

It all starts with the base right? I had 3 eight foot lengths of decking floating around up in the rafters of our horse barn, so I had to make a run over to the lumber yard to get one more 8 footer so that I would have four pieces of decking to make a square. After carefully lining the decking up to be square, and by measuring corner to corner, I used mending plates to join the decking together to be my base. I know its treated wood, but its also going to be the part of the coop that's always touching the ground and grass.
I used an old pallet to make a jig for the rafters, figured it would be the easiest way to make sure that I had all of my rafters turn out the same way. in retrospect I kind of wish that I had nailed a few pallets together to build a bigger jig, would have made it a little more fool proof if you ask me.
I wanted to go with bit of an A frame for the tractor, but I also wanted to be able to stand up when I'm inside of the coop, while using just 8 foot studs to keep cost down. So I decided to go with bit of a spacer there to help raise up the overall coop height without needing longer 2x4's. That actually turned out to be a very great idea later on as I got to working on this and Mom suggested that I put some tin siding that we also had up in the barn rafters on top of it so that I would have something to keep rain off of the girls while also giving them shade. The spacers there in the middle were 34" inches, and the metal siding is 38 inches, so I was able to just use a full sheet of it later on to cover it all.
After I got the rafters together, I sat them upright and used my handy carpenter's angle to mark the notch line so that they would sit flat on the decking.
Making the cut.....
And the rafters sitting flat on the ground, or at least leaning up against the garage door.
I used some rafter clips to attach the rafters to the decking. I had some that were for 2x6 or 2x8's. Mine didn't have holes to attach the screws exactly where I needed them, so I did have to drill a few extra holes in them to make things work.
Mark out where the rafters are going to go, space them out evenly. I'll also mention that here was when I kind of realized that one of my boards was a little shorter than the other one. Just something you might want to keep in mind when you're getting started.
Attach the clips to the decking.
And then the rafters to the clips. You might want a little help here in keeping the rafters upright, would also recommend having a level to help keep the rafters straight upright.
And after you got all the rafters in, you can add a side support board to help keep them all square. Keep that level handy as you screw that 2x4 to the rafters. Also, something I would have chanced about mine here is that I probably would have lowered this board down to where its only about 32 inches from the decking along the rafters. 3 food wide hardware cloth is a lot cheaper, and a little easier to find than 4 foot wide half inch hardware cloth.
I probably could have gotten away with using 2x2's, that would save a lot of weight. but it might have been hard to find clips that would have worked. I'm a big guy so I wasn't too worried about having to pull this by myself, at least at the start of the project anyways.
I used a longer decking clip and bent it to help support the 4 corners more. I figure that's where a lot of the stress is going to be at. I also added a 2x4 across the bottom of the front there to help support the door, and I figured that much of a lip will help keep chickens in when I'm going in and out of the run. Its worked so far.
2x4's for the door, remember to keep everything square.
And on the back of the 2x4's I tacked on a 1x3 that I had reclaimed from a bed spring. trying to keep some of my costs down. It acts as a door stop, along with giving less of a gap for something like a weasel to sneak in.
After getting some measurements from my 2x4 door opening, I had what I needed to make the door. Do remember that you don't want to make the door too snug, as you don't want to fight with opening it too much. I used two ratcheting straps to hold the door all together, and then put it together with mending plates. They are awesome to use when you want to keep something flush.
Here's a shot of the assembled door right before I finished all of the wiring to the run. You're life will be easier if you wait until that's done before installing hardware for the door.
I put another 2x4 along the sides here, might not have really needed them, especially after I added the tin.
I hadn't really planned on going with the tin for the roof when I started this, but I soon realized that it would be a good sun shade along with helping to keep the coop held together. I have plenty of tin just hanging up in the rafters of the barn that was never used for the barn, so why not use it?? I just had to take the Sawzall to the notches so that the tin would be able to sit flat when I installed it.
Now I'm getting started on the rough carpentry for the nesting box area. a 2x4 and some mending plates to attach it inside of a rafter.
And then I cut an OSB board here and tacked it on to be the wall facing the inside of the run. Save what you cut...
I had a half inch thick board, but if you're worried about weight, you could easily go thinner.
Another 2x4 installed with mending plates in between the outer rafter.
Remember the pieces you cut from the board??? They go perfectly here...
And here. it left me a good space to put an access door along that outer wall.
Cut some more OSB here and use some 2x2 at the bottom of the piece to make it roughly even with the bottom of the 2x4's. I had planned on using some vinyl covered hardware cloth I had to use that for the floor of the coop, and I wanted to make sure I had something to staple it to while making sure it stayed flat.
For some reason I didn't take a picture with the 2x2 piece in there, but it would be in there along the inside edge of the bottom.
Also used some 2x2's to frame the middle access door.
Then I went and stapled on the vinyl coated hardware cloth to the floor. I used a lot of staples, but it should allow me to not have to worry much about having to clean the floor of the nesting box much.
one of the black sex links to test it out a little.
Yeah, attaching the regular half inch hardware cloth to the bottom of the run. Here I used the 4 foot wide roll of 25 feet. Its a little hard to see in the picture, but the top of it runs up to the top of the first 2x4, and I wrapped the bottom of it under the decking boards. I think it makes it pretty impossible for any critter short of a bear to be able to rip out the staples to get in, but I do think it causes more resistance to dragging. I might try to remove the stuff on the bottom of the decking, or just figure out a way to install some lifting wheels. kinda leaning more towards the wheels, but gotta see where the budget is at.
Hmmm..... somewhere around in here I would have attached some old gate hinges I found floating around in the garage from some doors we removed from the barn after we opted to switch one doorway over to a rollup door. that was a lot simpler thing to do there. Anyways, I bolted the hinges on, and then ran a rope thru them so that I would have a good anchor point so that I can pull it around or even tow it with whatever. I'll get some pictures of it later and add them.
And right about here there was a slight moment of panic about whither or not I could actually slide this tractor right out of the garage door. I realized then I should figure that out before I got much further. Plus I was itching to get the girls out in the run as their water tub brooder was getting too small for them, and they was starting to get big enough to escape the portable puppy pen I had them out in during the day when it was nice and I was home. So I dragged it out into the yard to finish putting the wiring on.
For the rest of the hardwire cloth, I used 3 foot wide stuff. Its cheaper, and width ways it worked out better that way than trying to use 4 foot wide stuff. That was pretty hard to find and expensive to boot.
On the front here next to the door here I used up the last of the 4 foot wide hardware cloth. With both of the bottom sides being 8 foot and the roll only being 25 feet, I had one piece of it left over that was big enough that I could use it for both pieces I needed. I probably could have done the same with the 3 foot stuff, but it might not have been so neat.
Installing the door, not sure why I didn't get a shot of the hinges, and I've since swapped that latch over to a gate latch. Remember to take more photos.
In with the packaging of hardware cloth, they use a strand of wire to wrap around the roll to keep it all nicely rolled together. I used that to thread together the two upper pieces of hardwire cloth as it wasn't possible to have them meet over a 2x4 like the top of the bottom one did. I rolled the edge of the top hardware cloth over the top of the run here.
And then I added the tin to the top.
I moved the girls in right away and they liked it. used the barrel to give them a place where they can get in out of the rain. just tossed either some dry grass or some hay in it and its cozy for them, and the barrel will roll right along as I pull the tractor along.
They were all so happy to be in the run, and I left a saw horse in there for them to use as a roost for a bit
I've added some branches in there as well a little higher up, and I think I'm going to change things around so that they could have that 1x3 there flat. It was just easier to put it up that way for now.
There's a branch going along the bottom of the picture there, and I do have a piece of 2x2 there sticking out from the OSB as well to give them a spot to hop back and forth on to get up. They've made it work for them.
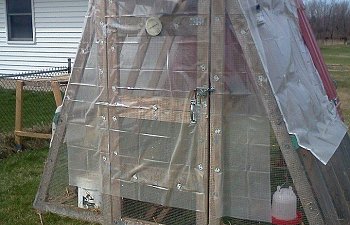
Haven't really shown off the finished build here.
Shower curtains on the sides to block the wind, Very useful for the winter.
Back in September last year I had a hawk attack, where the raptor had swooped in and actually had the chicken inside the tractor as I had just popped the whole door open for the girls to go in and out into their mobile pen I had set up. Had I just popped out to go to work maybe another minute or so earlier he might have not stuck. Anyways, I turned the door into a Dutch door by cutting it in half. I think I had kinda kicked around the idea of doing that in the beginning, but opted not to because it was easier and I needed to get the coop built.
Grain bag stapled to the back of the top door's bottom edge. Found it also worked great in keeping out sparrows from getting into the coop and food in it. Just made it a pain to open the top door and then trying to close it. Might try something else with it this summer.
During the first winter I parked the coop and put bedding in it, and a heated waterer in it. However its not really something you can hang. setting near the floor of the coop just ended up getting straw all in it. So I took a pallet and turned it into a table to set up the waterer on that, along with the feeder and flock block. Worked out pretty well, even though I could barely get that table in the door of the coop.
Last spring I was getting a single chicken that I wanted to keep in isolation so the table ended up becoming that. This winter I opted to just hang another pallet up on chains to be a swinging table. it worked OK, but I ended up having to set a couple of pans to catch water from getting splashed all over the coop.
I ended up putting some bungee cords on it, to help keep it from swinging so badly. really needed about another two in the back, but it was kinda hard to get in there to do that, so I didn't do it.
It all starts with the base right? I had 3 eight foot lengths of decking floating around up in the rafters of our horse barn, so I had to make a run over to the lumber yard to get one more 8 footer so that I would have four pieces of decking to make a square. After carefully lining the decking up to be square, and by measuring corner to corner, I used mending plates to join the decking together to be my base. I know its treated wood, but its also going to be the part of the coop that's always touching the ground and grass.
I used an old pallet to make a jig for the rafters, figured it would be the easiest way to make sure that I had all of my rafters turn out the same way. in retrospect I kind of wish that I had nailed a few pallets together to build a bigger jig, would have made it a little more fool proof if you ask me.
I wanted to go with bit of an A frame for the tractor, but I also wanted to be able to stand up when I'm inside of the coop, while using just 8 foot studs to keep cost down. So I decided to go with bit of a spacer there to help raise up the overall coop height without needing longer 2x4's. That actually turned out to be a very great idea later on as I got to working on this and Mom suggested that I put some tin siding that we also had up in the barn rafters on top of it so that I would have something to keep rain off of the girls while also giving them shade. The spacers there in the middle were 34" inches, and the metal siding is 38 inches, so I was able to just use a full sheet of it later on to cover it all.
After I got the rafters together, I sat them upright and used my handy carpenter's angle to mark the notch line so that they would sit flat on the decking.
Making the cut.....
And the rafters sitting flat on the ground, or at least leaning up against the garage door.
I used some rafter clips to attach the rafters to the decking. I had some that were for 2x6 or 2x8's. Mine didn't have holes to attach the screws exactly where I needed them, so I did have to drill a few extra holes in them to make things work.
Mark out where the rafters are going to go, space them out evenly. I'll also mention that here was when I kind of realized that one of my boards was a little shorter than the other one. Just something you might want to keep in mind when you're getting started.
Attach the clips to the decking.
And then the rafters to the clips. You might want a little help here in keeping the rafters upright, would also recommend having a level to help keep the rafters straight upright.
And after you got all the rafters in, you can add a side support board to help keep them all square. Keep that level handy as you screw that 2x4 to the rafters. Also, something I would have chanced about mine here is that I probably would have lowered this board down to where its only about 32 inches from the decking along the rafters. 3 food wide hardware cloth is a lot cheaper, and a little easier to find than 4 foot wide half inch hardware cloth.
I probably could have gotten away with using 2x2's, that would save a lot of weight. but it might have been hard to find clips that would have worked. I'm a big guy so I wasn't too worried about having to pull this by myself, at least at the start of the project anyways.
I used a longer decking clip and bent it to help support the 4 corners more. I figure that's where a lot of the stress is going to be at. I also added a 2x4 across the bottom of the front there to help support the door, and I figured that much of a lip will help keep chickens in when I'm going in and out of the run. Its worked so far.
2x4's for the door, remember to keep everything square.
And on the back of the 2x4's I tacked on a 1x3 that I had reclaimed from a bed spring. trying to keep some of my costs down. It acts as a door stop, along with giving less of a gap for something like a weasel to sneak in.
After getting some measurements from my 2x4 door opening, I had what I needed to make the door. Do remember that you don't want to make the door too snug, as you don't want to fight with opening it too much. I used two ratcheting straps to hold the door all together, and then put it together with mending plates. They are awesome to use when you want to keep something flush.
Here's a shot of the assembled door right before I finished all of the wiring to the run. You're life will be easier if you wait until that's done before installing hardware for the door.
I put another 2x4 along the sides here, might not have really needed them, especially after I added the tin.
I hadn't really planned on going with the tin for the roof when I started this, but I soon realized that it would be a good sun shade along with helping to keep the coop held together. I have plenty of tin just hanging up in the rafters of the barn that was never used for the barn, so why not use it?? I just had to take the Sawzall to the notches so that the tin would be able to sit flat when I installed it.
Now I'm getting started on the rough carpentry for the nesting box area. a 2x4 and some mending plates to attach it inside of a rafter.
And then I cut an OSB board here and tacked it on to be the wall facing the inside of the run. Save what you cut...
I had a half inch thick board, but if you're worried about weight, you could easily go thinner.
Another 2x4 installed with mending plates in between the outer rafter.
Remember the pieces you cut from the board??? They go perfectly here...
And here. it left me a good space to put an access door along that outer wall.
Cut some more OSB here and use some 2x2 at the bottom of the piece to make it roughly even with the bottom of the 2x4's. I had planned on using some vinyl covered hardware cloth I had to use that for the floor of the coop, and I wanted to make sure I had something to staple it to while making sure it stayed flat.
For some reason I didn't take a picture with the 2x2 piece in there, but it would be in there along the inside edge of the bottom.
Also used some 2x2's to frame the middle access door.
Then I went and stapled on the vinyl coated hardware cloth to the floor. I used a lot of staples, but it should allow me to not have to worry much about having to clean the floor of the nesting box much.
one of the black sex links to test it out a little.
Yeah, attaching the regular half inch hardware cloth to the bottom of the run. Here I used the 4 foot wide roll of 25 feet. Its a little hard to see in the picture, but the top of it runs up to the top of the first 2x4, and I wrapped the bottom of it under the decking boards. I think it makes it pretty impossible for any critter short of a bear to be able to rip out the staples to get in, but I do think it causes more resistance to dragging. I might try to remove the stuff on the bottom of the decking, or just figure out a way to install some lifting wheels. kinda leaning more towards the wheels, but gotta see where the budget is at.
Hmmm..... somewhere around in here I would have attached some old gate hinges I found floating around in the garage from some doors we removed from the barn after we opted to switch one doorway over to a rollup door. that was a lot simpler thing to do there. Anyways, I bolted the hinges on, and then ran a rope thru them so that I would have a good anchor point so that I can pull it around or even tow it with whatever. I'll get some pictures of it later and add them.
And right about here there was a slight moment of panic about whither or not I could actually slide this tractor right out of the garage door. I realized then I should figure that out before I got much further. Plus I was itching to get the girls out in the run as their water tub brooder was getting too small for them, and they was starting to get big enough to escape the portable puppy pen I had them out in during the day when it was nice and I was home. So I dragged it out into the yard to finish putting the wiring on.
For the rest of the hardwire cloth, I used 3 foot wide stuff. Its cheaper, and width ways it worked out better that way than trying to use 4 foot wide stuff. That was pretty hard to find and expensive to boot.
On the front here next to the door here I used up the last of the 4 foot wide hardware cloth. With both of the bottom sides being 8 foot and the roll only being 25 feet, I had one piece of it left over that was big enough that I could use it for both pieces I needed. I probably could have done the same with the 3 foot stuff, but it might not have been so neat.
Installing the door, not sure why I didn't get a shot of the hinges, and I've since swapped that latch over to a gate latch. Remember to take more photos.
In with the packaging of hardware cloth, they use a strand of wire to wrap around the roll to keep it all nicely rolled together. I used that to thread together the two upper pieces of hardwire cloth as it wasn't possible to have them meet over a 2x4 like the top of the bottom one did. I rolled the edge of the top hardware cloth over the top of the run here.
And then I added the tin to the top.
I moved the girls in right away and they liked it. used the barrel to give them a place where they can get in out of the rain. just tossed either some dry grass or some hay in it and its cozy for them, and the barrel will roll right along as I pull the tractor along.
They were all so happy to be in the run, and I left a saw horse in there for them to use as a roost for a bit
I've added some branches in there as well a little higher up, and I think I'm going to change things around so that they could have that 1x3 there flat. It was just easier to put it up that way for now.
There's a branch going along the bottom of the picture there, and I do have a piece of 2x2 there sticking out from the OSB as well to give them a spot to hop back and forth on to get up. They've made it work for them.
Haven't really shown off the finished build here.
Shower curtains on the sides to block the wind, Very useful for the winter.
Back in September last year I had a hawk attack, where the raptor had swooped in and actually had the chicken inside the tractor as I had just popped the whole door open for the girls to go in and out into their mobile pen I had set up. Had I just popped out to go to work maybe another minute or so earlier he might have not stuck. Anyways, I turned the door into a Dutch door by cutting it in half. I think I had kinda kicked around the idea of doing that in the beginning, but opted not to because it was easier and I needed to get the coop built.
Grain bag stapled to the back of the top door's bottom edge. Found it also worked great in keeping out sparrows from getting into the coop and food in it. Just made it a pain to open the top door and then trying to close it. Might try something else with it this summer.
During the first winter I parked the coop and put bedding in it, and a heated waterer in it. However its not really something you can hang. setting near the floor of the coop just ended up getting straw all in it. So I took a pallet and turned it into a table to set up the waterer on that, along with the feeder and flock block. Worked out pretty well, even though I could barely get that table in the door of the coop.
Last spring I was getting a single chicken that I wanted to keep in isolation so the table ended up becoming that. This winter I opted to just hang another pallet up on chains to be a swinging table. it worked OK, but I ended up having to set a couple of pans to catch water from getting splashed all over the coop.
I ended up putting some bungee cords on it, to help keep it from swinging so badly. really needed about another two in the back, but it was kinda hard to get in there to do that, so I didn't do it.