My husband is going to collaborate with this article since he's the one who built it. All I did was show him pictures of coops I liked and tell him how big, how many, what and where when he asked. I'll include a materials price list (what I remember) at the end, but the costs will be different for anyone who wants to use ours as inspiration due to location, availability and material substitutions. We got a number of our materials for free or on sale, so that made the cost considerably lower. It helps to be handy and imaginative and have a lot of weird stuff, tools, lumber, etc. laying around your property... My husband does wood working for a living, so we also have access to tools and a shop to work in that most people don't have access to.
We also built a broiler/meat bird coop at the same time so some of the materials were used for both, but I'll write the information about that coop separately later on another article.
First of all, when we decided to get chickens this year, we also decided to build our own coop and not buy a kit or pre-built coop. We have 8 hens and a rooster. We originally bought 6 hens and a rooster, but the hatchery sent an extra hen and we adopted another. We knew when we started that we would need the coop to be big enough to accommodate them comfortably in winter, when they probably won't go out much, and hopefully have room for more if we want to add to our flock.
We had an old single axle trailer frame languishing behind our yard barn, that was 6 ft. by 10 ft.= 60 square ft. So, if you take the minimum recommended square ft per bird as 2-3 sq. ft, then we could push it and have 20 full sized birds in there... While my chickens have a fairly large outside area, I would probably not try to have that many chickens in that space. I think that would be a little cramped, especially in the winter when they're inside more, but we had 18 meat cockrells in there full time for a couple weeks and they were fine.
I don't have a picture of the trailer before we started building. I wasn't planning on writing an article or anything when we built it, so I don't have photo documentation for every step.
The floor is made of 5/8 inch OBS (oriented strand board or "flake board) and covered with the cheapest vinyl flooring we could get at Lowes. It's obviously the cheap stuff. My husband ripped it just putting it in. It's already started to curl up at the corners because we didn't tack it down thinking it would be easier to clean if we could just pull it up and drag it out the door...

The walls and ceiling are 1 3/4 inch insulated fiberglass panels. He got the idea from a co-worker who was thinking about using it in his dog kennels. Since it's insulated it should be cooler in summer and warmer in winter. So far this summer, it hasn't been too hot in the coop. With both windows open to let in a breeze, it's not too bad.
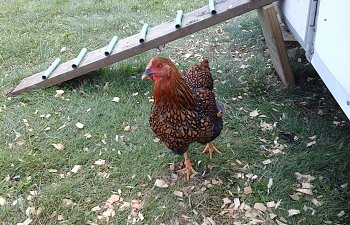
It's held together with some kind of metal C-channel type pieces that we had custom made. The seams and joints are caulked to keep water out. You can see the C-channel stuff behind the Buff Orpington here and in any of the other exterior pictures:

We used self-tapping screws to hold it together. The roof is metal barn roofing. You can see the roof in some of the exterior pictures. Yes, the roof is flat... We figured that since it is a mobile coop and since nowhere in our yard is the ground actually flat, the roof will never be completely flat and the rain will run off.
We put in two windows on opposite sides to let in light and air. One is double hung and the other is a casement window. They were propped in the back corner of the yard barn from who-knows-what. The double hung one still had the stickers on it... We put 1/2 inch hardware cloth over both instead of normal window screen to keep out predators.
So far the windows work well. They let in a nice cross breeze when it's hot and are hopefully high enough for ventilation during winter without letting in drafts. The only problem I've had so far is when it rains and the windows are open and we're not there to close them, but that's probably just going to happen.
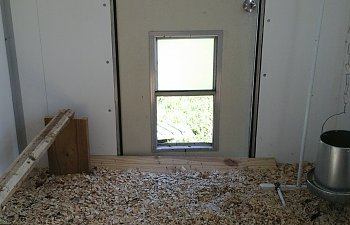
The door is reclaimed (aka -free). It has a window that slides up that is the perfect size for a chicken. All we had to do was turn over the door and window and it works perfectly. It's a weird window too- to open it, you have to pinch in two tabs on the sides at the same time, then slide the window up, while still holding the tabs in. I'm pretty sure that even a raccoon couldn't figure this out... The door knob is an actual knob (the round kind you have to turn). A raccoon might be able to figure this out if it could reach it, which I doubt since it's pretty far off the ground.

The shaving kept falling out every time we opened the door, so this triangular cut piece of wood in the doorway does the trick. They still fall out a little when the chickens kick shavings between the piece of wood and the door, but it's not nearly as bad as it was before.
The ramp is just a couple pieces of wood we had laying around and cut up pieces of old garden hose. We also added a rounded off piece of wood on the outside of the chicken door/window to make it more comfortable for their feet.
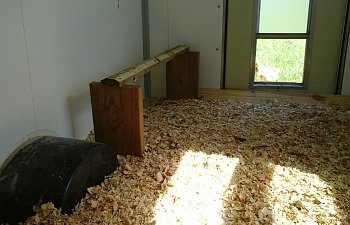
The perch is a couple of 2x4s with the corners beveled and sanded to make it more comfortable for their little chicken toes to curl around. We had to extend it though as they got older (and fatter) and when we added the rescue hen. Now it's just the right length for everyone with room to spare. (They still all like to squish up next to Walter the rooster though. I guess chickens like to cuddle too...) I'd say it's only about 1.5 feet off the ground, but they seem to like it. We can always make a tiered one later if we add more birds.
I nagged my husband until he made me a droppings board to put under the perch. (It was getting pretty messy underneath.) It's a thin, flat piece of wood just wide enough to catch the droppings but not so wide they can't jump up and down from the roost.
It's suspended from the bottom of the roost with some hooks and left-over swing-set chain. I can just scrape along the edge and catch with a dust pan for a quick clean or I can take it off and pressure wash to get it really clean.

I probably should have taken pictures of the perch and dropping board when they were new... and clean. But I guess it serves to show how it works. The only problem so far is: since the dropping board is suspended from a chain, it tends to "teeter-totter" from the weight of the droppings and then some roll off. Oh well. It's not near as bad as it would be without and I scrape up stuff from the floor as I see it anyway.
To cover up the wheels on the inside we used an old 55 gallon plastic barrel that came rolling through our yard one year during a particularly windy storm. (No one claimed it, so it became ours.) My husband cut the bottom off and then cut that in half and screwed it down to create wheel wells. We caulked around the edges to seal it up.
The black thing to the left of the bird is the wheel well. (This is a meat cockrel; they lived in this coop for a couple weeks while the broiler coop was being built.)
The feeder is currently hanging from a cheap coat rack I was going to throw out. My husband doesn't like this arrangement apparently, so I told him to make something he did approve of but he still hasn't come up with anything yet.
We finished the nesting boxes just in time! The hens started laying three days after we put the nesting boxes in. Again, random pieces of lumber (are you seeing a trend?) that my husband had stashed in the basement. We bought the little 3 gallon tote boxes at the hardware store. The roof has a pretty sharp pitch to it so the birds can't perch on top.
(Not quite big enough for sharing...Buffy here thinks she wants to go broody, but Nugget thinks she wants that box too.)
There's a nice, finished piece of wood on the front for them to jump up on to and walk back and forth as they pick out which nest they want.
Here's a picture of the two wood pieces the boxes set on. There are pieces of wood at the level of the top of each box to make each cubby hole a little bigger so they have room to turn around and to make it so the hens can't flip the box up.
Here's a picture of the front. You can see how the boxes are sitting down lower.
During the day (so far) they don't spend much time in the coop. They only really go inside to eat and lay eggs. They love to hang out underneath when it's hot or raining. It's just the right height for them to get under and between the cross pieces they can stand up straight and walk around. It's shady and cool under there and they can hide from aerial attacks. It's even high enough that I can slid the dust baths underneath when it's raining and they can still get in the boxes to dust bathe.
They're fenced in with an old electric fence we got from a co-worker. I believe it is 160 ft. long (about 1,500 square feet)... It was rolled up in his barn for a while, so some of the vertical plastic pieces are broken (chewed on), but the horizontal wiring is intact. So far, so good. When we got it we weren't sure how we wanted to fence our chickens, so this was a way to test out whether we like this type of electric fence. We can always buy a better/more expensive fence later if this doesn't work out. We got the solar powered charger at TSC for 50% off.
We also mounted a truck tool box to the tongue of the trailer to store supplies in. It's big enough that I can fit: a bail of shaving (if I lay it down diagonally), two 50 lb bags of food, a 20 lb bag of grit, a 20 lb bag of scratch, and still have room left over. There's also little compartments on the sides that we can put stuff in. We go it at a consignment auction and it's worked rather well for us. I would like to paint it white at some point so the box stays cooler inside and out, especially since they figured out how to jump up onto the box...
Here's the price list, as near as we remember.
Price list:
•6'x10' single axel trailer frame - free, materials already on hand
•Insulated fiber glass wall/ceiling panels- $230
•OSB flooring -$48-ish
•Linoleum -$40-ish
•Door -reclaimed (free)
•Windows -free, materials already on hand
•Roof & custom made C-channel pieces -$132
•Truck tool box -$100
•164', second hand electric fence -$50
•Solar charger -$50
•Grounding rod -$30-ish
•Post driver (for grounding rod) -$15
•Clamp (for electric fence) -less than $5
•Screws, misc. hardware. -$30-40
•Nesting box totes -$15
•Nesting box frame -free, materials already on hand
•Perch -free, materials already on hand
Total Estimated Cost- $745.00
Updates:
Now that it's winter, there are some information updates I need to add.
*For the most part, it's insulated pretty well, but with the single digit and 0° temperatures we've had this winter, the water freezes and it's pretty cold inside the coop. We've had to put two red heat lamps in the coop just to keep it above freezing on some days. Part of the problem comes from the floor. While the walls and ceiling are insulated, the floor and the wheel wells are not. (Related: we have a remote set up to the heat lamps, so if we need to turn it on or off, we can just push a button instead of having to go outside. It's quite handing and I would recommend one to anyone for just about anything. It's an indoor/outdoor remote control that you plug another cord into, similar to this:

*If I could choose again (and I may try to talk my husband into looking into it) I would pick a different window instead of the casement window. Probably best to have two double hung windows. Even with the top of the double hung open a little all the time, it still needs some extra ventilation and with the casement window open, it seems like too much draft.
*The chicken pop door pre-set into the door, while still a good idea, is sort of a pain too... Sometimes when it's really cold the door freezes shut and we have to get a propane torch and warm up the latches. One good feature is that we can open the pop door halfway and the chickens can still get in and out while reducing the amount or wind &/or rain that gets in. Another thing, while I used to be incredulous about the necessity of an automatic chicken door opener, now as I stand at the window, looking out at the 25° and 6 inches of snow, I see the usefulness of such a device. We all stand around arguing about who has to go out and open the door and do chicken chores. My husband is brainstorming a way to update the current set up so we use a remote or something to open the chicken door...