'Coop De Grass'
A simple project that eggceeded all eggpectations!
 The initial plan.... it seemed sooo simple- a weekend at most...... Like a Federal project- Overbudget, Overtime, Overbuilt!
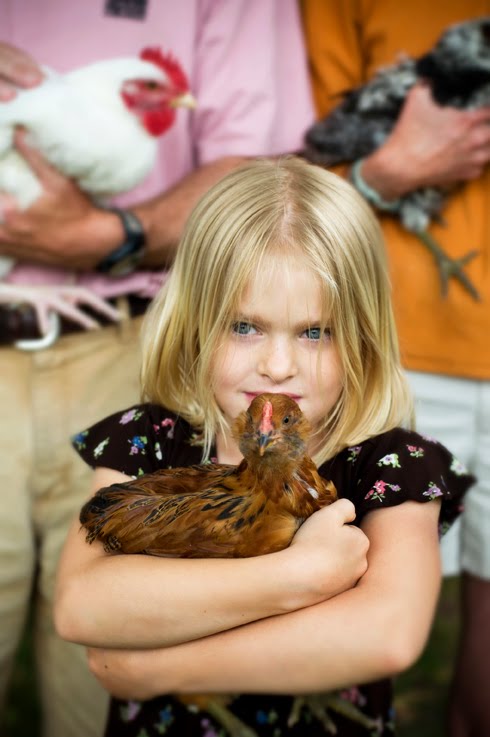
We moved to Traverse City, MI in November 09 and as winter ended early, were chomping at the bit for fresh food, a garden and "how about some chickens too?" A city ordinance was just passed last year for 4 hens (no roosters) per in-town lot, so we were well placed to begin our lives as urban chicken ranchers! In a moment of giddy excitment we hit up Tractor Supply and the girls chose a variety of attractive chicks among kazillions of others- giving us 2 Bared Rock/ Rhode Island Reds (both which are turning out to be roosters unfortunately), 2 bantams (one truly is and the other, "Butter", is turning into the fattest gigantic Cornish X-cross rooster ever.. destined for the freezer the other is also a rooster)2 Auraucana's (one is a rooster).. leaving us with 3 likely hens, though one may just be a submissive rooster waiting to let loose once he is the last one on the island?. A motley crew at best!
Of course, getting the chicks was the easy part.... nothing like 8 rapidly growing/ smelly animals in your basement to light a fire under your rear and get working on the coop- funny how I suddenly got the green light to spend any time necessary to get it done from my spouse.....
First step- spend hours reviewing all the coops on the forum. Second step- ignore everything and reinvent the wheel, adding lots of bells and whistles because they seem like such a good idea. Third step- spend the next 5 weeks figuring out ways to accomodate all the little cool changes you made on the various napkins and each time kicking yourself for not just using someone else's plans instead!!!
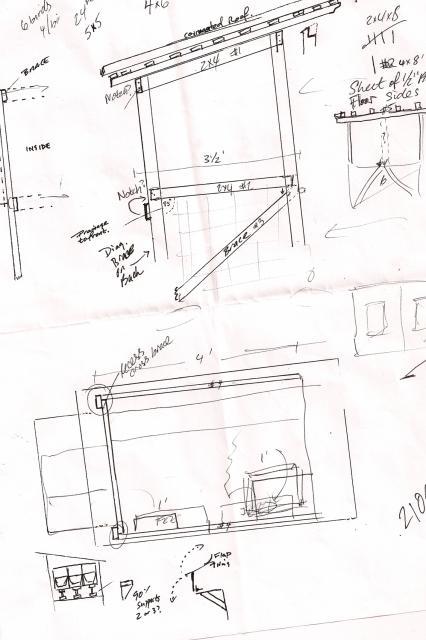
So, the coop design- basic 5' x 3' with shedding roof for those snowy winters. It's Michigan so the whole thing is insulated with solid foam and then skinned with 1/4"plywood to stop the chickens (who are Foam-aholics) from pecking the stuff away- which they neatly did on some unprotected areas!. The concern from my perspective was how to insulate but allow ventilation. I cruised the forum for info on this and in the end decided on soffit vents and a large front vent up top that eventually will have a hinged board over the top that we can lift up most of the time and drop down during periods of inclement weather. The insulation and necessary changes needed to protect the insulation on the inside, forced me construct double skinned walls and ceilings- this was a huge pain in the rear, easily tripled the build time on this plan. In a more mellow climate this could be a simple plywood skin and be done! In reality it is better insulated than our 70 year old house.... maybe we should move in there this winter?
I constructed the basic frame as above. The vertical posts were 2"x 6"s from an old bunk bed (dark stained wood). I cut notches for the horizontal pieces to fit into (These were new 2x3's, good deal at Lowes) and left a couple of feet at each end to fashion handles to allow the thing to be picked up 'Rickshaw' style- (it's heavy, but 2 of us can move it). The exterior walls were 1/2" plywood with various off cuts of 1x3 to act as cross bracing for attaching the wall panels. Most of the coop is screwed together. I had to pre drill a lot since the lumber is not super thick and is prone to splitting. The roof angle is kind of random about 30 degrees or so- a good shedding pitch that met the needs for a 3 foot high platform (waist height to be able to bend forward and reach the back) and the limitations of 6 foot vertical posts. All openings between joists and outside were either blocked with bits of wood or screen material cut and stapled over the opening to stop excessive bug penetration (I have no idea if that is important or not, but I still did it!)
left side of coop, panel removed, showing the long screened vent up top right. (No hinged cover/ flap put on yet!)
good view of the chicken gang-plank and hoisting rope!
The roof is skip sheathed over 1x2 rafters (I think the roof measured 7' x 5' total, giving plenty of overhang on the sides and front/back.) Skip sheathing while trying to insulate and keeps bug screens on, was a bit of a nightmare and took some serious time to figure out the kinks so as not to screw it up. (I think it worked ok, but boy it took some time!) Tar paper was then applied to prevent any water ingress. For the roof itself, I used some corrugated composite material called Ondura which was strong, fit the roof size perfectly without cutting and was not brittle like fiberglass. it was about $80 for 2 sheets, but in retrospect I would do it again- it looks good, was easy to install (square it up and nail!) and should easily tolerate snow load and crappy weather!
Skip sheathing before roof
bad shot of roof material....
The whole wall panel on the left side of the coop removes to scrape out the accumulating debris. I added a window to the front (an old sliding screen door thing from the Restore), thinking this would be cool. In retrospect, not so much! The chickens will not roost anywhere near the window and instead perch on the 1/4" plywood divider used to stop all the bedding going down the hatch.... Maybe next time put the window on the right and the big door on the left..... rats! I am still considering how to cover the window so they roost better at night- maybe a blind or drape on the outside? Perhaps a hot tub, fridge with beer????
Still figuring out roosts... they don't like my constructed one, preferring to balance on that tiny 1/4"divider board!
The coop sits 3' above ground- again, good for winter snow, but also good for protection at night and a weather proof covered area in winter. There is a 1' sq hatch and a gangplank that leads down into a wired enclosure below. Small branches are tacked to the plank to give grip for climbing up and down. They seem to navigate it pretty well, but the transition into the coop is hard on the fat old rooster- too bad he is destined to depart soon! The gangplank is hoisted by a rope from the front of the coop- the kids get a kick hoisting it at night and dropping it in the morning! When closed, it totally blocks off the opening into the coop, effectively sealing it off from any entry from below. i might consider making the opening bigger if I were to do this all over again. There is another small hatch on the right end of the lower enclosure that can be opened by rope to allow the chickens to exit the coop to the yard or to a wire run that I built when they are not roaming the yard eating our new plant starts...
The right side of the coop is currently rough finished with a cut-out that will be removed once we get near to laying eggs. I plan to build and insert 2 nesting boxes at the end (12' x 12' opening for each), with outside access by lifting the roof section, so the kids do not have to open the big door to get the eggs.
The wood was finished inside and out with a bizarre yellowish deck stain picked up from ACE Hardwares cast-off shelf ($4 for the gallon!)- looked better in the shop, but in reality looks like chick poop... kind of fitting really! I did finish the floor inside to make it easy to clean. I also caulked all the joints inside and out to prevent moisture reaching the edges of the plywood. Good thing too since they have spilled copious quantities of water from their water thing!!!
Overall, a pretty pleasing product- not ghetto looking, so the neighbors are happy, the chickens like it (will be even better when we get down to 4 birds, once the roosters are gone!). The few things I know I would change: the window location- move to the right side and put the door on the left. Make the hatch bigger. Maybe build with a solid plywood roof and put the roofing material directly on top, not the complicated structure that I ended up building and then having to accommodate with the rest of my design! (read "Big time suck!") Total price of the coop was about $280. The roofing was the most expensive part, but works really well. Some material was salvage/ recovered, but nowhere near as much as I had hoped- time was just running out and I had no idea how fast those birds would grow!- so in the end it was just a matter of get it done! It has been a great way to meet the neighbors too, all of whom continue to spend time asking about how the chickens are doing, if the coop is working etc!
I would be happy to take other pictures or answer questions if anyone is interested- thanks for looking!
"Chip" rooster or hen??? It is still up in the air!
A simple project that eggceeded all eggpectations!
 The initial plan.... it seemed sooo simple- a weekend at most...... Like a Federal project- Overbudget, Overtime, Overbuilt!
We moved to Traverse City, MI in November 09 and as winter ended early, were chomping at the bit for fresh food, a garden and "how about some chickens too?" A city ordinance was just passed last year for 4 hens (no roosters) per in-town lot, so we were well placed to begin our lives as urban chicken ranchers! In a moment of giddy excitment we hit up Tractor Supply and the girls chose a variety of attractive chicks among kazillions of others- giving us 2 Bared Rock/ Rhode Island Reds (both which are turning out to be roosters unfortunately), 2 bantams (one truly is and the other, "Butter", is turning into the fattest gigantic Cornish X-cross rooster ever.. destined for the freezer the other is also a rooster)2 Auraucana's (one is a rooster).. leaving us with 3 likely hens, though one may just be a submissive rooster waiting to let loose once he is the last one on the island?. A motley crew at best!
Of course, getting the chicks was the easy part.... nothing like 8 rapidly growing/ smelly animals in your basement to light a fire under your rear and get working on the coop- funny how I suddenly got the green light to spend any time necessary to get it done from my spouse.....
First step- spend hours reviewing all the coops on the forum. Second step- ignore everything and reinvent the wheel, adding lots of bells and whistles because they seem like such a good idea. Third step- spend the next 5 weeks figuring out ways to accomodate all the little cool changes you made on the various napkins and each time kicking yourself for not just using someone else's plans instead!!!
So, the coop design- basic 5' x 3' with shedding roof for those snowy winters. It's Michigan so the whole thing is insulated with solid foam and then skinned with 1/4"plywood to stop the chickens (who are Foam-aholics) from pecking the stuff away- which they neatly did on some unprotected areas!. The concern from my perspective was how to insulate but allow ventilation. I cruised the forum for info on this and in the end decided on soffit vents and a large front vent up top that eventually will have a hinged board over the top that we can lift up most of the time and drop down during periods of inclement weather. The insulation and necessary changes needed to protect the insulation on the inside, forced me construct double skinned walls and ceilings- this was a huge pain in the rear, easily tripled the build time on this plan. In a more mellow climate this could be a simple plywood skin and be done! In reality it is better insulated than our 70 year old house.... maybe we should move in there this winter?

I constructed the basic frame as above. The vertical posts were 2"x 6"s from an old bunk bed (dark stained wood). I cut notches for the horizontal pieces to fit into (These were new 2x3's, good deal at Lowes) and left a couple of feet at each end to fashion handles to allow the thing to be picked up 'Rickshaw' style- (it's heavy, but 2 of us can move it). The exterior walls were 1/2" plywood with various off cuts of 1x3 to act as cross bracing for attaching the wall panels. Most of the coop is screwed together. I had to pre drill a lot since the lumber is not super thick and is prone to splitting. The roof angle is kind of random about 30 degrees or so- a good shedding pitch that met the needs for a 3 foot high platform (waist height to be able to bend forward and reach the back) and the limitations of 6 foot vertical posts. All openings between joists and outside were either blocked with bits of wood or screen material cut and stapled over the opening to stop excessive bug penetration (I have no idea if that is important or not, but I still did it!)

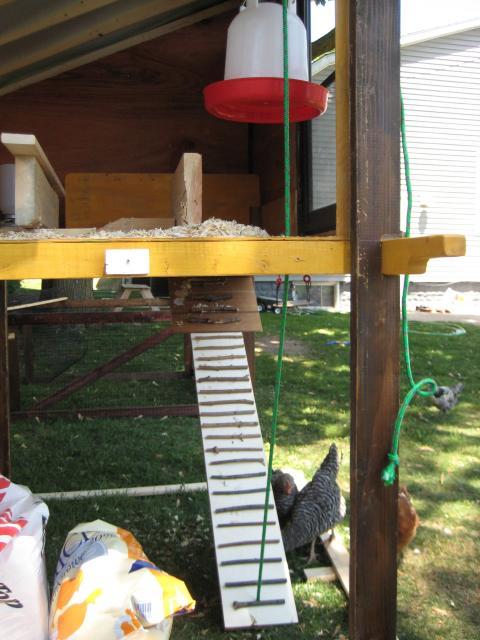 good view of the chicken gang-plank and hoisting rope!
The roof is skip sheathed over 1x2 rafters (I think the roof measured 7' x 5' total, giving plenty of overhang on the sides and front/back.) Skip sheathing while trying to insulate and keeps bug screens on, was a bit of a nightmare and took some serious time to figure out the kinks so as not to screw it up. (I think it worked ok, but boy it took some time!) Tar paper was then applied to prevent any water ingress. For the roof itself, I used some corrugated composite material called Ondura which was strong, fit the roof size perfectly without cutting and was not brittle like fiberglass. it was about $80 for 2 sheets, but in retrospect I would do it again- it looks good, was easy to install (square it up and nail!) and should easily tolerate snow load and crappy weather!
 Skip sheathing before roof
  bad shot of roof material....
The whole wall panel on the left side of the coop removes to scrape out the accumulating debris. I added a window to the front (an old sliding screen door thing from the Restore), thinking this would be cool. In retrospect, not so much! The chickens will not roost anywhere near the window and instead perch on the 1/4" plywood divider used to stop all the bedding going down the hatch.... Maybe next time put the window on the right and the big door on the left..... rats! I am still considering how to cover the window so they roost better at night- maybe a blind or drape on the outside? Perhaps a hot tub, fridge with beer????
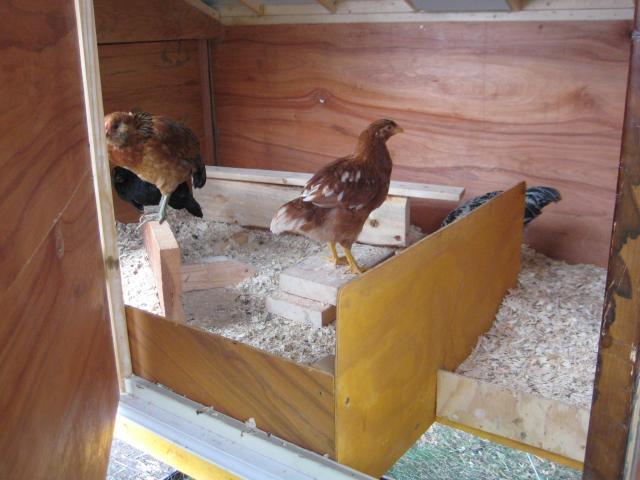 Still figuring out roosts... they don't like my constructed one, preferring to balance on that tiny 1/4"divider board!
The coop sits 3' above ground- again, good for winter snow, but also good for protection at night and a weather proof covered area in winter. There is a 1' sq hatch and a gangplank that leads down into a wired enclosure below. Small branches are tacked to the plank to give grip for climbing up and down. They seem to navigate it pretty well, but the transition into the coop is hard on the fat old rooster- too bad he is destined to depart soon! The gangplank is hoisted by a rope from the front of the coop- the kids get a kick hoisting it at night and dropping it in the morning! When closed, it totally blocks off the opening into the coop, effectively sealing it off from any entry from below. i might consider making the opening bigger if I were to do this all over again. There is another small hatch on the right end of the lower enclosure that can be opened by rope to allow the chickens to exit the coop to the yard or to a wire run that I built when they are not roaming the yard eating our new plant starts...
The right side of the coop is currently rough finished with a cut-out that will be removed once we get near to laying eggs. I plan to build and insert 2 nesting boxes at the end (12' x 12' opening for each), with outside access by lifting the roof section, so the kids do not have to open the big door to get the eggs.
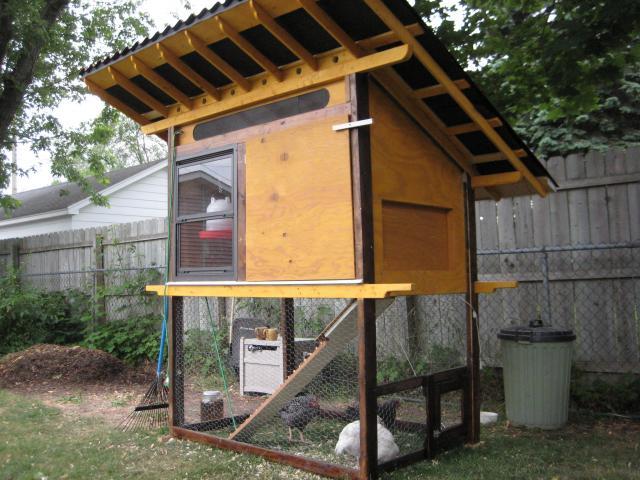
The wood was finished inside and out with a bizarre yellowish deck stain picked up from ACE Hardwares cast-off shelf ($4 for the gallon!)- looked better in the shop, but in reality looks like chick poop... kind of fitting really! I did finish the floor inside to make it easy to clean. I also caulked all the joints inside and out to prevent moisture reaching the edges of the plywood. Good thing too since they have spilled copious quantities of water from their water thing!!!
Overall, a pretty pleasing product- not ghetto looking, so the neighbors are happy, the chickens like it (will be even better when we get down to 4 birds, once the roosters are gone!). The few things I know I would change: the window location- move to the right side and put the door on the left. Make the hatch bigger. Maybe build with a solid plywood roof and put the roofing material directly on top, not the complicated structure that I ended up building and then having to accommodate with the rest of my design! (read "Big time suck!") Total price of the coop was about $280. The roofing was the most expensive part, but works really well. Some material was salvage/ recovered, but nowhere near as much as I had hoped- time was just running out and I had no idea how fast those birds would grow!- so in the end it was just a matter of get it done! It has been a great way to meet the neighbors too, all of whom continue to spend time asking about how the chickens are doing, if the coop is working etc!
I would be happy to take other pictures or answer questions if anyone is interested- thanks for looking!
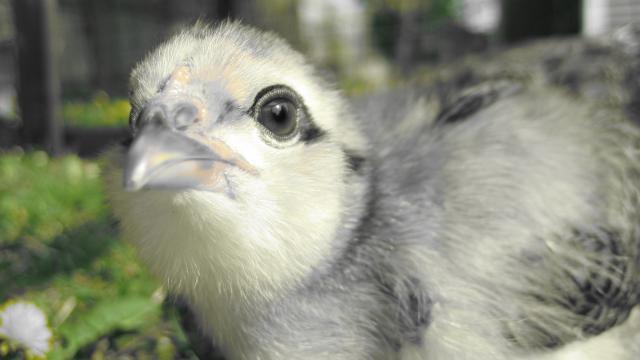
 "Chip" rooster or hen??? It is still up in the air!