New Hampshire Windy Ridge Mountain Coop
We made the decision to get chickens in Fall 2018. I say we… but it was clear that Mrs. MtnMan had no interest in small farming. But she was willing to indulge on one condition: she had nothing to do with them. She’d grown up on a farm – but was the prissy farmers daughter. She traded farm chores with her sister – my wife would clean the house; her sister handled the barn and animals.
The Mrs. indulged me, but there was skepticism. Until summer 2018, I was still recovering from cancer treatment, and joint replacements in both knees and both hips. I needed a wheelchair, walker or crutches to move. But as I regained some strength – I wanted to see what I could do.
So second big decision (after deciding to get chickens): I’d build a coop, not buy one. Understand, I’ve never built anything. I’ve fixed stuff – but build – nope. I grew up in Brooklyn, Queens and Manhattan in New York City. The only tools we had in the apartment was screwdrivers, a hammer and a few pliers.. I acquired some skills through the years, being a homeowner, but nowhere near the skill needed for the coop.
I decided on an 8’ x 6’ coop, with 6’ high walls, and a 6/12-roof pitch, as we live in a snowy winter climate. I watched a lot of YouTube videos on chicken coops, and framing. There wasn’t much online for me to learn about snow load, and wind impact. Fortunately, I had a lot of building materials available – all excess from when our home was built. I found windows at our local dump.
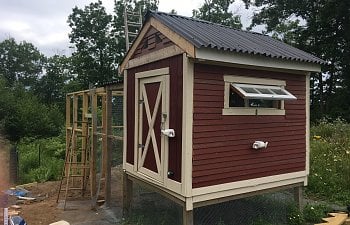
We decided to place to coop alongside our beehives, so we could share the electric netting. Mrs. MtnMan had one requirement for the coop. As it would be the first thing visible as you come up the driveway, it had to look good enough to leave a great first impression. Challenge accepted!
I started the coop in January framing the floor and walls in the basement. It took forever – I’m not able to kneel, and bending at the waist hurt – so I went a little at a time, and often had to lie on the floor to hammer in the nails.

The chicks were schedule to arrive at the end of April, and they would probably be in the brooder until mid-May. I had plenty of time to finish, or so I thought. Then we had the rainiest spring we’ve had in years. I got the footings dug (there’s a reason New Hampshire is called the granite state…), set the 4x4s in the ground, attached the base to the 4x4s, and then set the walls – done in the rain.


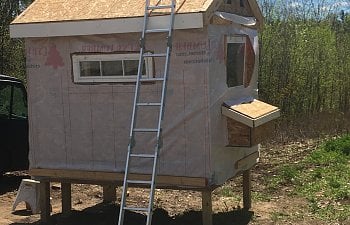
Due to non-stop pouring rain, I returned to the basement to build the roof trusses, and waited for the next break in the rain to move back outside. We live on an exposed ridge with serious wind, so we wrapped the walls to reduce drafts and protect the wood.

I have to admit – until this point of the build, I was able to move walls, carry lumber, and set trusses with my tractor doing the heavy lifting. But with my health issues – I needed help with the roof and roofing. Yup – the Mrs. did all of the ladder climbing and installed the sheets of asphalt roofing. She really wanted nothing to do with the chickens, but she’d rather help with the coop than sit in the emergency room waiting for me.

At this point of construction, the 7 week old pullets are inside the coop – acclimating to their new home, but with no access to outside. This gave me about a week to finish the run. And finally – the weather cooperated.

We live in an area with a lot of potential predators. In addition to mammals, we have almost every raptor in New Hampshire. Because we are at elevation, and have an exposed ridge, there is almost always a raptor circling above our home. We’ve been here for 5 years, and have never seen a chipmunk or squirrel. And we’ll sometimes see rabbit tracks in the snow, but almost always find evidence of a raptor kill – traces of fur and bloodstains in the snow, and talon tracks alongside the mess.
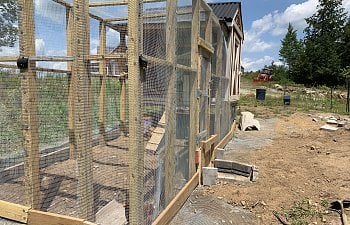
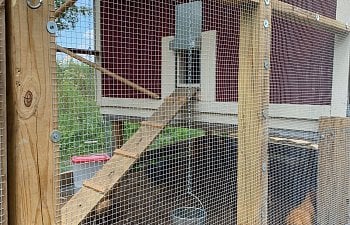
Our land abuts conservation trust land, and then into national forest, so 100’s of thousands of acres. We put ½’ hardware cloth, and a 3 foot apron around the entire coop and run area. (Still not quite finished in the attached picture)

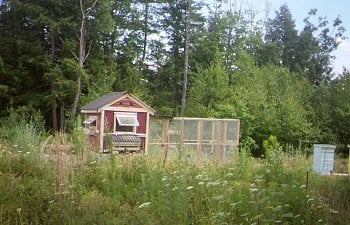
The exterior was finished, and the pullets had their run finished.
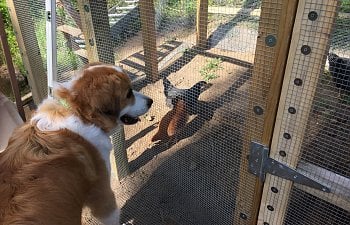
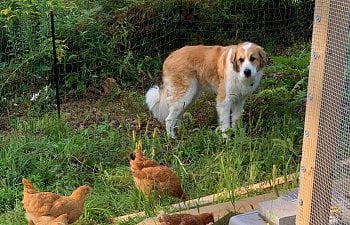
We were now able to allow the chickens into the run, while their guardian watches.


I decided to use sand on the floor of the coop, on top of vinyl flooring. This was my initial interior layout:

When I posted a picture of this interior, I got a lot of advice on how badly I built it. The ladder was useless (needs a 45 degree angle) and the roosting bars need to be level. And – what about poop boards? So I reconfigured the roosting area.

The boards are level, 12” away from walls, and 12” apart from each other, measured at the center of the boards. I used sand and pdz on the poop boards beneath the roosting bars. All bars are being used, and no issues. I can lower the whole roosting area in the winter, to get the chickens below window height and potential drafts
Over time, I grew confident enough to open the run door, and allow the pullets to range, within an enclosed area surrounded by electric poultry netting, and usually with Titan watching over them. So far – no losses, though I’m sure it’ll happen at some point if I allow them outside the run.
.
I am pleased with the outcome. I learned a lot from the mistakes I made along the way. The biggest mistake… I should have gone bigger. I’m enjoying the chickens and eggs way more than I expected – and plan to expand in a big way next year. Chicken math – not something I planned on!
We made the decision to get chickens in Fall 2018. I say we… but it was clear that Mrs. MtnMan had no interest in small farming. But she was willing to indulge on one condition: she had nothing to do with them. She’d grown up on a farm – but was the prissy farmers daughter. She traded farm chores with her sister – my wife would clean the house; her sister handled the barn and animals.
The Mrs. indulged me, but there was skepticism. Until summer 2018, I was still recovering from cancer treatment, and joint replacements in both knees and both hips. I needed a wheelchair, walker or crutches to move. But as I regained some strength – I wanted to see what I could do.
So second big decision (after deciding to get chickens): I’d build a coop, not buy one. Understand, I’ve never built anything. I’ve fixed stuff – but build – nope. I grew up in Brooklyn, Queens and Manhattan in New York City. The only tools we had in the apartment was screwdrivers, a hammer and a few pliers.. I acquired some skills through the years, being a homeowner, but nowhere near the skill needed for the coop.
I decided on an 8’ x 6’ coop, with 6’ high walls, and a 6/12-roof pitch, as we live in a snowy winter climate. I watched a lot of YouTube videos on chicken coops, and framing. There wasn’t much online for me to learn about snow load, and wind impact. Fortunately, I had a lot of building materials available – all excess from when our home was built. I found windows at our local dump.
We decided to place to coop alongside our beehives, so we could share the electric netting. Mrs. MtnMan had one requirement for the coop. As it would be the first thing visible as you come up the driveway, it had to look good enough to leave a great first impression. Challenge accepted!
I started the coop in January framing the floor and walls in the basement. It took forever – I’m not able to kneel, and bending at the waist hurt – so I went a little at a time, and often had to lie on the floor to hammer in the nails.
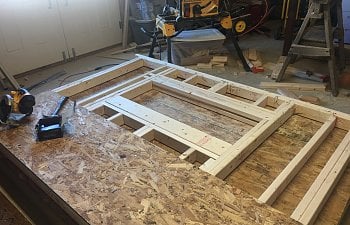
The chicks were schedule to arrive at the end of April, and they would probably be in the brooder until mid-May. I had plenty of time to finish, or so I thought. Then we had the rainiest spring we’ve had in years. I got the footings dug (there’s a reason New Hampshire is called the granite state…), set the 4x4s in the ground, attached the base to the 4x4s, and then set the walls – done in the rain.
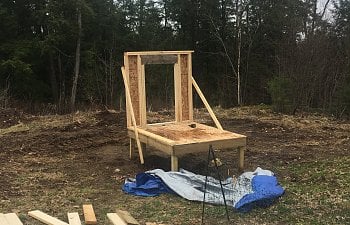
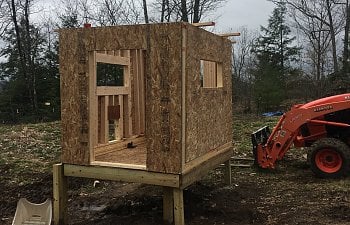
Due to non-stop pouring rain, I returned to the basement to build the roof trusses, and waited for the next break in the rain to move back outside. We live on an exposed ridge with serious wind, so we wrapped the walls to reduce drafts and protect the wood.
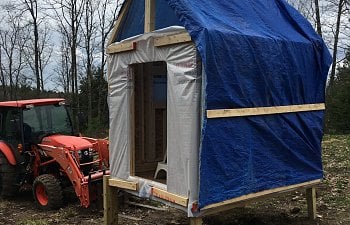
I have to admit – until this point of the build, I was able to move walls, carry lumber, and set trusses with my tractor doing the heavy lifting. But with my health issues – I needed help with the roof and roofing. Yup – the Mrs. did all of the ladder climbing and installed the sheets of asphalt roofing. She really wanted nothing to do with the chickens, but she’d rather help with the coop than sit in the emergency room waiting for me.
At this point of construction, the 7 week old pullets are inside the coop – acclimating to their new home, but with no access to outside. This gave me about a week to finish the run. And finally – the weather cooperated.
We live in an area with a lot of potential predators. In addition to mammals, we have almost every raptor in New Hampshire. Because we are at elevation, and have an exposed ridge, there is almost always a raptor circling above our home. We’ve been here for 5 years, and have never seen a chipmunk or squirrel. And we’ll sometimes see rabbit tracks in the snow, but almost always find evidence of a raptor kill – traces of fur and bloodstains in the snow, and talon tracks alongside the mess.
Our land abuts conservation trust land, and then into national forest, so 100’s of thousands of acres. We put ½’ hardware cloth, and a 3 foot apron around the entire coop and run area. (Still not quite finished in the attached picture)
The exterior was finished, and the pullets had their run finished.
We were now able to allow the chickens into the run, while their guardian watches.
I decided to use sand on the floor of the coop, on top of vinyl flooring. This was my initial interior layout:
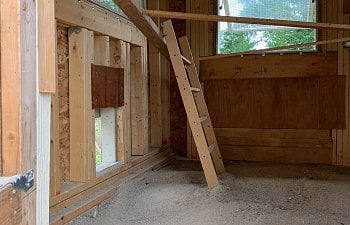
When I posted a picture of this interior, I got a lot of advice on how badly I built it. The ladder was useless (needs a 45 degree angle) and the roosting bars need to be level. And – what about poop boards? So I reconfigured the roosting area.
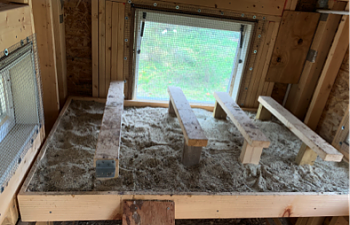
The boards are level, 12” away from walls, and 12” apart from each other, measured at the center of the boards. I used sand and pdz on the poop boards beneath the roosting bars. All bars are being used, and no issues. I can lower the whole roosting area in the winter, to get the chickens below window height and potential drafts
Over time, I grew confident enough to open the run door, and allow the pullets to range, within an enclosed area surrounded by electric poultry netting, and usually with Titan watching over them. So far – no losses, though I’m sure it’ll happen at some point if I allow them outside the run.
.
I am pleased with the outcome. I learned a lot from the mistakes I made along the way. The biggest mistake… I should have gone bigger. I’m enjoying the chickens and eggs way more than I expected – and plan to expand in a big way next year. Chicken math – not something I planned on!
