This is the story of our new coop. Our grown kids call it the chicken palace. My coworkers say I can rent it out for $800 a month on AirBnB, and my stepmom wants to stay there when she comes to visit.
My husband looked at a few plans, listened to what I wanted, and worked from a design in his head, so I have no plans to upload for you. Hopefully the pictures will tell the story. He is a freak about leveling and "squaring up". If I held the measuring tape/post level/straight level once, I held them a thousand times. But the result is an awesome coop that should last a long time.

We decided on a place between 2 trees, close to the fence on the north side of our property. DH dug a trench in our hard Texas clay-filled soil that was 6' x 16'. He griped a lot during this phase.
The 4x4 posts went in, perfectly square finally.
Concrete poured in 2' deep footings. No predators digging in here...
Sides of coop and run going up.
Support beams for floor of coop. Coop is 6'x8', with run space underneath. Rest of the run is also 6'x8'.
Roof supports are up.
I was painting like crazy trying to keep up. In retrospect, I would have painted the boards first and then touched up when finished, but we started the coop mid-October and were racing to finish before the first big winter storm. Oh, and this pic shows the corrugated metal roofing up.
The short side of the coop and run face east and west - long sides face north/south.
Plywood floor and first wall.
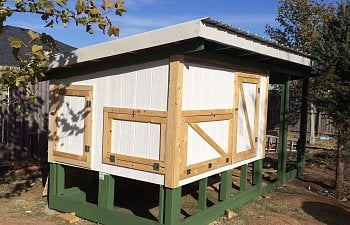
Coop walls up and painted. First clean out door in place - opens side to side.
2nd clean out door up, which drops down. Notice the trim is not painted. He didn't want to wait on me.
$20 worth of vinyl flooring stapled on the floor. Good thing I don't lay vinyl floors as a career. Also shows the door opening for the nesting boxes, with our lawn tractor perfectly placed in the opening.
All coop doors now in place. The 2 doors on the short side (which faces west) are a drop down door for the nest boxes on the right and a door on the left to access what will eventually be a small storage space for supplies. That improvement will have to wait until spring.
Fancy nesting boxes built and installed.
Our Pullet-Shut automatic pop door. I love this thing! We bought the whole shebang, the solar charger and the light sensor, and I don't regret a single $$$$$. It's awesome.
Hardware cloth being installed.
The finished (for now) product. We put in a small (cheap) sliding window on the south side, where our prevailing winds come from. There is also a hardware-cloth-covered open space under the eaves that run the length of the coop on the same side. We plan to put another sliding window on the north side in the spring this year that will allow some increased ventilation in the summer. We bought an inexpensive wooden screen door and covered it in hardware cloth.
I can stand up in the main run!
The ramp for entrance to the coop.
The girls seem to like their coop. We have two different roosting bars that run the width of the coop, at different heights. I'm really glad we put some thought into where the coop should go before we built it. We moved our girls into their new home a week before Christmas, and right after Christmas we had a huge blizzard with 50 mph winds. The girls were just fine in their snug little home. The fence on the north side of the coop blocked the wind perfectly and the tree on the west side of the coop will provide shade in our hot Texas summer afternoons,
We also plan to add another door on the north side of the coop this spring. I would also like to add some poop trays below the roosts. Now that we have a bigger coop, we are looking forward to adding a few more chickens to our flock!
My husband looked at a few plans, listened to what I wanted, and worked from a design in his head, so I have no plans to upload for you. Hopefully the pictures will tell the story. He is a freak about leveling and "squaring up". If I held the measuring tape/post level/straight level once, I held them a thousand times. But the result is an awesome coop that should last a long time.
We decided on a place between 2 trees, close to the fence on the north side of our property. DH dug a trench in our hard Texas clay-filled soil that was 6' x 16'. He griped a lot during this phase.

The 4x4 posts went in, perfectly square finally.
Concrete poured in 2' deep footings. No predators digging in here...
Sides of coop and run going up.
Support beams for floor of coop. Coop is 6'x8', with run space underneath. Rest of the run is also 6'x8'.
Roof supports are up.
I was painting like crazy trying to keep up. In retrospect, I would have painted the boards first and then touched up when finished, but we started the coop mid-October and were racing to finish before the first big winter storm. Oh, and this pic shows the corrugated metal roofing up.
The short side of the coop and run face east and west - long sides face north/south.
Plywood floor and first wall.
Coop walls up and painted. First clean out door in place - opens side to side.
2nd clean out door up, which drops down. Notice the trim is not painted. He didn't want to wait on me.
$20 worth of vinyl flooring stapled on the floor. Good thing I don't lay vinyl floors as a career. Also shows the door opening for the nesting boxes, with our lawn tractor perfectly placed in the opening.

All coop doors now in place. The 2 doors on the short side (which faces west) are a drop down door for the nest boxes on the right and a door on the left to access what will eventually be a small storage space for supplies. That improvement will have to wait until spring.
Fancy nesting boxes built and installed.
Our Pullet-Shut automatic pop door. I love this thing! We bought the whole shebang, the solar charger and the light sensor, and I don't regret a single $$$$$. It's awesome.
Hardware cloth being installed.
The finished (for now) product. We put in a small (cheap) sliding window on the south side, where our prevailing winds come from. There is also a hardware-cloth-covered open space under the eaves that run the length of the coop on the same side. We plan to put another sliding window on the north side in the spring this year that will allow some increased ventilation in the summer. We bought an inexpensive wooden screen door and covered it in hardware cloth.
I can stand up in the main run!
The ramp for entrance to the coop.
The girls seem to like their coop. We have two different roosting bars that run the width of the coop, at different heights. I'm really glad we put some thought into where the coop should go before we built it. We moved our girls into their new home a week before Christmas, and right after Christmas we had a huge blizzard with 50 mph winds. The girls were just fine in their snug little home. The fence on the north side of the coop blocked the wind perfectly and the tree on the west side of the coop will provide shade in our hot Texas summer afternoons,
We also plan to add another door on the north side of the coop this spring. I would also like to add some poop trays below the roosts. Now that we have a bigger coop, we are looking forward to adding a few more chickens to our flock!