After moving into a somewhat rural suburban home last summer my girlfriend and I got real interested in becoming more self sufficient. This spring we built a garden and decided what better way to add to the backyard than our own little flock. So we got 3 Americauna and 3 Barred rock chicks. We have 2 more chicks coming today from a local chicken farmer that picks up compost at our work. Unsure of the breed, but they are adoreable little yellow fluff balls. Anyways enough introduction and time to get to the point. After keeping the chicks in our shed under a brooder light we realized we needed to build a coop quickly and cheaply. We work at a Whole Foods Market so pallets are readily available. The majority of the supplies used came from pallets, with the exception of some 2x4's for stilts, some left over 2x6's from our garden beds, some plywood, and the hardware. The run is currently unfinished, but is being made out of an old aluminum green house frame (greenhouse took off during a bad strom and the tarp got ripped and shredded. I'll add more photos as we continue to finish the run and put everything together. And of course once the girls are able to play around in it.

To start it off we used a smaller sized pallet and covered it in some attic floor sheets we had left over from another project. Any plywood would work fine. We used the pallet cause it weighs about 50 pounds and is super sturdy. We put two 2x4x6's on each corner leaving 2 feet stilts on the bottom so we can put food and water underneath.
Breaking down the pallets and cleaning the planks into usable pieces was the most time consuming part of the whole coop. Our friend Joe's lab was more than happy to help with that though.
We cut the stilts to match up with the size of the pallet planks. The back two stilts were cut about 8 inches shorter to give the roof a slope. We're going to make a lean to style roof that slopes from front to back. Next we used the 2x4 runners from the pallets to attach all the stilts (we used 2x6s on the side because we had extras laying around). Also we attached the stilts around the sides of the pallet. We wanted this thing to be mighty sturdy so there are some right corner bracing hardware and some straight metal reinforcers thrown in there too. (By the way im new to constructing things so my terminology is terrible I am just describing the things I found browsing at Lowes or Home Depot)
Starting to look like a frame at this point.
Now the paneling. These were all made from 1x6 planks off the pallets. They were all heat treated not chemical treated and we sanded them down pretty well. When using pallets for animal structures, gardens, or inside furniture you always want to make sure they are stamped HT or KD meaning heat treated or kiln dried. The chemically treated ones have some nasty stuff you don't want near your girls....or your food. Also a good idea to use ones that were not used for shipping chemicals, oil or any of that kinda goo. Ours were used strictly for shipping cases of dry food and a few for shipping tomato and pepper transplants. It's also not a bad idea to bleach wash the planks because I've heard alot of pallets can contain ecoli and salmonella and other bacteria from the food they carry or being left out to mold and mildew.
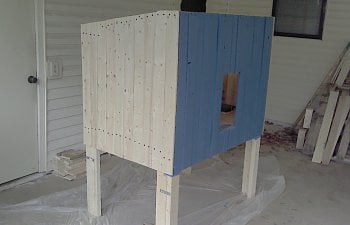
We cut a few of them to make a door way and got to painting! If anyone cares to know we used Peacock blue and Olive.
To get the angle right without doing a lot of measuring drawing and cutting we hung all of the planks and then made one cut with a circular saw following as closely as possible to the 2x6's. Worked out pretty well so we did the same on the back side.
You'll have to take a couple breaks to enjoy a beer or some tea with the flock.
Meanwhile my girlfriend is painting away...
We found some metal peacocks at a garage sale and nailed those to the sides for decoration. We aslo found some decorative hooks that matched the paint and the peacocks so we attached those for some hanging baskets or windchimes or whatever you like.
On the insde of the home I made a little shelf the girls can hop up on and two 5 gallon bucks for nest boxes. Probably going to have to build an add on nesting area later on since we will now have 8 hens. Opposite to this there is a 2x2 perch for them to roost on.
With so many broken pallet pieces and little cut reminances I decided to go with a cedar shake style roof. The frame is two 2x4's and four 1x2's and a sheet of plywood. Just trying to use up as many scraps as I can. It took a while to make all the cuts which I did yesterday. I imagine lining it up perfect and nailing it together today will be rather time consuming as well. Also before I start to piece this part together I went ahead and sprayed all of the plywood with one of those spray paint type rubber coatings I found in Lowes roofing section. I'm hoping this will help keep the water that makes it through the shingles from rotting out the plywood or seeping through to the girls.
Moved the coop back down into the yard. This is the green house frame that we will be using. Last night we wrapped the lower layer of chicken wire around the frame and leveled it out and buried it. We also wrapped it around the back side of the stilts and stapled it to the coop. We installed some big metal hooks to the bottom of the pallet floor so we can hang their food and water dispensers directly under the coop.
We still have got to finish the roof and attach it to the coop and do about 2 more layers of chicken wire up the greenhouse frame.
I will update this post as soon as I get this thing finished! When we first set out to build a coop we took some plans we found to Home Depot and were overwhelmed by the quickly adding up costs of the materials. We ended up ditching our cart that had about 400 bucks worth of hardware and maybe half the lumber we needed and decided to come up with our own design on a severe budget with recycled materials. I hope this can lend ideas to others and inspire them to dig into scrap piles and upcycle other peoples junk to make something awesome. After all you don't have to spend a fortune on lumber to come up with a neat little home for your girls!
To start it off we used a smaller sized pallet and covered it in some attic floor sheets we had left over from another project. Any plywood would work fine. We used the pallet cause it weighs about 50 pounds and is super sturdy. We put two 2x4x6's on each corner leaving 2 feet stilts on the bottom so we can put food and water underneath.
Breaking down the pallets and cleaning the planks into usable pieces was the most time consuming part of the whole coop. Our friend Joe's lab was more than happy to help with that though.
We cut the stilts to match up with the size of the pallet planks. The back two stilts were cut about 8 inches shorter to give the roof a slope. We're going to make a lean to style roof that slopes from front to back. Next we used the 2x4 runners from the pallets to attach all the stilts (we used 2x6s on the side because we had extras laying around). Also we attached the stilts around the sides of the pallet. We wanted this thing to be mighty sturdy so there are some right corner bracing hardware and some straight metal reinforcers thrown in there too. (By the way im new to constructing things so my terminology is terrible I am just describing the things I found browsing at Lowes or Home Depot)
Starting to look like a frame at this point.
Now the paneling. These were all made from 1x6 planks off the pallets. They were all heat treated not chemical treated and we sanded them down pretty well. When using pallets for animal structures, gardens, or inside furniture you always want to make sure they are stamped HT or KD meaning heat treated or kiln dried. The chemically treated ones have some nasty stuff you don't want near your girls....or your food. Also a good idea to use ones that were not used for shipping chemicals, oil or any of that kinda goo. Ours were used strictly for shipping cases of dry food and a few for shipping tomato and pepper transplants. It's also not a bad idea to bleach wash the planks because I've heard alot of pallets can contain ecoli and salmonella and other bacteria from the food they carry or being left out to mold and mildew.
We cut a few of them to make a door way and got to painting! If anyone cares to know we used Peacock blue and Olive.
To get the angle right without doing a lot of measuring drawing and cutting we hung all of the planks and then made one cut with a circular saw following as closely as possible to the 2x6's. Worked out pretty well so we did the same on the back side.
You'll have to take a couple breaks to enjoy a beer or some tea with the flock.
Meanwhile my girlfriend is painting away...
We found some metal peacocks at a garage sale and nailed those to the sides for decoration. We aslo found some decorative hooks that matched the paint and the peacocks so we attached those for some hanging baskets or windchimes or whatever you like.
On the insde of the home I made a little shelf the girls can hop up on and two 5 gallon bucks for nest boxes. Probably going to have to build an add on nesting area later on since we will now have 8 hens. Opposite to this there is a 2x2 perch for them to roost on.
With so many broken pallet pieces and little cut reminances I decided to go with a cedar shake style roof. The frame is two 2x4's and four 1x2's and a sheet of plywood. Just trying to use up as many scraps as I can. It took a while to make all the cuts which I did yesterday. I imagine lining it up perfect and nailing it together today will be rather time consuming as well. Also before I start to piece this part together I went ahead and sprayed all of the plywood with one of those spray paint type rubber coatings I found in Lowes roofing section. I'm hoping this will help keep the water that makes it through the shingles from rotting out the plywood or seeping through to the girls.
Moved the coop back down into the yard. This is the green house frame that we will be using. Last night we wrapped the lower layer of chicken wire around the frame and leveled it out and buried it. We also wrapped it around the back side of the stilts and stapled it to the coop. We installed some big metal hooks to the bottom of the pallet floor so we can hang their food and water dispensers directly under the coop.
We still have got to finish the roof and attach it to the coop and do about 2 more layers of chicken wire up the greenhouse frame.
I will update this post as soon as I get this thing finished! When we first set out to build a coop we took some plans we found to Home Depot and were overwhelmed by the quickly adding up costs of the materials. We ended up ditching our cart that had about 400 bucks worth of hardware and maybe half the lumber we needed and decided to come up with our own design on a severe budget with recycled materials. I hope this can lend ideas to others and inspire them to dig into scrap piles and upcycle other peoples junk to make something awesome. After all you don't have to spend a fortune on lumber to come up with a neat little home for your girls!