[FONT=comic sans ms,sand]Welcome to Peepthis541's page![/FONT]
My name is Dave and I live in Eugene, Oregon. After a couple years hiatus from keeping 2 hens in my front yard, I decided to get some more. I love the idea of raising your own food. I've been gardening for 3 years now and learning more all the time. Having a few hens is more work than managing a garden, but I like the challenges and love being able to use my creativity in constructing a nice environment for them.
[FONT=comic sans ms,sand]Some Flock Photos: [/FONT]
[FONT=comic sans ms,sand]Some Flock Photos: [/FONT]


[FONT=comic sans ms,sand]The fruits of labor, and the nesting box where it all happens. [/FONT]


[FONT=comic sans ms,sand]Hens take a stroll on the sidewalk while free ranging (left). My Barred Rock hen (right). She is one of the most aggressive hens of the flock, despite her small size and young age. [/FONT]


[FONT=comic sans ms,sand]My beautiful Brahmas. The largest but gentlest hens of the flock. [/FONT]

[FONT=comic sans ms,sand]The ladies go to work on my topsoil, looking for bugs and worms. [/FONT]
Here are some recent projects:
[FONT=arial black,avant garde]Chicken Coop and installation of Automatic opening and closing door[/FONT]

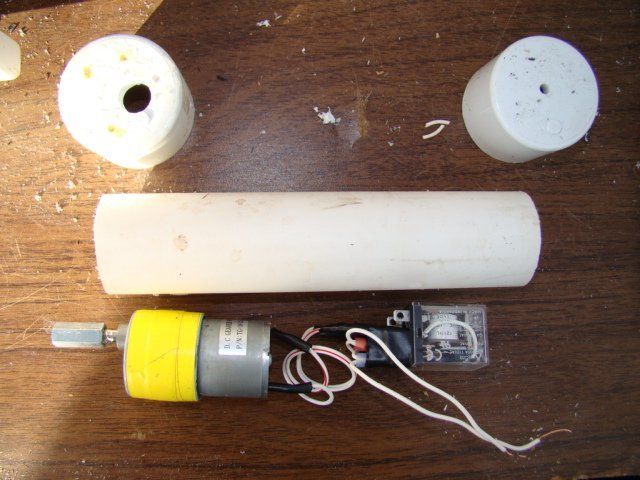
A 12vDC high torque, 5 rpm motor purchased off ebay for ~$12.
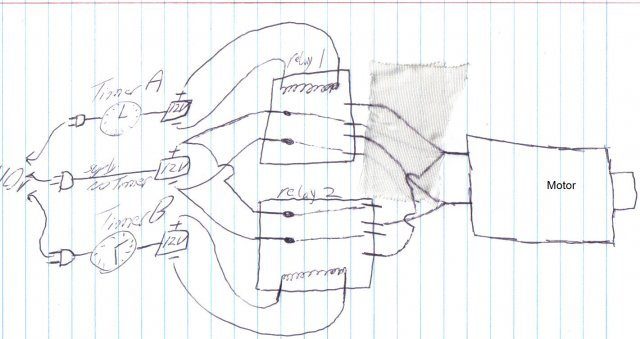
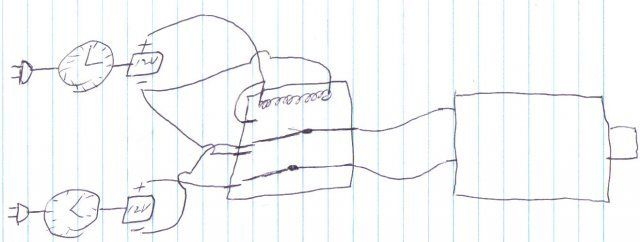
Here's a mock up of the auto-door plan (fig 1.). I drew in a place for diodes in line because I thought it would be the way to control interference of two currents running to one motor at opposing polarities. I ended up using a Double Pole Double Throw relay instead (fig 2.). The relay was ~$9 at Radio Shack.
[FONT=comic sans ms,sand]Figure 2 [/FONT]
[FONT=comic sans ms,sand]Figure 3 [/FONT]
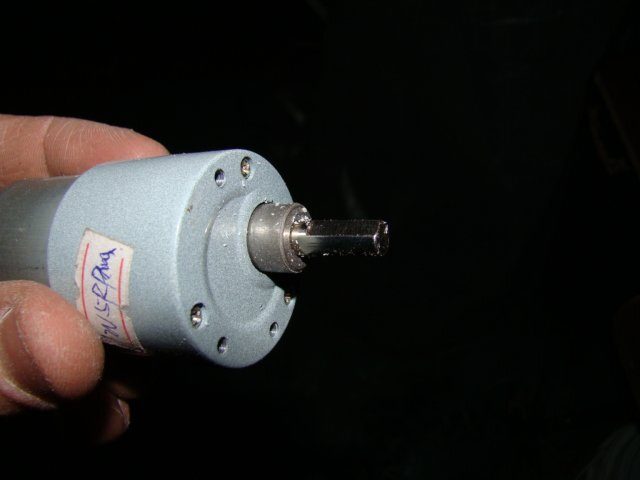
A 12vDC high torque, 5 rpm motor purchased off ebay for ~$12.
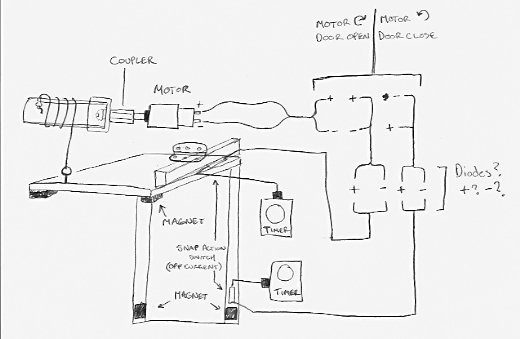
Here's a mock up of the auto-door plan (fig 1.). I drew in a place for diodes in line because I thought it would be the way to control interference of two currents running to one motor at opposing polarities. I ended up using a Double Pole Double Throw relay instead (fig 2.). The relay was ~$9 at Radio Shack.
[FONT=comic sans ms,sand]Figure 2 [/FONT]

[FONT=comic sans ms,sand]Figure 3 [/FONT]
[FONT=comic sans ms,sand]Figure 4 & 5[/FONT]
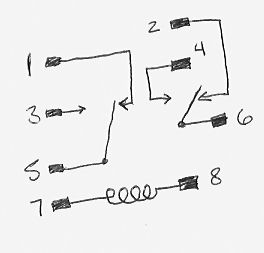
Because of my inexperience in electronics, I had to solicit help from people on BYC (fig. 3-5).
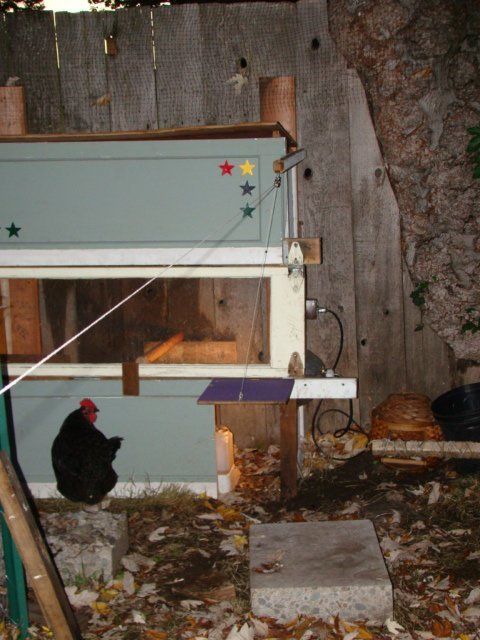
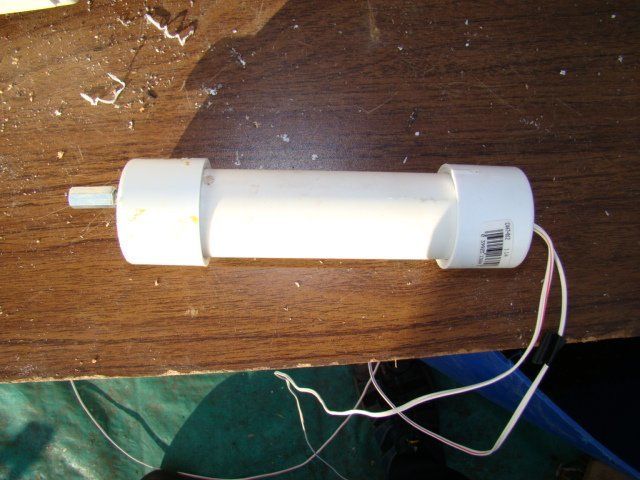
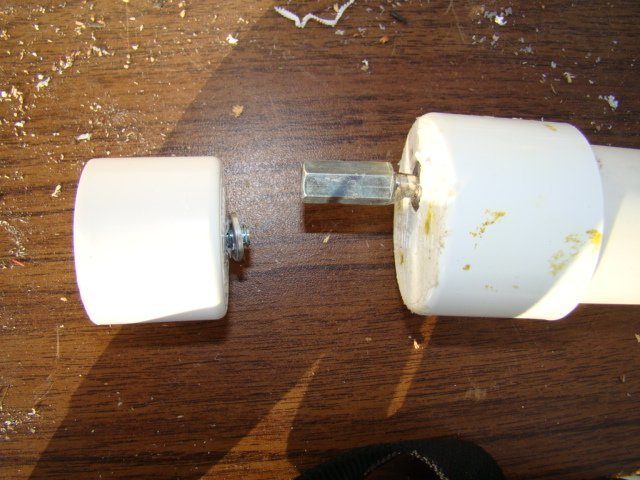
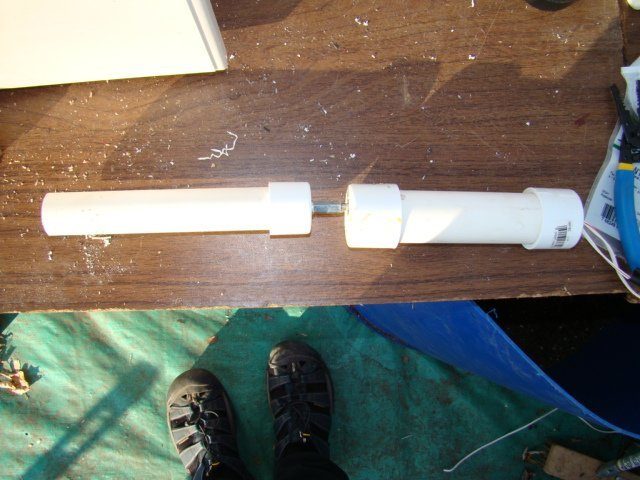
The motor assembly and DPDT relay. The housing is PVC. End caps are drilled to accommodate the motor shaft on one end, and the wiring on the other.
A close up of the motor shaft, to which a 1/4" coupler ($.80) is attached. Then the spool rod is connected via a short 1/4" screw and lock washer through another PVC end cap.
Door frame and flap. Frame is made of plywood and flap is fiberglass to prevent bucking in weather. I installed magnets for a better seal at closed position. At the top right of the frame is a switch installed to cut the power to the motor when door is closed.
I installed a 2x2 to the bottom of the flap to add some weight and assist in a complete close of the door.
Installed door and wiring. I put a couple pieces of wood in between the base of the door frame and the coop because the door was not sealing properly and the switch was not activating and shutting off the motor. The second switch is installed above the door frame to stop the motor when the door is fully opened. The timers cost me about $2-3 each at Goodwill. The 12vDC adapters cost me $3 each at an electronics/computer recycling place.
Coopification of Chicken Tractor
I built a chicken tractor at the same time as I built the hen coop. Unfortunately, it turned out to be not as practical as I would have liked because it was a little too large to wheel around my small and cluttered front yard. Also I was a bit intimidated at the prospect of corralling the hens around and getting them to go into the tractor, or back into their yard.
So, I decided to "coopify" the tractor and build a roosting and nesting house on top of it. It is still movable, however much heavier now, so it will probably be a two person job to move it around the yard.
The tractor was made entirely out of salvaged and recycled materials. The only exception was the wire.
One side of the coop. With a hinged panel to provide access for cleaning.
The roof area is the roosting area, and below is the nesting box.
Sliding doors provide access to the roosting compartment.
Close ups of the nesting areas (left) and roosting areas (right). A 2x2 foot perch was added to the opening of the nest box to keep shavings in. Also a platform was added outside of the nest box to help them enter or jump up to roosting area.
The finished product. Outside access door installed at bottom. Hinged flap installed at roosting compartment floor to allow sweeping out of wood shavings.
[FONT=arial black,avant garde]Auto Watering system and Feeder (PVC)[/FONT]
[FONT=comic sans ms,sand]4" PVC pipes are mounted under a shelf where a 5 gallon bucket sits holding extra feed. [/FONT]
[FONT=comic sans ms,sand] The PVC pipes have large holes cut in them so hens can have access to feed as it flows down.
*The 90 degree elbows are not ideal (feed has to be coerced down into the horizontal pipes by shaking), but it was the only way this would work in the area I wanted it to without destroying the porch fence. [/FONT]
[FONT=comic sans ms,sand] Auto watering system. A hose is connected to a toilet water intake valve, which restricts the water's intake after it reaches a certain level. This level is just below the openings I made on the sides of the bucket.
I copied this design from the BYC DIY page. Thanks! [/FONT]
The motor assembly and DPDT relay. The housing is PVC. End caps are drilled to accommodate the motor shaft on one end, and the wiring on the other.
A close up of the motor shaft, to which a 1/4" coupler ($.80) is attached. Then the spool rod is connected via a short 1/4" screw and lock washer through another PVC end cap.


Door frame and flap. Frame is made of plywood and flap is fiberglass to prevent bucking in weather. I installed magnets for a better seal at closed position. At the top right of the frame is a switch installed to cut the power to the motor when door is closed.

I installed a 2x2 to the bottom of the flap to add some weight and assist in a complete close of the door.


Installed door and wiring. I put a couple pieces of wood in between the base of the door frame and the coop because the door was not sealing properly and the switch was not activating and shutting off the motor. The second switch is installed above the door frame to stop the motor when the door is fully opened. The timers cost me about $2-3 each at Goodwill. The 12vDC adapters cost me $3 each at an electronics/computer recycling place.
Coopification of Chicken Tractor
I built a chicken tractor at the same time as I built the hen coop. Unfortunately, it turned out to be not as practical as I would have liked because it was a little too large to wheel around my small and cluttered front yard. Also I was a bit intimidated at the prospect of corralling the hens around and getting them to go into the tractor, or back into their yard.
So, I decided to "coopify" the tractor and build a roosting and nesting house on top of it. It is still movable, however much heavier now, so it will probably be a two person job to move it around the yard.


The tractor was made entirely out of salvaged and recycled materials. The only exception was the wire.


One side of the coop. With a hinged panel to provide access for cleaning.


The roof area is the roosting area, and below is the nesting box.


Sliding doors provide access to the roosting compartment.


Close ups of the nesting areas (left) and roosting areas (right). A 2x2 foot perch was added to the opening of the nest box to keep shavings in. Also a platform was added outside of the nest box to help them enter or jump up to roosting area.

The finished product. Outside access door installed at bottom. Hinged flap installed at roosting compartment floor to allow sweeping out of wood shavings.
[FONT=arial black,avant garde]Auto Watering system and Feeder (PVC)[/FONT]

[FONT=comic sans ms,sand]4" PVC pipes are mounted under a shelf where a 5 gallon bucket sits holding extra feed. [/FONT]

[FONT=comic sans ms,sand] The PVC pipes have large holes cut in them so hens can have access to feed as it flows down.
*The 90 degree elbows are not ideal (feed has to be coerced down into the horizontal pipes by shaking), but it was the only way this would work in the area I wanted it to without destroying the porch fence. [/FONT]

[FONT=comic sans ms,sand] Auto watering system. A hose is connected to a toilet water intake valve, which restricts the water's intake after it reaches a certain level. This level is just below the openings I made on the sides of the bucket.
I copied this design from the BYC DIY page. Thanks! [/FONT]