Hello, I hope this article isn't too confusing for anyone. I am new to the chicken world. When I decided to get a few chickens, I knew what i wanted. It was much earlier in the year. I couldn't find a coop that was good enough, all the reviews were terrible and the coops fell apart in a year or less. I didn't want to spend the money on the cheap things only to fall aprt, and figured I might be able to make one myself. Plus, eveytime I did find one, they were sold out. I do not have the funds to buy one that is 1000's of dollars. But, I do not know how much I spent. maybe about 600, but not more than 1000. (I hope.) So, I started with researching coops and what the chicks needed, what I needed, and so on. I found myself on this sight an awful lot. A wealth of info here! After I figured that out, I got to work on my plans. rough to say the least. I originally wanted a coop with wheels that I could move around with a portable chicken tractor that hooked up to it. Well that is one of my failures. The wheels worked when it was not yet fully made. But it was too heavy for them in the long run, and too heavy for me to drag around the yard. So, I got my very strong neighbor to drag it to it's spot and I removed the wheels. They at least worked to get us to the permanent spot. Then I tweaked it a bit more. I am hopfully going to upload pictures and tell you about them as I go. Let's see if this works.


If you can make these out and understand my chicken scratch. LOL This is what I started with. It of course changed as I went. Sorry about the size and being sideways. I can't figure out how to change it.
Ok. This was my base frame. These are landscape timbers and 2 by twos. NOTE: Do not use the rounded one! They are a bugger to get measurements with. You see over in the corner? That is part of my standup garden my father made me, he used landscape timbers. But his were square. VERY IMPORTANT! You'll see why later. I painted them, hoping to have less painting later on. Ehh..it sort of worked.
This is the base where the little coop run will be. Once again, do not get the round timbers. I had to chisel out spots where the 2x2's would fit more evenly into. Just made so much more work for myself. This already took me months to do. I can only work for short periods and have horrible arthitis in my hands. My hands were swollen up so badly, and they looked like they belong to a big lumberjacker! lol
It felt so wobbly so I put braces in the corners and pallette pieces under the 2x2's. It also helped to slide it over the ground to it's final resting place.
Here are the wheel brackets I built. It may have worked if I picked bigger wheels for the size of the coop.
Here they are attached. See what I mean? they are way too small.
Putting the roof 2x2's on, cut at a 5 degree angle.
Putting the wall 2x2's on. You can see in this picture how the timbers in the corner are not only rounded, but are not straight. this also did not help me!
And here you can see just how off it is. I had to piecemeal it together. The plan was for it to be 4x4ft. It is a bit bigger. The floor of the coop, and in the back, will be where the nestboxes are.
Sorry, this picture should have been before the floor picture. The 2x2's I put down for the floor to lay on. It's strong. I can climb in it and crawl around.
The trap door I put in for the coop run. The screws were too long, I had to then place a piece of thick corrugated cardboard over the screws so the chicks wouldn't injure themselves, which was a pain, literately!
Looking from the back of the coop, into the nestbox area, with a divider until they are ready to lay. Furring strips were screwed and glued together, and left over flooring was used for the divider.
So, I had to add another little door, so I could get the divider out when the chicks were ready to lay. this is that door space and a better look at the furring strips.
The hardware cloth on the run part of the coop. and a shower tension rod with the wheels up. It was a good plan, but it was just too heavy for me in the end. I later used the shower tension rod as the curtain holder for the nestbox area.
Now the free palette wood. (BTW: if you have a Food Depot where you live, you can have their palettes as long as they aren't the blue or red ones.) This is the back of the coop, Top part is fixed (I think I should have made that open as well. Not sure I could change it now though. The middle door is the nest box, the bottom door is to the floor, where I can clean it out.
Side palette wall with the hardware cloth on the window areas for ventilation.
This is the other side wall, with the door i was telling you about to remove the divider for the nest boxes.
All finished side wall, you can see the plastic bag covered roost bar inside it too.
My little run door, made out of pvc and s biner clamps and wire. So when they are in the coop run, I can push the tractor up against it, and open that and they can get in it. I think I will have to change how it opens though. now the 'hinge' is at the top. Not sure they will be able to push it open or not. I think that would be a fairly easy fix, if it's a problem.
I caulked the whole thing from the inside and outside.. It's pretty tight.
Got some cheap vinyl stick on flooring at HD, again you can see the piecemeal I had to do to get it all covered.
Got some different sized dog crate trays to place to catch the poo, and make it easier for me to clean. I can pull them out from either end of the coop.
This is the front of the coop, without the front door.
Door on, and roof on. Again, I had to piecemeal the roof, and also you can see just how 'Off' it is. I just trimmed it. Ideally I should have gotten another strip of roof, but HD was all out, so I piecemealed it and used flexible clear caulk and did all the seams up there and stuff. It does not leak, not one drop. Also, the front door is one door in this picture. after we got it in it's permanent place I realized it may be better to have a split door so I took the piece that connected the vertical and horizontal palette wood, and added another hinge, to make two doors, top and bottom.
Here it is moved to it's permanent place, between my sheds by the help of two very strong neighbors.
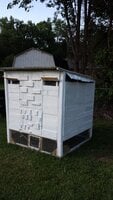
here it is, painted with the windows open and the split front door, and no wheels.
Finished side door for the nest box divider. also I tried to staple the hardware cloth to the base of the coop, but it didn't work. I wanted it so i could lift it up and cut the grass underneath it. So, when I lifted it all the staples popped. So I ziptied them and put 6 inch U shaped stakes in to hold it. when I pull up the stakes, I can rest them on the hooks and pull the hardware cloth up and hook that with the ties and mow under it. Works like a charm.
This is the door split open. I also added a screen door with a spring loaded hook and eye. since it gets no shade and that will help ventilate it. the lower door opens up and fits perfect with the tractor I made, so they can hop right from the coop to the tractor. (I hope)
Both doors open
You can see the trap door and the pull out trays and the roost bar and the tension rod with curtain I made from an old daybed cover, I no longer have. Oh I also gorilla taped the roof before I siliconed it to make the space smaller, as I said, not one drop gets in.
Nest box door opened, I tried to stick the vinyl to the sides, it didn't hold, so I just gorilla taped it. I had to keep reminding myself that the chickens wouldn't care.
Bottom back door under the nest box door open where I can pull out the poop trays.
Here's the side door with the pull out so you can see what i did there.
Looking from nest box door, with the divider half out. That tray will hopefully work ok for the chickens, to lay. once I put bedding in it. I think it's a tray for a snake cage.
I have plans to paint flowers on the outsdie of it. I just have to get up the guts to start penciling in everything! I am not an artist and it intimidates me.
My chicken tractor. Nice big front door that goes over the bottom door of the coop, and I can also crawl in there. The tarp is a drawstring, which I have wraped around the handles. I wish the tarp also had gromets so I can use the lawn staples to stake it down better.
Best idea ever, what to make this little access door. I can hang their food from a rope and clamp in the shade or at the front of the tractor, and place their water in. I can even grab them right from the little door. I made a roost bar too, but they ahven't used it yet. I thought maybe it was too slippery, so I put gorilla tape around it, but maybe it's not wide enough. Not sure how i can adapt that.
Now, this is not PVC, it is pex pipe. I had a bunch left over from a previous garden project. Note: PVC glue does not work on pex pipe, if you are wondering, and I had to get these little clamps and try to tighten them down a whole lot. I am pretty happy with it, but it was a pain, again. Next time I may just use pvc. Our HD did not have very many fittings for it either, like that are available for pvc fittings. so I had to come up with ways to make it work. But in the end it is light and works well, and the chicks got the hang of it right away.
So things I would change or not do the next time: Now, keep in mind this will probably change as the chicks are still not old enough to live there yet.
1) add another movable door to the back of the coop.
2) Do NOT use Rounded Landscape Timbers!
3)make it light enough, and have big enough wheels to move it yourself.
4)PVC instead of PEX pipe for the tractor.
I'm sure there will be more. But overall I am very happy with this, considering I have never built anything before in my life! I guess I learned a lot via osmosisi from my construction type father. Thanks Dad!
If I forgot to touch on anything, please ask questions, I will try to remember as much for you as I can.
Thank you for taking the time to look at this very VERY LONG post!
If you can make these out and understand my chicken scratch. LOL This is what I started with. It of course changed as I went. Sorry about the size and being sideways. I can't figure out how to change it.
Ok. This was my base frame. These are landscape timbers and 2 by twos. NOTE: Do not use the rounded one! They are a bugger to get measurements with. You see over in the corner? That is part of my standup garden my father made me, he used landscape timbers. But his were square. VERY IMPORTANT! You'll see why later. I painted them, hoping to have less painting later on. Ehh..it sort of worked.
This is the base where the little coop run will be. Once again, do not get the round timbers. I had to chisel out spots where the 2x2's would fit more evenly into. Just made so much more work for myself. This already took me months to do. I can only work for short periods and have horrible arthitis in my hands. My hands were swollen up so badly, and they looked like they belong to a big lumberjacker! lol
It felt so wobbly so I put braces in the corners and pallette pieces under the 2x2's. It also helped to slide it over the ground to it's final resting place.
Here are the wheel brackets I built. It may have worked if I picked bigger wheels for the size of the coop.
Here they are attached. See what I mean? they are way too small.
Putting the roof 2x2's on, cut at a 5 degree angle.
Putting the wall 2x2's on. You can see in this picture how the timbers in the corner are not only rounded, but are not straight. this also did not help me!
And here you can see just how off it is. I had to piecemeal it together. The plan was for it to be 4x4ft. It is a bit bigger. The floor of the coop, and in the back, will be where the nestboxes are.
Sorry, this picture should have been before the floor picture. The 2x2's I put down for the floor to lay on. It's strong. I can climb in it and crawl around.
The trap door I put in for the coop run. The screws were too long, I had to then place a piece of thick corrugated cardboard over the screws so the chicks wouldn't injure themselves, which was a pain, literately!
Looking from the back of the coop, into the nestbox area, with a divider until they are ready to lay. Furring strips were screwed and glued together, and left over flooring was used for the divider.
So, I had to add another little door, so I could get the divider out when the chicks were ready to lay. this is that door space and a better look at the furring strips.
The hardware cloth on the run part of the coop. and a shower tension rod with the wheels up. It was a good plan, but it was just too heavy for me in the end. I later used the shower tension rod as the curtain holder for the nestbox area.
Now the free palette wood. (BTW: if you have a Food Depot where you live, you can have their palettes as long as they aren't the blue or red ones.) This is the back of the coop, Top part is fixed (I think I should have made that open as well. Not sure I could change it now though. The middle door is the nest box, the bottom door is to the floor, where I can clean it out.
Side palette wall with the hardware cloth on the window areas for ventilation.
This is the other side wall, with the door i was telling you about to remove the divider for the nest boxes.
All finished side wall, you can see the plastic bag covered roost bar inside it too.
My little run door, made out of pvc and s biner clamps and wire. So when they are in the coop run, I can push the tractor up against it, and open that and they can get in it. I think I will have to change how it opens though. now the 'hinge' is at the top. Not sure they will be able to push it open or not. I think that would be a fairly easy fix, if it's a problem.
I caulked the whole thing from the inside and outside.. It's pretty tight.
Got some cheap vinyl stick on flooring at HD, again you can see the piecemeal I had to do to get it all covered.
Got some different sized dog crate trays to place to catch the poo, and make it easier for me to clean. I can pull them out from either end of the coop.
This is the front of the coop, without the front door.
Here it is moved to it's permanent place, between my sheds by the help of two very strong neighbors.
here it is, painted with the windows open and the split front door, and no wheels.
Finished side door for the nest box divider. also I tried to staple the hardware cloth to the base of the coop, but it didn't work. I wanted it so i could lift it up and cut the grass underneath it. So, when I lifted it all the staples popped. So I ziptied them and put 6 inch U shaped stakes in to hold it. when I pull up the stakes, I can rest them on the hooks and pull the hardware cloth up and hook that with the ties and mow under it. Works like a charm.
Both doors open
You can see the trap door and the pull out trays and the roost bar and the tension rod with curtain I made from an old daybed cover, I no longer have. Oh I also gorilla taped the roof before I siliconed it to make the space smaller, as I said, not one drop gets in.
Nest box door opened, I tried to stick the vinyl to the sides, it didn't hold, so I just gorilla taped it. I had to keep reminding myself that the chickens wouldn't care.
Bottom back door under the nest box door open where I can pull out the poop trays.
Here's the side door with the pull out so you can see what i did there.
Looking from nest box door, with the divider half out. That tray will hopefully work ok for the chickens, to lay. once I put bedding in it. I think it's a tray for a snake cage.
I have plans to paint flowers on the outsdie of it. I just have to get up the guts to start penciling in everything! I am not an artist and it intimidates me.
My chicken tractor. Nice big front door that goes over the bottom door of the coop, and I can also crawl in there. The tarp is a drawstring, which I have wraped around the handles. I wish the tarp also had gromets so I can use the lawn staples to stake it down better.
Best idea ever, what to make this little access door. I can hang their food from a rope and clamp in the shade or at the front of the tractor, and place their water in. I can even grab them right from the little door. I made a roost bar too, but they ahven't used it yet. I thought maybe it was too slippery, so I put gorilla tape around it, but maybe it's not wide enough. Not sure how i can adapt that.
Now, this is not PVC, it is pex pipe. I had a bunch left over from a previous garden project. Note: PVC glue does not work on pex pipe, if you are wondering, and I had to get these little clamps and try to tighten them down a whole lot. I am pretty happy with it, but it was a pain, again. Next time I may just use pvc. Our HD did not have very many fittings for it either, like that are available for pvc fittings. so I had to come up with ways to make it work. But in the end it is light and works well, and the chicks got the hang of it right away.
So things I would change or not do the next time: Now, keep in mind this will probably change as the chicks are still not old enough to live there yet.
1) add another movable door to the back of the coop.
2) Do NOT use Rounded Landscape Timbers!
3)make it light enough, and have big enough wheels to move it yourself.
4)PVC instead of PEX pipe for the tractor.
I'm sure there will be more. But overall I am very happy with this, considering I have never built anything before in my life! I guess I learned a lot via osmosisi from my construction type father. Thanks Dad!
If I forgot to touch on anything, please ask questions, I will try to remember as much for you as I can.
Thank you for taking the time to look at this very VERY LONG post!