Chickadoodle Heights
A year ago my partner and I moved to our new dream home in Keighley, West Yorkshire, England. When viewing the house one of the first things I saw was the garden and I fell in love! It also had bedrooms etc. but really the garden was what sold it") So having moved in the only thing missing was chickens.
So having moved in the only thing missing was chickens.
I didn't draw up plans as such. I used this site and 'Chicken Coops for Dummies' to inspire me, addressing problems as they arose. I did my homework, trying to learn from others to make the best coop I could, to make it easy to clean, comfortable for the birds and not too much of an eye sore as the coop is visible from a well used public footpath.
I have never kept chickens before. My boyfriend grew up on a wildfowl reserve, so what he doesn't know about birds isn't worth knowing. However, these chickens were my project, and apart from a little manual labour (sometimes a man is needed!) it's all my own work. All the good bits, the bad bits are mine.
In the beginning....
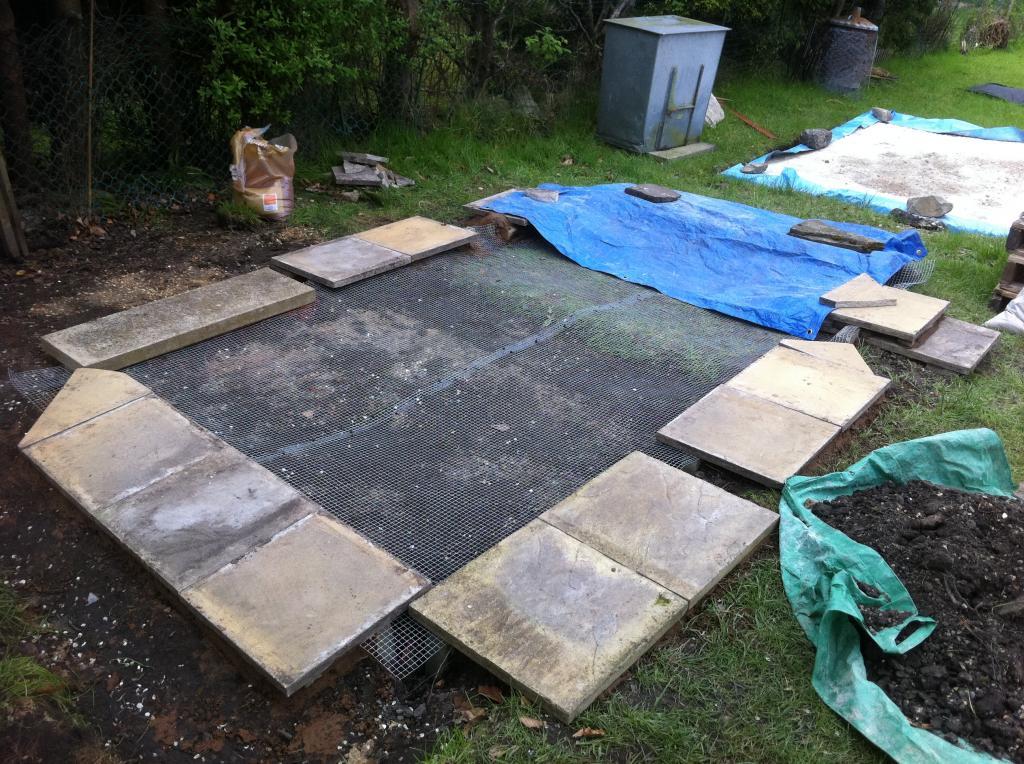
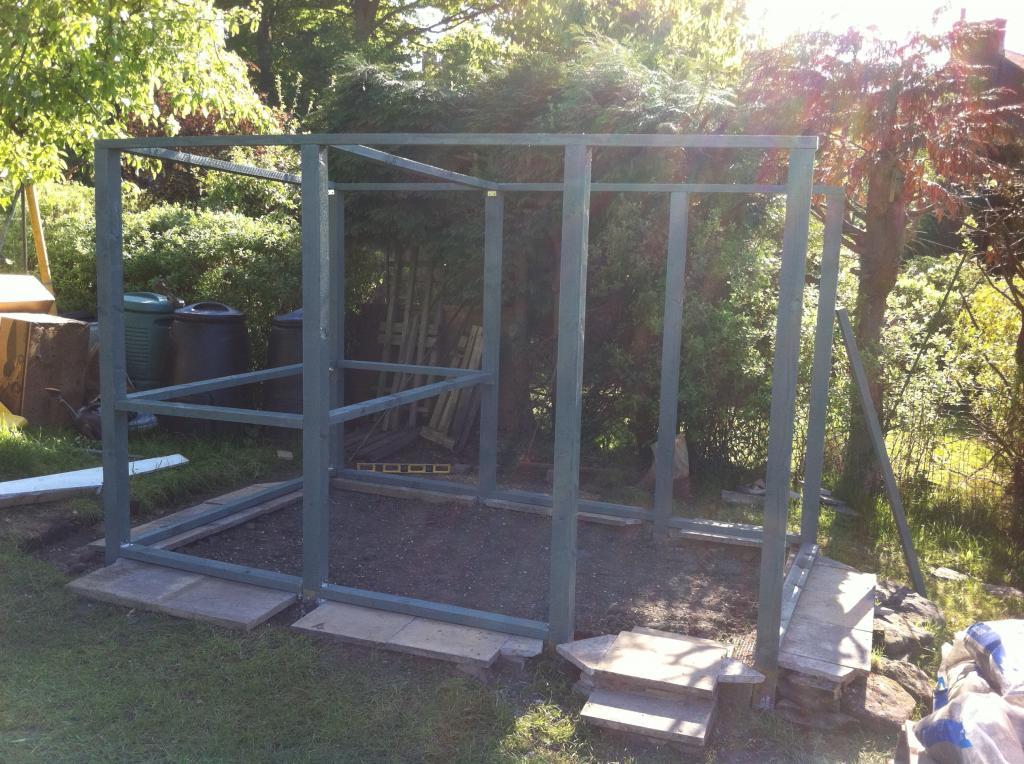
When we moved in we noticed that the shed we inherited was pretty much 30% rotten, from a bad leak in the roof. That would have to go. Or not entirely... We pulled it down and I salvaged the wood that had not been wet and rotten through. We cleared the paving stones it had been sitting on and marked out the space for the coop. The plan was for 4-6 bantams, so I have marked out 1.8mx3m. Colleagues and friends had mentioned problems with rodents in the area, so I laid the leftover paving stones vertically to create a barrier.

To be doubly secure I laid a base of mesh (hardware cloth) on the base as well. I also laid some paving stones flat over the vertical ones to give a good base.
My garden is challenging. It's sloped and quite wet, so plonking a wooden frame on the soil is not an option as it would likely sink in or slide. So I decided to build my coop on legs, as I had seen in several other BYC designs. So the next stage was to concrete in some posts. I also heeded advice from other BYC'ers and have painted pretty much as I have gone along.
From here I added cross-beams. As I am not terribly handy I have made use of lots of metal brackets to do the hard carpentery for me.
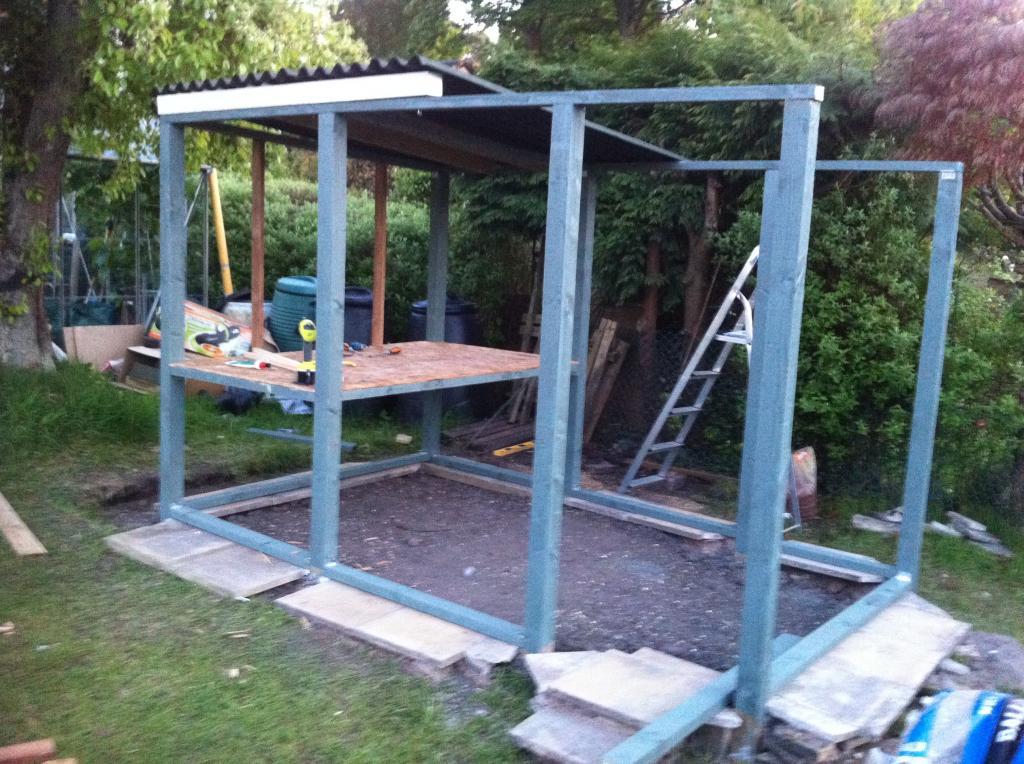
So next was the roof and the floor of the coop. The floor was salvaged from the dead-shed, a bit of OSB that was the roof. I cut out templates using card and drew that on the OSB. Sadly it didn't work and it took ages to get it to fit and even then there are gaps. The roof was much easier. I used two sheets of corrugated bitumen and added couple of extra cross beams. You can't tell too well from this angle, but the front end is about 20cm higher than the other end, creating a slope. I have also cut out little lengths of mesh to fit the profile of the corrugated roof - no point rodent proofing the rest only to leave this as a point of entry!
After this I started adding the salvaged shed panals to the coop. This was hard work and I had a little 'muscle' in the form of my partner and my brother. We moved the cut pieces in place and then while one person held it steady, the other used the nail gun to fasten it down. The nails in the electric nail gun (a pneumatic one was way out of my budget) were about 40mm, and not very thick, so I also used some thicker 55mm nails in key places. I have also used a couple of picture frames to serve as windows! To make them myself was beyond my skills, so bought these wooden frames (one on sale, one at a charity store), painted them up and used bath sealant to make them waterproof.
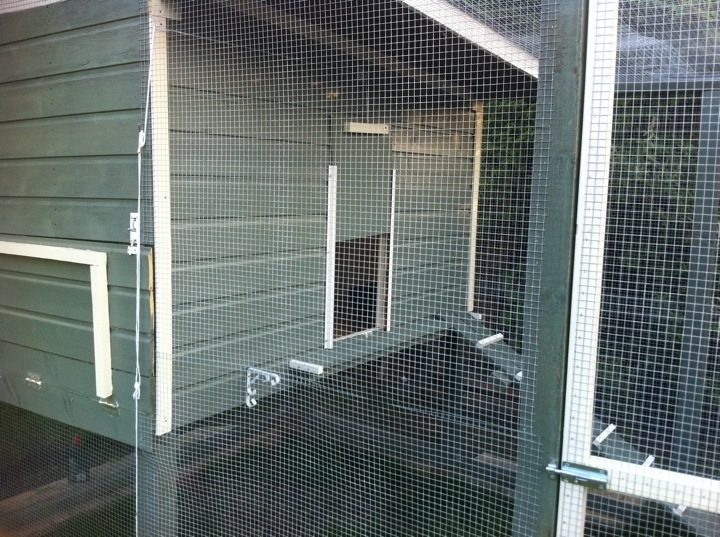
With the help of my brother Steve, I also added a hatch for collecting eggs. To keep contruction to a minimum and reduce the chance for leaks, I have chosen to have an internal next box, which I will build at a later stage. This is hinged at the bottom, with two latches on the top. This is so I can have both hands free when collecting eggs and serves as a deterrent for our Jack Russell Terriers who want to 'help'
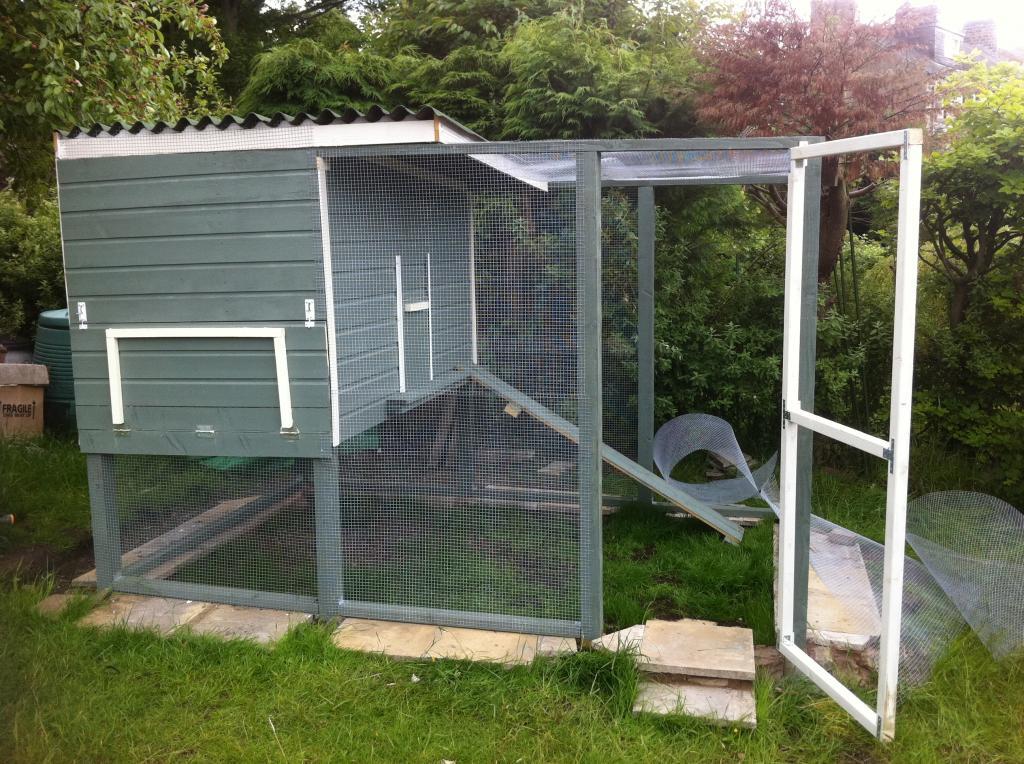
Mesh on, door on. Again, advice from BYC'ers was to have a walk in door for the coop. I am glad I did this, even though I found it quite hard to hang the door. The mesh was added with the use of the nail gun (it also does staples), which was pretty easy. Also with a mesh roof to protect from cats and rodents.
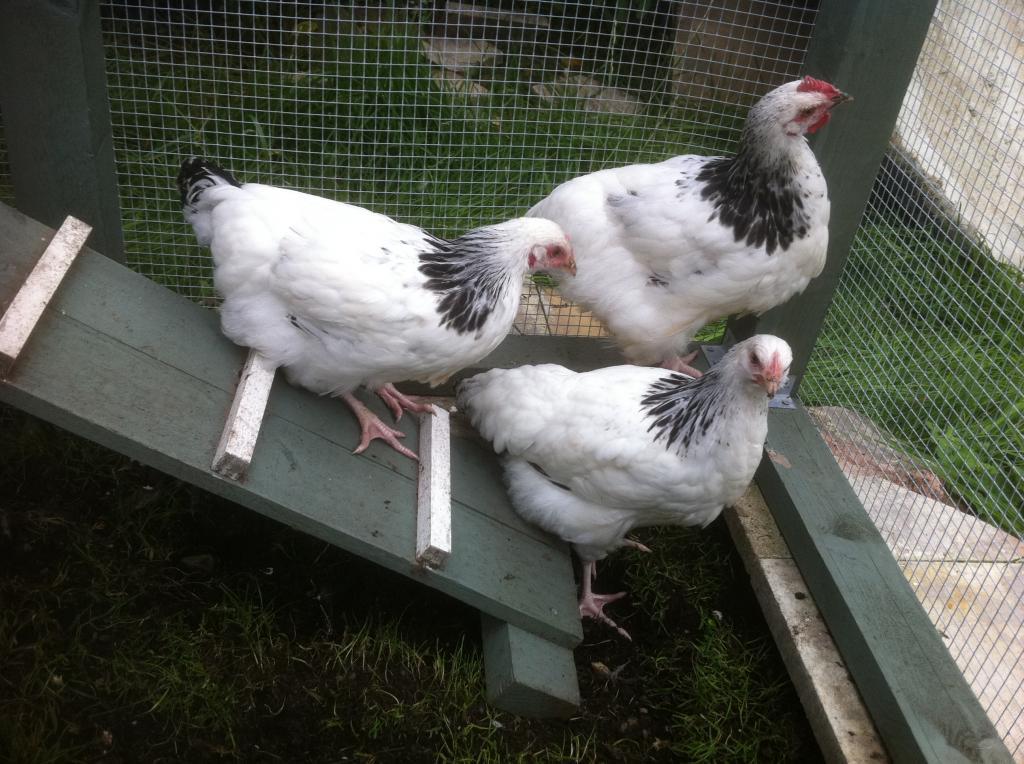
Detail here is of my 'pop door'. I salvaged two metal 'S' shaped rails, which I've painted up and screwed in to make a runner for the door. Finding a suitable door was less straightforward and I experimented a few times. The tongue and groove I salvaged from the shed was too thick and didn't stay totally flat. I tried using an old wooden shelf, again too thich and too heavy. Eventually I used some laminate flooring which I've painted and sealed (I painted it with exterior wood glue), which has worked a treat! Here I pull on a cord to lift and lower. Also seen here is my ramp. Not having kept chickens, I wasn't sure how well they would get in and out of a coop this high. My BF assured me they would fly up, but I still wanted to give them a helping hand. To allow for easier access (for me!) I have placed it to the far side of the coop and made a little shelf for them to run along. The little white bracket is for hanging treats!
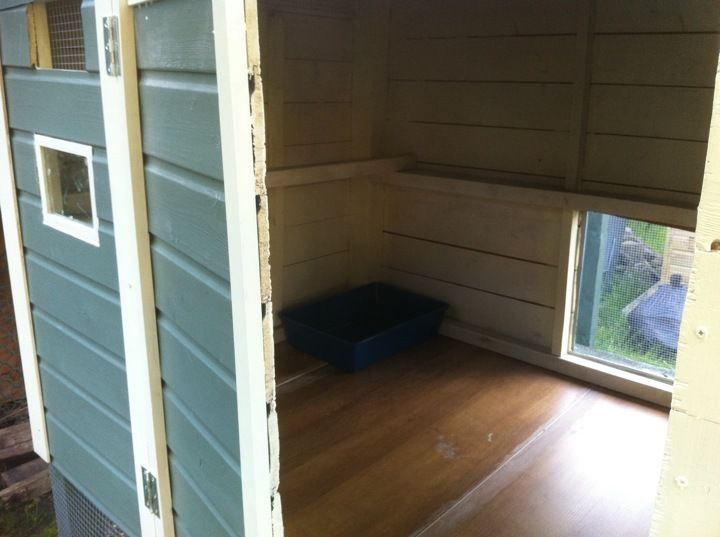
Again, mindfull of BYC advice, I thought I should put in a nice flooring. Ideally I would have used vinyl, but I couldn't find any cast-offs going for free and a box of slightly damaged laminate flooring was going cheap. Another factor in this was that at this stage I didn't have a car, so all trips to the hardware store were done by taxi, so I couldn't just try other places. In hindsight, vinyl would have been easier to fit, and waterproof to boot. However, I don't know if the cheaper vinyl would get scratched by the chicken claws? Anyway, this is how it looked. I sealed the joins with exterior wood glue to help make it more waterproof.
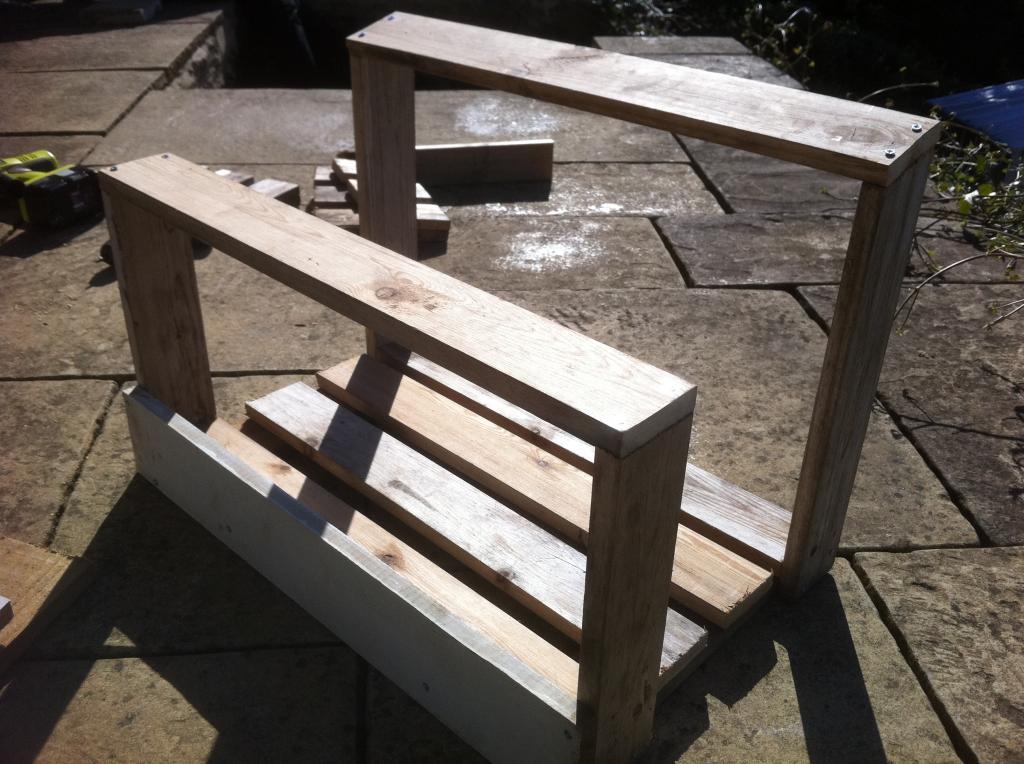
Having built the coop, I now set about the task of the nest box. I figured two nests would be more than plenty. I found some small kitty-litter trays, which I thought would be good for bantams, so I built it based on their dimensions. I wanted to have removable trays for cleaning, and also be able to pull out the whole thing to make it easier to do the 'big' cleans. From our greenhouse, I salvaged an old book shelf that was also partially rotten. I cut off the rotten stuff and had enough to make a frame.
Roof and partition added
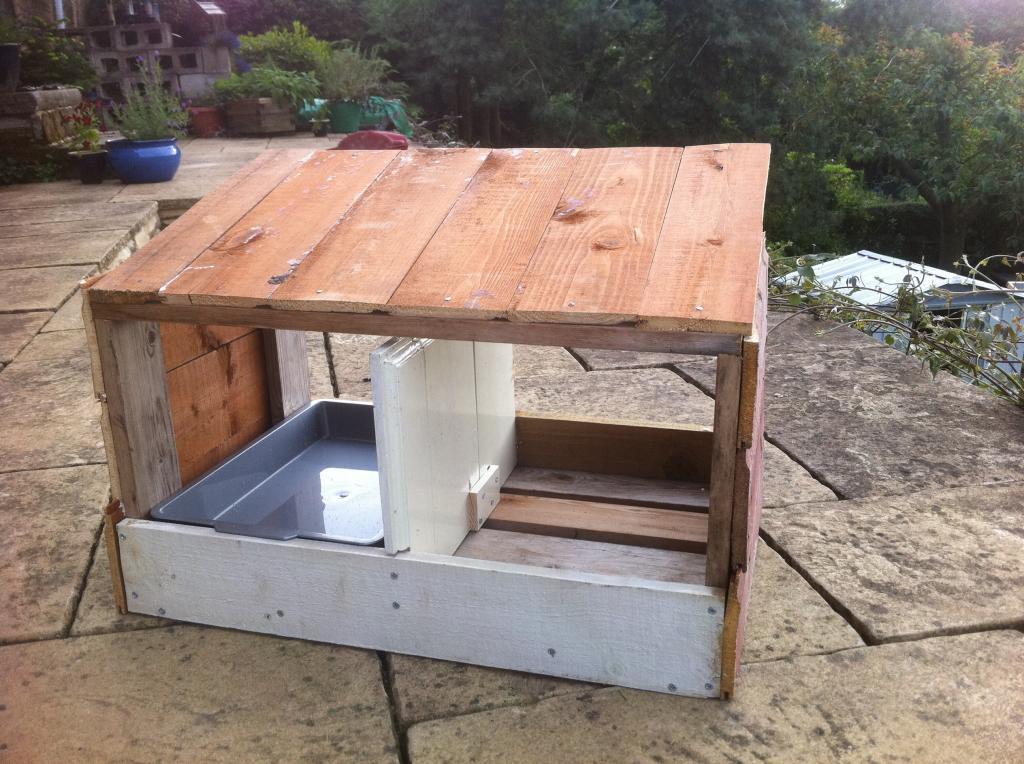
Sides added. As you can see, the grey plastic litter tray (on the left) fits in nicely (phew!).
Time for some birds!
OK, so now we are ready to roll! My in-laws have chickens, so they kindly offered to hatch some eggs for us. So I bought some hatching eggs on eBay, and out of 12 eggs I only had two hatch. Here are my first two, Tom and Barbara, Partridge Wyndotte bantams. Also here is Margot, the surrogate mum, looking after them (kindly loaned to us by my in-laws, it was still a little cold). You can also see here that we have grass in the coop. That didn't last long, but it was nice while they were small
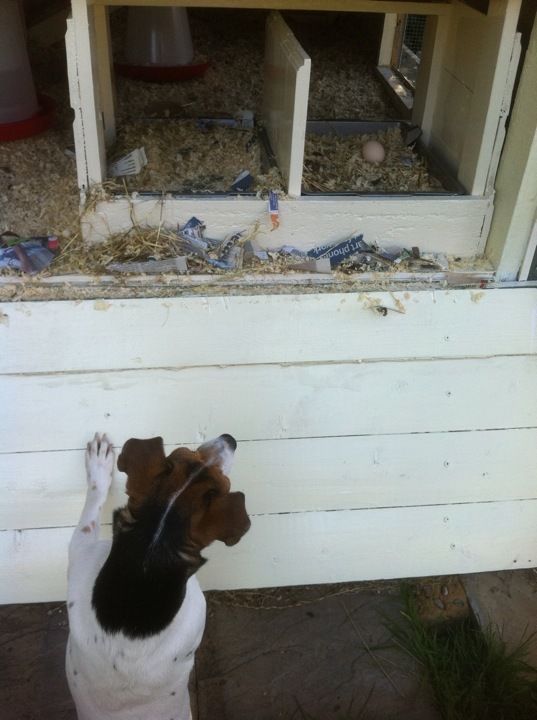
Here is my dog Pippa helping me collect one of our first eggs (laid by Margot at this stage).
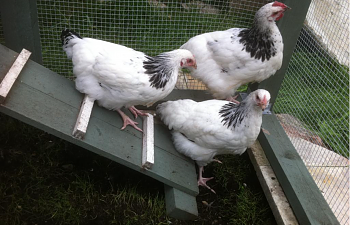
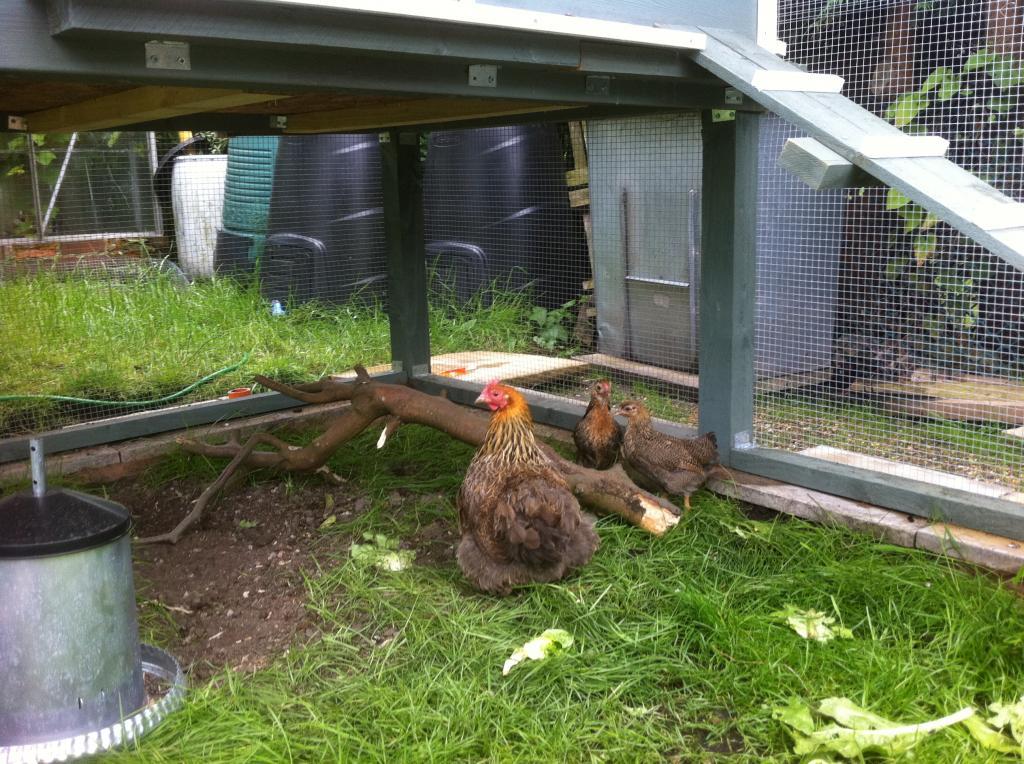
So a few months have now passed. I have three more chickens, and Margot has gone back to her owners. Please welcome Jerry, Sue and Mel to Chickadoodle Heights! They are Light Sussex bantams, but much bigger than the Wyndottes. Here they are at about 12 weeks, already bigger than Tom and Barbara, who are about 6 weeks older.
So what else is new in the 'Heights?
First of all, thanks to a less than desirable neighbour, I have put looks on all the doors Dodgy 'chav' with destructive children, didn't want my boys and girls going a wandering if they decided to open it up while I'm at work. I also added in better latches, mostly because the cheaper ones didn't fir well and were starting to rust.
Next I added an automatic door opener. Genius. My coop is about 30m from my back door, down some steep steps and across a muddy garden. Saves me one journey a day and is a life saver if we are away as my neighbours only need to top up water and food.
With the arrival of the Light Sussex, it was clear that the little roost I installed was not enough. The Sussex were roosting in the nest boxes, so I put in a wider roost (a 2x4) which they prefer.
Maintainance has included doing some planing of the doors, as all the wood has swollen in the wet weather. Having painted it, I didn't expect it to swell, but there you go. I'll have to check for gaps when it shrinks back in summer. I also had to add in some extra supports to the corrugated bitumen roof, following some heavy rain which caused sagging and leaks. This was a bit of an undertaking to take the whole roof off and do the carpentery, with the chickens still in the pen. So if you use bitumen, add in plenty of supports, particulary if you might get debris on the roof, like I did with fallen pears off a nearby tree which I think caused the original 'sag'.
On the roof I also removed some of the foam inserts which fit between the bitumen and the supporting wood, to improve ventilation. This seems to have worked to bring the condensation down a bit.
I had to do a bit of 'fixing' when I dropped something heavy on a paving stone by the human door, smashing it. I used some cement and stones to create a new step, moulding it with wood and my hands. The finished result is pretty good in that it is functional, although looks a bit more rustic than I would have liked.
Was has worked?
The shelf and ramp work well. Margot sussed it out straightaway, and the Tom and Barbara learned within 24 hours. The Light Sussex took a bit longer, but they use it too now.
The plan to have all the insides of the coop removable for easy cleaning has worked well. I take all the 'bits' out and then it's a much easier job to scoop out the poop and sawdust. It also means I have been able to clean the poop off the nest box, roost and ladder. Even the ramp gets a clean every now and again.
Hanging the outside drinker from a shelving bracket works well. It's right by the door so easy to grab when time is short. I use a long thin rope and a carabiner, which not only makes it quick, but easy enough when wearing gloves, esp during this cold weather.
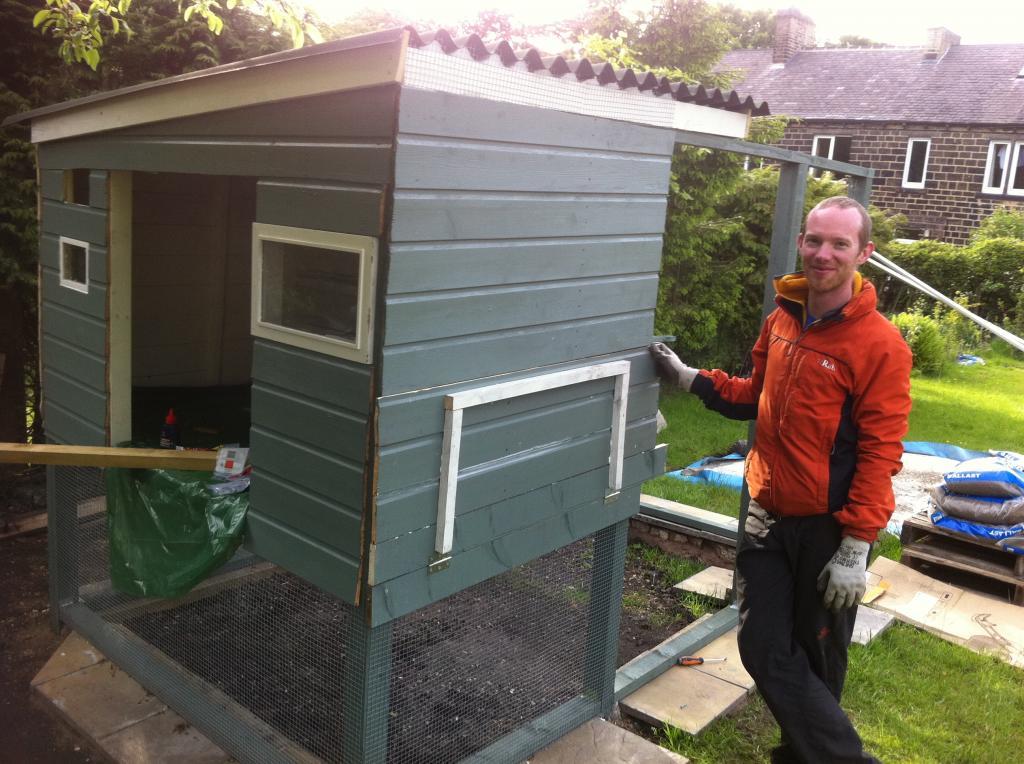
Walk in door for humans. This is great. No hunching over, I can go in and move around easily.
Birds seem happy with the nest box, although only one of the boxes is used. I have found a few eggs elsewhere in the coop, but I think that was when the Light Sussex were still using it to roost.
In terms of the build, painting bits before assembly gave a better finish. Where I didn't do that, the finished result isn't as good.
What might I want to change?
Bigger run. Really. They seem happy enough, but would like to give them more space. Am trying to work out how I can expand it.
Some sort of cover over more of the run. It gets wet here in Keighley, West Yorkshire. I think a bit more dry space would be nice for my boys and girls.
More, more, more. I am loving having my chickens. Plans of expansion are afoot. At the very least I have started on a tractor to allow them to 'visit' other parts of the garden.
I can't quite get a drinker to work inside the coop without it leaking or becoming full of sawdust. One i bought that could be hung was poorly designed and water constantly leaked. Another couldn't be hung so got knocked off the block I put it on and leaked everywhere.
Has anyone worked out the orgin of the names for my chickens?
Tom, Barbara, Jerry (and Margot) - they are characters from 'The Good Life', a 1970's tv sitcom about a couple who quit their jobs and go into self sufficiency. People would ask me how I was enjoying the 'Good Life', so the chicks were named accordingly.
Sue and Mel - a bit of a tangent, but two British tv presenters did a series where they re-created the 'Good Life' and lived as the characters from the sitcom had. The presenters were called Sue Perkins and Giles Coren (http://www.bbc.co.uk/programmes/b00w08q9), but as my partner is called Giles I couldn't very well name a chicken after him! Sue also usually works with a funny lady called Mel, and when the two are on screen together they cluck and fuss like hens, so it seemed to fit
A year ago my partner and I moved to our new dream home in Keighley, West Yorkshire, England. When viewing the house one of the first things I saw was the garden and I fell in love! It also had bedrooms etc. but really the garden was what sold it
So having moved in the only thing missing was chickens.I didn't draw up plans as such. I used this site and 'Chicken Coops for Dummies' to inspire me, addressing problems as they arose. I did my homework, trying to learn from others to make the best coop I could, to make it easy to clean, comfortable for the birds and not too much of an eye sore as the coop is visible from a well used public footpath.
I have never kept chickens before. My boyfriend grew up on a wildfowl reserve, so what he doesn't know about birds isn't worth knowing. However, these chickens were my project, and apart from a little manual labour (sometimes a man is needed!) it's all my own work. All the good bits, the bad bits are mine.
In the beginning....
When we moved in we noticed that the shed we inherited was pretty much 30% rotten, from a bad leak in the roof. That would have to go. Or not entirely... We pulled it down and I salvaged the wood that had not been wet and rotten through. We cleared the paving stones it had been sitting on and marked out the space for the coop. The plan was for 4-6 bantams, so I have marked out 1.8mx3m. Colleagues and friends had mentioned problems with rodents in the area, so I laid the leftover paving stones vertically to create a barrier.
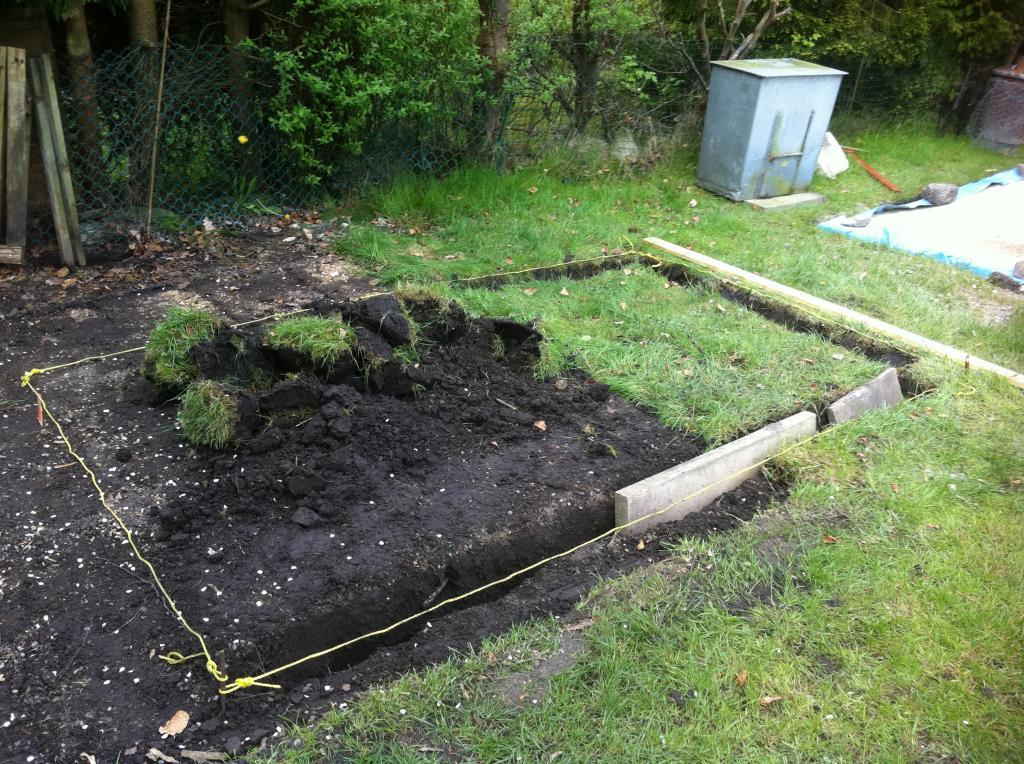
To be doubly secure I laid a base of mesh (hardware cloth) on the base as well. I also laid some paving stones flat over the vertical ones to give a good base.
My garden is challenging. It's sloped and quite wet, so plonking a wooden frame on the soil is not an option as it would likely sink in or slide. So I decided to build my coop on legs, as I had seen in several other BYC designs. So the next stage was to concrete in some posts. I also heeded advice from other BYC'ers and have painted pretty much as I have gone along.
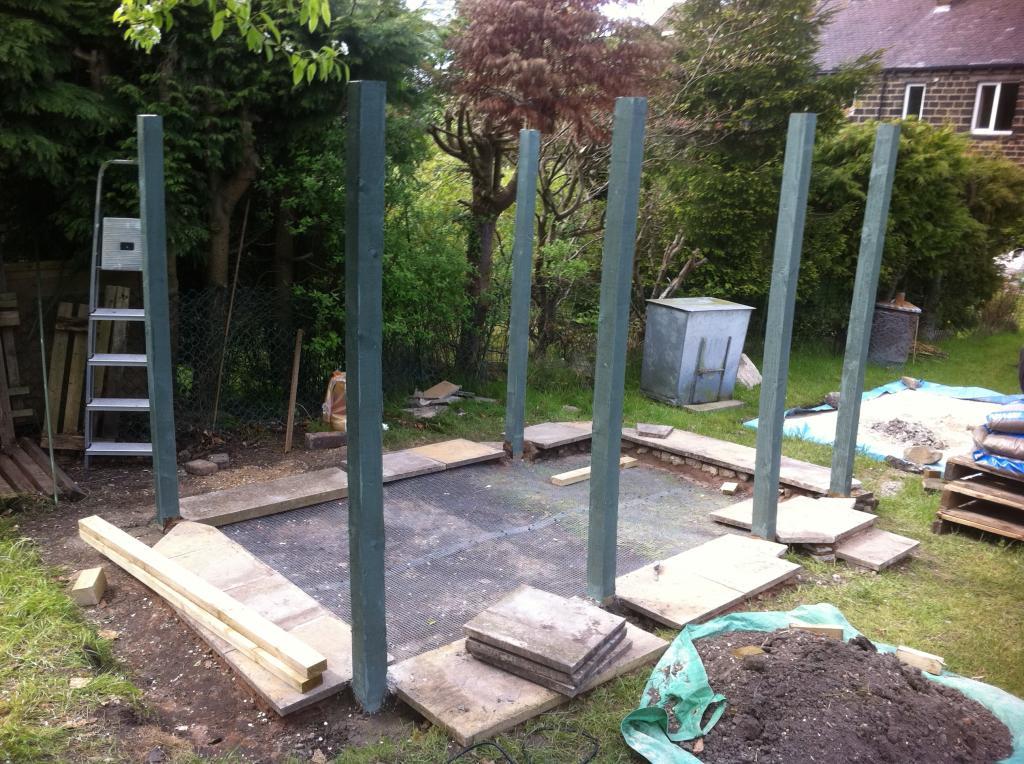
From here I added cross-beams. As I am not terribly handy I have made use of lots of metal brackets to do the hard carpentery for me.
So next was the roof and the floor of the coop. The floor was salvaged from the dead-shed, a bit of OSB that was the roof. I cut out templates using card and drew that on the OSB. Sadly it didn't work and it took ages to get it to fit and even then there are gaps. The roof was much easier. I used two sheets of corrugated bitumen and added couple of extra cross beams. You can't tell too well from this angle, but the front end is about 20cm higher than the other end, creating a slope. I have also cut out little lengths of mesh to fit the profile of the corrugated roof - no point rodent proofing the rest only to leave this as a point of entry!
After this I started adding the salvaged shed panals to the coop. This was hard work and I had a little 'muscle' in the form of my partner and my brother. We moved the cut pieces in place and then while one person held it steady, the other used the nail gun to fasten it down. The nails in the electric nail gun (a pneumatic one was way out of my budget) were about 40mm, and not very thick, so I also used some thicker 55mm nails in key places. I have also used a couple of picture frames to serve as windows! To make them myself was beyond my skills, so bought these wooden frames (one on sale, one at a charity store), painted them up and used bath sealant to make them waterproof.
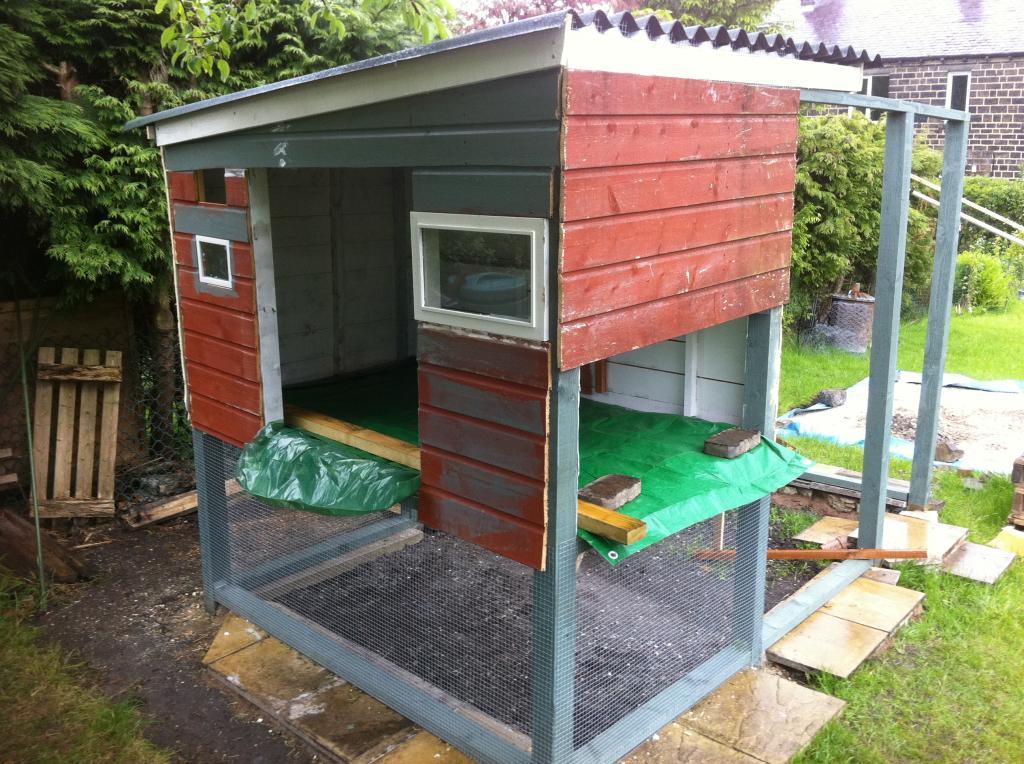
With the help of my brother Steve, I also added a hatch for collecting eggs. To keep contruction to a minimum and reduce the chance for leaks, I have chosen to have an internal next box, which I will build at a later stage. This is hinged at the bottom, with two latches on the top. This is so I can have both hands free when collecting eggs and serves as a deterrent for our Jack Russell Terriers who want to 'help'
Mesh on, door on. Again, advice from BYC'ers was to have a walk in door for the coop. I am glad I did this, even though I found it quite hard to hang the door. The mesh was added with the use of the nail gun (it also does staples), which was pretty easy. Also with a mesh roof to protect from cats and rodents.
Detail here is of my 'pop door'. I salvaged two metal 'S' shaped rails, which I've painted up and screwed in to make a runner for the door. Finding a suitable door was less straightforward and I experimented a few times. The tongue and groove I salvaged from the shed was too thick and didn't stay totally flat. I tried using an old wooden shelf, again too thich and too heavy. Eventually I used some laminate flooring which I've painted and sealed (I painted it with exterior wood glue), which has worked a treat! Here I pull on a cord to lift and lower. Also seen here is my ramp. Not having kept chickens, I wasn't sure how well they would get in and out of a coop this high. My BF assured me they would fly up, but I still wanted to give them a helping hand. To allow for easier access (for me!) I have placed it to the far side of the coop and made a little shelf for them to run along. The little white bracket is for hanging treats!
Again, mindfull of BYC advice, I thought I should put in a nice flooring. Ideally I would have used vinyl, but I couldn't find any cast-offs going for free and a box of slightly damaged laminate flooring was going cheap. Another factor in this was that at this stage I didn't have a car, so all trips to the hardware store were done by taxi, so I couldn't just try other places. In hindsight, vinyl would have been easier to fit, and waterproof to boot. However, I don't know if the cheaper vinyl would get scratched by the chicken claws? Anyway, this is how it looked. I sealed the joins with exterior wood glue to help make it more waterproof.
Having built the coop, I now set about the task of the nest box. I figured two nests would be more than plenty. I found some small kitty-litter trays, which I thought would be good for bantams, so I built it based on their dimensions. I wanted to have removable trays for cleaning, and also be able to pull out the whole thing to make it easier to do the 'big' cleans. From our greenhouse, I salvaged an old book shelf that was also partially rotten. I cut off the rotten stuff and had enough to make a frame.
Roof and partition added
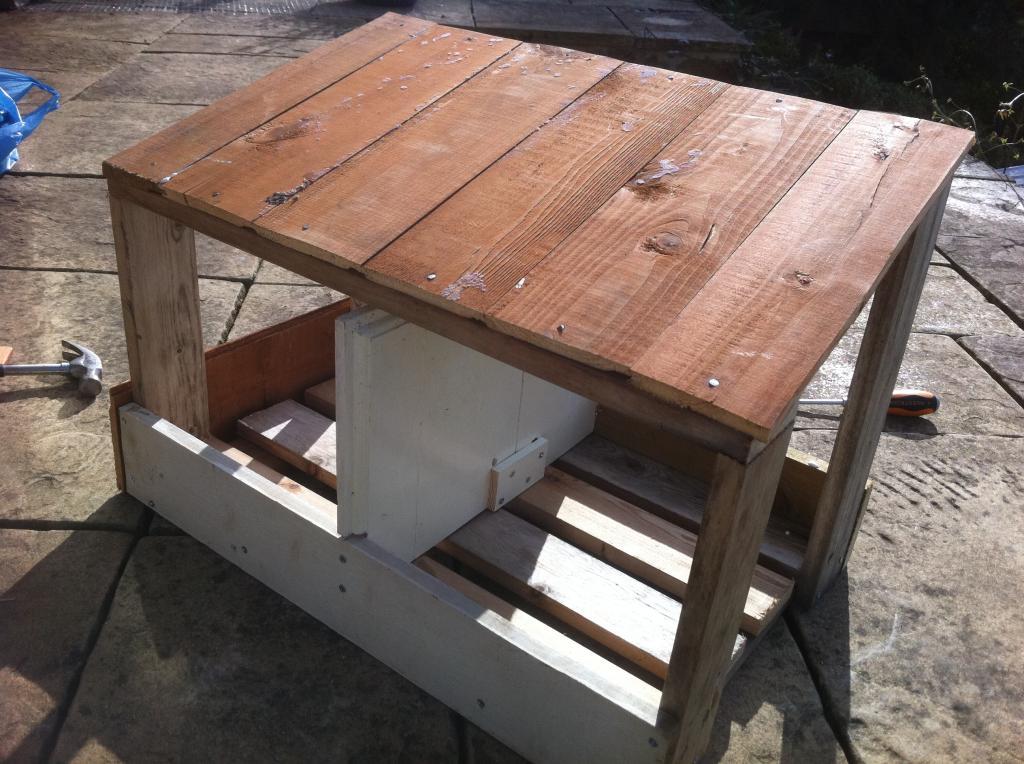
Sides added. As you can see, the grey plastic litter tray (on the left) fits in nicely (phew!).
Time for some birds!
OK, so now we are ready to roll! My in-laws have chickens, so they kindly offered to hatch some eggs for us. So I bought some hatching eggs on eBay, and out of 12 eggs I only had two hatch. Here are my first two, Tom and Barbara, Partridge Wyndotte bantams. Also here is Margot, the surrogate mum, looking after them (kindly loaned to us by my in-laws, it was still a little cold). You can also see here that we have grass in the coop. That didn't last long, but it was nice while they were small
Here is my dog Pippa helping me collect one of our first eggs (laid by Margot at this stage).
So a few months have now passed. I have three more chickens, and Margot has gone back to her owners. Please welcome Jerry, Sue and Mel to Chickadoodle Heights! They are Light Sussex bantams, but much bigger than the Wyndottes. Here they are at about 12 weeks, already bigger than Tom and Barbara, who are about 6 weeks older.
So what else is new in the 'Heights?
First of all, thanks to a less than desirable neighbour, I have put looks on all the doors
Dodgy 'chav' with destructive children, didn't want my boys and girls going a wandering if they decided to open it up while I'm at work. I also added in better latches, mostly because the cheaper ones didn't fir well and were starting to rust.Next I added an automatic door opener. Genius. My coop is about 30m from my back door, down some steep steps and across a muddy garden. Saves me one journey a day and is a life saver if we are away as my neighbours only need to top up water and food.
With the arrival of the Light Sussex, it was clear that the little roost I installed was not enough. The Sussex were roosting in the nest boxes, so I put in a wider roost (a 2x4) which they prefer.
Maintainance has included doing some planing of the doors, as all the wood has swollen in the wet weather. Having painted it, I didn't expect it to swell, but there you go. I'll have to check for gaps when it shrinks back in summer. I also had to add in some extra supports to the corrugated bitumen roof, following some heavy rain which caused sagging and leaks. This was a bit of an undertaking to take the whole roof off and do the carpentery, with the chickens still in the pen. So if you use bitumen, add in plenty of supports, particulary if you might get debris on the roof, like I did with fallen pears off a nearby tree which I think caused the original 'sag'.
On the roof I also removed some of the foam inserts which fit between the bitumen and the supporting wood, to improve ventilation. This seems to have worked to bring the condensation down a bit.
I had to do a bit of 'fixing' when I dropped something heavy on a paving stone by the human door, smashing it. I used some cement and stones to create a new step, moulding it with wood and my hands. The finished result is pretty good in that it is functional, although looks a bit more rustic than I would have liked.
Was has worked?
The shelf and ramp work well. Margot sussed it out straightaway, and the Tom and Barbara learned within 24 hours. The Light Sussex took a bit longer, but they use it too now.
The plan to have all the insides of the coop removable for easy cleaning has worked well. I take all the 'bits' out and then it's a much easier job to scoop out the poop and sawdust. It also means I have been able to clean the poop off the nest box, roost and ladder. Even the ramp gets a clean every now and again.
Hanging the outside drinker from a shelving bracket works well. It's right by the door so easy to grab when time is short. I use a long thin rope and a carabiner, which not only makes it quick, but easy enough when wearing gloves, esp during this cold weather.
Walk in door for humans. This is great. No hunching over, I can go in and move around easily.
Birds seem happy with the nest box, although only one of the boxes is used. I have found a few eggs elsewhere in the coop, but I think that was when the Light Sussex were still using it to roost.
In terms of the build, painting bits before assembly gave a better finish. Where I didn't do that, the finished result isn't as good.
What might I want to change?
Bigger run. Really. They seem happy enough, but would like to give them more space. Am trying to work out how I can expand it.
Some sort of cover over more of the run. It gets wet here in Keighley, West Yorkshire. I think a bit more dry space would be nice for my boys and girls.
More, more, more. I am loving having my chickens. Plans of expansion are afoot. At the very least I have started on a tractor to allow them to 'visit' other parts of the garden.
I can't quite get a drinker to work inside the coop without it leaking or becoming full of sawdust. One i bought that could be hung was poorly designed and water constantly leaked. Another couldn't be hung so got knocked off the block I put it on and leaked everywhere.
Has anyone worked out the orgin of the names for my chickens?
Tom, Barbara, Jerry (and Margot) - they are characters from 'The Good Life', a 1970's tv sitcom about a couple who quit their jobs and go into self sufficiency. People would ask me how I was enjoying the 'Good Life', so the chicks were named accordingly.
Sue and Mel - a bit of a tangent, but two British tv presenters did a series where they re-created the 'Good Life' and lived as the characters from the sitcom had. The presenters were called Sue Perkins and Giles Coren (http://www.bbc.co.uk/programmes/b00w08q9), but as my partner is called Giles I couldn't very well name a chicken after him! Sue also usually works with a funny lady called Mel, and when the two are on screen together they cluck and fuss like hens, so it seemed to fit