[FONT=times new roman,times]To: The Chickens
Love, The Dog [/FONT]

(Project is still in the works 4-29-10)
Approx cost of building doghouse from scratch is planned.
We designed this for 2-6 chickens based on the following "rule of thumbs."
Roost: 6-10 inches of space per bird.
Nest boxes: 1 nest box per 4-6 hens.
Space: 1 square foot per bird.
Shade: Is provided by the doghouse itself.
So I think we've got all the necessities covered")
Here's how we did it:
Love, The Dog [/FONT]
(Project is still in the works 4-29-10)
Approx cost of building doghouse from scratch is planned.
We designed this for 2-6 chickens based on the following "rule of thumbs."
Roost: 6-10 inches of space per bird.
Nest boxes: 1 nest box per 4-6 hens.
Space: 1 square foot per bird.
Shade: Is provided by the doghouse itself.
So I think we've got all the necessities covered
Here's how we did it:
CLICK THE CHECKLIST BELOW FOR LARGER VERSION!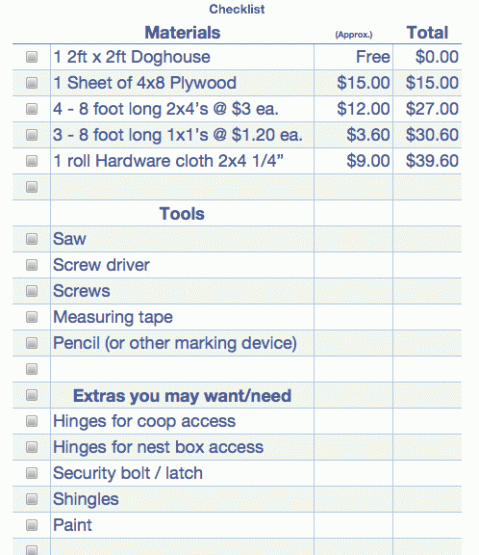
| First step: Get your checklist and your helpers! Remember this is a general guide, as the size of the dog house dictates what other materials you will need. Many of these items can be found as left overs from other projects, or sometimes for free from local listings (Freecycle, Craigslist, Penny saver, the classified section of your paper, etc.). I encourage you to use your imagination to salvage & reuse as much as you possibly can! |
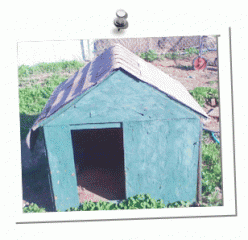
| Start with a salvageable dog house. Here we have a 2ft x 2ft x 3ft (at peak) model. It’s approximately 4 years old but fairly sturdy and in a decent condition still. |
|
| Attach hinges, and a security bolt on the back of the dog house. (May have to remove the wall fully before replacing.) This gives you easy access to clean the house out and remove any “bracing” that may be in the way (only if not a necessary support). |
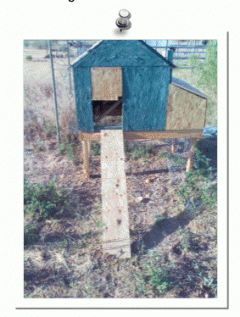
Remove the floor of the dog house. Use the floor to measure out your 2x4’s by placing them directly on top except 1 side. Use your measuring tape and let the 1 side hang off the floor by 1 foot. Then screw the 2x4’s together. In our case we ended up with a 2ft x 3ft rectangle. Colder climates may want to skip this next portion: *Cut one more board to fit “within” your rectangle along the 4th side of the dog house. (Not pictured). This board will be used as support for the hardware cloth later. | 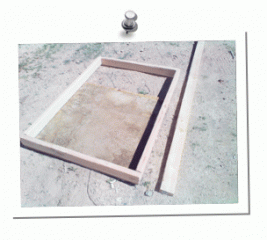
|
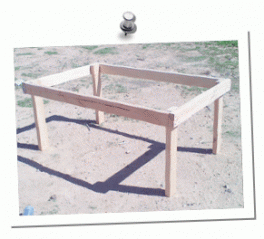
| Cut 1 - 2x4 into 4 equal pieces. Screw these into the corners of the rectangle, turn over and ‘voila’ you have a stand for the dog-coop. |
*Note: Cold climates may not want to cut hole to put in mesh, if so skip to last portion of this section. Cut a hole in the floor of the dog house. Leave 2 inches on the sides and a minimum of 4 inches thinner than the hardware cloth you have. (Our hole is approximately 1.5ft wide x 1ft 8” long.) Sandwich the hardware cloth between the rectangle stand (bottom) & the floor (top). Use your extra 2x4 to either support & sandwich or just support the plywood of the flooring. Now cut a piece of the new plywood (1ft x 2ft for us) and screw it to the base to finish covering the stand. This will complete the floor of the coop! | 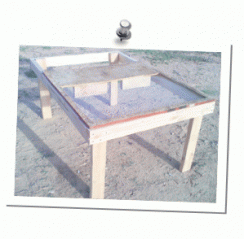
|
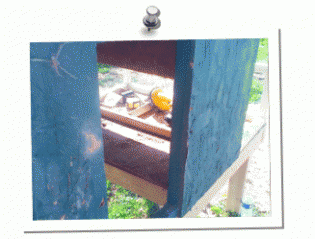
| Place the doghouse on the stand, aligning it with it’s original flooring & attach securely. Remove the wall facing the extended portion of the stand. Cut 1 foot off along the base of the wall and reattach. This picture is looking through the door of the dog-coop, facing the newly cropped wall. (With all of our tools sitting on the extended portion of the flooring.) |
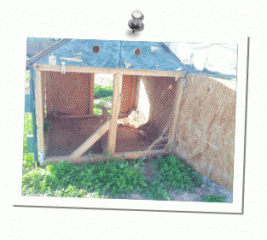
| Using the 1x1’s I suggest building a nest box and THEN attaching it to the dog-coop. We just set the boards on the base and cut them to size sort of guesstimating on the angled pieces and it ended up a little cockeyed. It did work out fine in the end though. You will need 1 more 1x1 than what is shown, along the wall of the dog house to support the roof and give you a place to screw in the hinges. (Shown in a later picture.) | 
|

| After measuring the (slightly tweaked in our case,) nest box frame, measure & cut out plywood to cover it. Keep in mind that the “roof” piece should overlap the walls. *Plan all your plywood needs BEFORE cutting! This will help avoid waste! |
| Here is our “finished” nest box addition. Shingles and paint will have to wait for another time. | 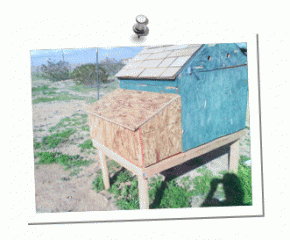
|
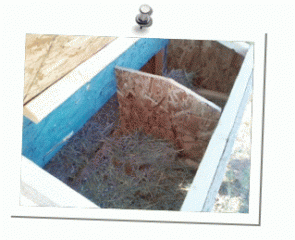
| Here is the inside of the nest box. Complete with extra 1x1 for hinge support (cut at an angle to allow roof to shut properly). The plywood divider for 2 - 1x1 nests and some hay for cushioning. |
| Using the remaining scraps of plywood, create a smaller opening and a ramp into the coop. When planning out the nest boxes we purposely “scrunched” the pieces to one side so we could have one long (nearly 6 foot) ramp piece left over. |
|
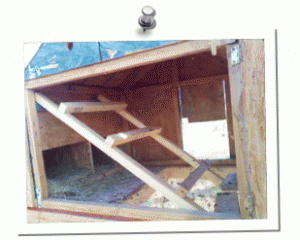
| Using the remaining 1x1’s build a small ladder. This one is nearly 3 feet long and 1.5 feet wide. With a few strategic blocks of scrap 2x4’s and a few extra screws we were able to fasten this securely to the top of the coop and brace it over the mesh. |
| For the chicken run, we used a couple of field fence posts we had and just wrapped the whole thing in chicken wire with plans to build something more sturdy, appealing & larger ASAP. Plywood can be added onto the legs of the coop stand to provide better shade & wind protection. | 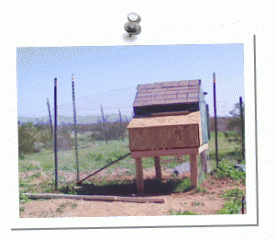
|

| However our local listings searches paid off, and here you can see the giant run we got for the very low price of free. There are some minor repairs that need done and 1 side is not fenced, but we should have enough scraps to manage it all. |
| Oh, and when you're satisfied with your coop & run, don't forget to get your chickens! Pictured here are 4 white leghorns currently living in a rabbit cage brooder inside. We also have 2 older Rhode Island Reds who are already making use of the dog-coop and who seem to love it! | 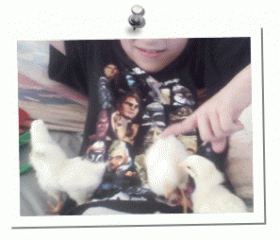
|
The new run is sitting in the side yard waiting for a weekend so we can fix it up and finally FINISH with the 'current' chicken coop.
Just in time for us to start our large metal storage shed (10ft x 10ft) to chicken coop conversion. ^_^ Chickens are addicting!!!
Additional images to be added hopefully the 1st week of May 2010
What would I do differently if I had to do it over again? I'd have measured out the roost ladder instead of just slapping it together. (I was tired, it was hot and I wanted to be DONE!) If I had measured it out carefully so that the roosts were more evenly spaced that would give all the chickens a little more individual room. I definitely wouldn't keep more than 6 chickens at a time in this and that is pushing the limit to the max! Also I would have tried to scrape together enough for an extra plywood board (or tried to find some scraps) to cover the legs of the support (as I wrote in the steps) to offer more shade & WIND protection!