Simple and effectively designed with the homesteader in mind. The Chicken Box!

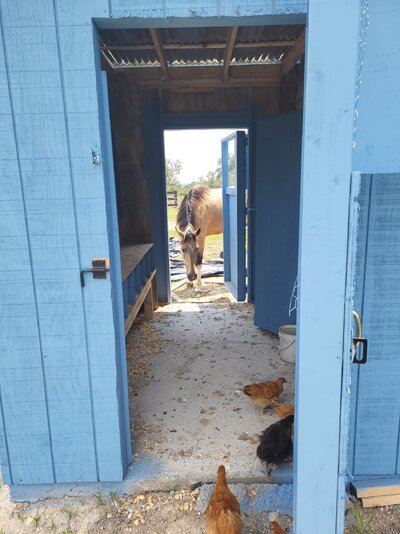
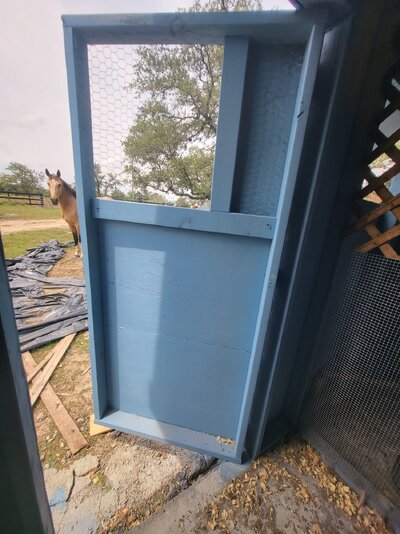
No, it's not the most beautiful coop I'll admit, but two full size doors, for shoveling without having to turn around. two large windows on a 10X10 concrete slab that scrapes and can be sanitized easily makes keeping your birds healthy and clean far easier. We included a solar powered chicken door as well, which is just really cool!
(Big enough for the horse!)
Inside includes a separate room, for raising chicks, multiple spots for roosting bars, and 7 nesting boxes. This design fits about 15 birds comfortably, maxes out at 25 if you leave the separate room open and put a few extra sleeping roost inside. (Although I don't recommend trying to keep 25 all year it would be crammed, really 20 would be my limit unless I plan on butchering by fall.)


The Build!
This coop was around 1,900$ in central texas buying my materials from my local home depot. I had some things lying around, but most of the build was purchased new.
I work in homebuilding with my father, and all of this design comes from standard wall and frame style construction, the same type you would see in commercially built homes or garages. Although a few steps are skipped, we live in a very warm climate, insulation is not even thought of in this build, in fact it's designed to bleed heat as fast as possible. When winter comes we do run a heater IF it freezes. There is space for standard insulation within the framing so it can be included, for about an extra few hundred dollars.
FOUNDATION:
I can assure you, nothing last as long as rock or concrete. In 50 years if the coop falls down and rots, the slab will be there. This slab cost about 50 bags of quikrete, around 570$. It is an exact 10 foot by 10 foot square, and is 3.5 inches thick. We did all of this with a stand mixer, between me and my father it took about 5 hours to pour, screed, and touch up.
WHAT YOU NEED:
-Concrete 50 bags(a mixer is needed)
-One 12 foot 2X4 (screed board, and then reused as a top plate)
-four 10 foot 2x4 pressure treated(form boards, reused as base boards bolted to the concrete)
-Small stakes made of scrap to hold form
-Plastic sheet to cover fill earth
-Metal wire inlay to prevent cracks
-Fill earth
-screws, screwgun, hammer, sledge, trowel, hose, bubble level, concrete pusher or shovel.
-tractor helps but we have pure rock as soil shovel may be fine.
Rubber boots are awesome, but otherwise be prepared to ruin your shoes or feet, concrete is not good on the skin.
PICTURES:
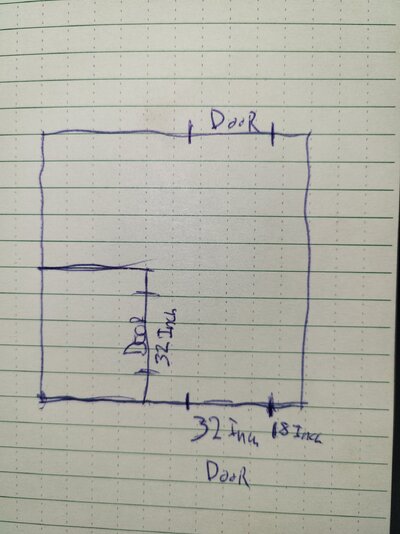
The four 10 foot pressure treated 2x4 boards make the 3.5 inch height when turned on there short side up, I had dug till I got to rock (almost instantly)then brought In fill dirt until the middle was about 2 inches deep and all the sides tapered to 3.5 inches. Some 2x4 scrap cut on a chop saw to a point hammered down holds the square in place and screw the edges together with long screws. (Note: Technically by the way the wood takes up space, it's a 10 foot by 9 foot 9 inches with the window and door sides being the longer sides. It all adds up to 10 by 10 of slab since the width of a 2x4 is 1.5 inches wide)
NOTES ON POURING:
Start on one side, working your way over like a loading bar, when you have a few feet that looks like it is almost past the top of the board get your long 12 foot board, 2 people, and start sawing on top of your forms pushing and pulling back and forth, leveling your slop into perfect bubbly concrete cream. If it's still to high repeat this process till the board floats over your concrete and form boards, then at every stake, have one side pick up over it and angle the board smooth and switch sides. (IMPORTANT: level your form boards with a bubble level before pouring. don't put too many stakes, 2 per side is fine any more and you will have a hard time leveling.)
 example of screeding, notice the left to right loading bar like action. Slop on the right good concrete on the left. Always 2 people. (Concrete sucks I know but it's worth it)
Towards the end you may have extra concrete, just let of fall off the side and clean it up later. Then get a trowel and make any minor adjustments you may want as it dries, after about an hour it hardens, and you can really shape it like playdough and fix any little imperfections.

ITS DONE!! Now for the most fun of any build!
FRAMING:
Concrete is dry, levelish, and ready for a building!
WHAT YOU NEED:
-Forty 2x4x8
-Four 2x4x10
-twelve 4x8 siding boards.
-9 hinges, 5 latches.
-fourteen, 3 inch concrete anchors
-a drill and concrete drill bit sized for your anchors.(size is very important.)
-Framing nail gun, or just screw, everything together. (Screws are over-kill but maybe cheaper if you dont have the tools.)
- chicken wire(we had all the wire already, so this is not included in price, but its a small amount.)
The extra lumber from the concrete that got taken down after it hardened.
PICTURES:
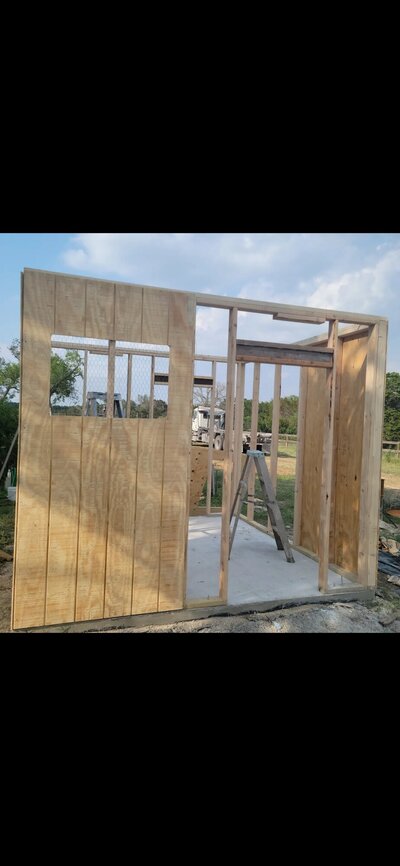
A 4x8 on top of the pressure treated form boards nailed while on the ground then raised into place, held up with old fencing. While it's in place drill three holes through the wood into the concrete and set your anchors, make sure everything is perfect before each hole. A normal 2x4x8 makes up the top bar with an 18inch block makes a bandaid where two boards come together. The board on the ground cut into three pieces will make the bottom of the next wall frame, with the cut making the doors bottom. (Each wall has six 2x4x8 2 foot on center, starting at one side, the side you end at won't be 2 foot on center, but we cut this final piece anyways, make this like a mirror image, don't start one the north end for one wall and the south for the other, or nothing will line up) after everything is in place make a double top plate, by using 2x4x10 on top of the 2x4x8 this helps hold all the seems together. Overlap seems don't continue them.

When you get all your frames up screw them together at the edges. Get your sheeting, put one nail in the very corner so it can still rotate, and then get you level push or pull the whole building until its level, as in the picture. When it's level finish nailing in the sheeting and the building will no longer move on that corner. You must level the whole building before moving on, all 4 sides should have one corner of sheeting.(in the picture we were leveling the final wall, and you can see the other leveled pieces already installed each wall has one board) Windows dont need to be framed out, we simply put wire on the frame where we wanted windows, mesured and cut holes in the siding with a jig saw, doors do get framed out, break your 2 foot on center rule, and frame a 32 inch door with a header between the extra studs. I just made a wood I beam, and nailed it in. Sheet right over where your door frame is, get a jig saw and just cut it in place.
And that's a wrap! One framed box.
ROOFING: sorry it deleted all my work after trying to add a photo, here are the pictures maybe ill come back and fix this
No, it's not the most beautiful coop I'll admit, but two full size doors, for shoveling without having to turn around. two large windows on a 10X10 concrete slab that scrapes and can be sanitized easily makes keeping your birds healthy and clean far easier. We included a solar powered chicken door as well, which is just really cool!
(Big enough for the horse!)
Inside includes a separate room, for raising chicks, multiple spots for roosting bars, and 7 nesting boxes. This design fits about 15 birds comfortably, maxes out at 25 if you leave the separate room open and put a few extra sleeping roost inside. (Although I don't recommend trying to keep 25 all year it would be crammed, really 20 would be my limit unless I plan on butchering by fall.)
The Build!
This coop was around 1,900$ in central texas buying my materials from my local home depot. I had some things lying around, but most of the build was purchased new.
I work in homebuilding with my father, and all of this design comes from standard wall and frame style construction, the same type you would see in commercially built homes or garages. Although a few steps are skipped, we live in a very warm climate, insulation is not even thought of in this build, in fact it's designed to bleed heat as fast as possible. When winter comes we do run a heater IF it freezes. There is space for standard insulation within the framing so it can be included, for about an extra few hundred dollars.
FOUNDATION:
I can assure you, nothing last as long as rock or concrete. In 50 years if the coop falls down and rots, the slab will be there. This slab cost about 50 bags of quikrete, around 570$. It is an exact 10 foot by 10 foot square, and is 3.5 inches thick. We did all of this with a stand mixer, between me and my father it took about 5 hours to pour, screed, and touch up.
WHAT YOU NEED:
-Concrete 50 bags(a mixer is needed)
-One 12 foot 2X4 (screed board, and then reused as a top plate)
-four 10 foot 2x4 pressure treated(form boards, reused as base boards bolted to the concrete)
-Small stakes made of scrap to hold form
-Plastic sheet to cover fill earth
-Metal wire inlay to prevent cracks
-Fill earth
-screws, screwgun, hammer, sledge, trowel, hose, bubble level, concrete pusher or shovel.
-tractor helps but we have pure rock as soil shovel may be fine.
Rubber boots are awesome, but otherwise be prepared to ruin your shoes or feet, concrete is not good on the skin.
PICTURES:
The four 10 foot pressure treated 2x4 boards make the 3.5 inch height when turned on there short side up, I had dug till I got to rock (almost instantly)then brought In fill dirt until the middle was about 2 inches deep and all the sides tapered to 3.5 inches. Some 2x4 scrap cut on a chop saw to a point hammered down holds the square in place and screw the edges together with long screws. (Note: Technically by the way the wood takes up space, it's a 10 foot by 9 foot 9 inches with the window and door sides being the longer sides. It all adds up to 10 by 10 of slab since the width of a 2x4 is 1.5 inches wide)
NOTES ON POURING:
Start on one side, working your way over like a loading bar, when you have a few feet that looks like it is almost past the top of the board get your long 12 foot board, 2 people, and start sawing on top of your forms pushing and pulling back and forth, leveling your slop into perfect bubbly concrete cream. If it's still to high repeat this process till the board floats over your concrete and form boards, then at every stake, have one side pick up over it and angle the board smooth and switch sides. (IMPORTANT: level your form boards with a bubble level before pouring. don't put too many stakes, 2 per side is fine any more and you will have a hard time leveling.)
Towards the end you may have extra concrete, just let of fall off the side and clean it up later. Then get a trowel and make any minor adjustments you may want as it dries, after about an hour it hardens, and you can really shape it like playdough and fix any little imperfections.
ITS DONE!! Now for the most fun of any build!
FRAMING:
Concrete is dry, levelish, and ready for a building!
WHAT YOU NEED:
-Forty 2x4x8
-Four 2x4x10
-twelve 4x8 siding boards.
-9 hinges, 5 latches.
-fourteen, 3 inch concrete anchors
-a drill and concrete drill bit sized for your anchors.(size is very important.)
-Framing nail gun, or just screw, everything together. (Screws are over-kill but maybe cheaper if you dont have the tools.)
- chicken wire(we had all the wire already, so this is not included in price, but its a small amount.)
The extra lumber from the concrete that got taken down after it hardened.
PICTURES:
A 4x8 on top of the pressure treated form boards nailed while on the ground then raised into place, held up with old fencing. While it's in place drill three holes through the wood into the concrete and set your anchors, make sure everything is perfect before each hole. A normal 2x4x8 makes up the top bar with an 18inch block makes a bandaid where two boards come together. The board on the ground cut into three pieces will make the bottom of the next wall frame, with the cut making the doors bottom. (Each wall has six 2x4x8 2 foot on center, starting at one side, the side you end at won't be 2 foot on center, but we cut this final piece anyways, make this like a mirror image, don't start one the north end for one wall and the south for the other, or nothing will line up) after everything is in place make a double top plate, by using 2x4x10 on top of the 2x4x8 this helps hold all the seems together. Overlap seems don't continue them.
When you get all your frames up screw them together at the edges. Get your sheeting, put one nail in the very corner so it can still rotate, and then get you level push or pull the whole building until its level, as in the picture. When it's level finish nailing in the sheeting and the building will no longer move on that corner. You must level the whole building before moving on, all 4 sides should have one corner of sheeting.(in the picture we were leveling the final wall, and you can see the other leveled pieces already installed each wall has one board) Windows dont need to be framed out, we simply put wire on the frame where we wanted windows, mesured and cut holes in the siding with a jig saw, doors do get framed out, break your 2 foot on center rule, and frame a 32 inch door with a header between the extra studs. I just made a wood I beam, and nailed it in. Sheet right over where your door frame is, get a jig saw and just cut it in place.
And that's a wrap! One framed box.
ROOFING: sorry it deleted all my work after trying to add a photo, here are the pictures maybe ill come back and fix this