The Chicken Experience
Our Coop Building Experience...

Let me start by saying this has been a pretty cool experience for my DH and I. He has been enlisting the help of friends to finish the barn -- adding a loft, installing wiring, framing in the tack room (even wiring it for phone and Internet), plumbing for a washer, sink, and hot water tank, wiring for a dryer, installing a French drain for the wash rack.... The new "Hen Palace" became our own little project, with just a little help from a friend to hook up the wiring. My DH had a chicken as a pet as a child, and has been very supportive of the whole immersion into what I call "The Chicken Experience"...
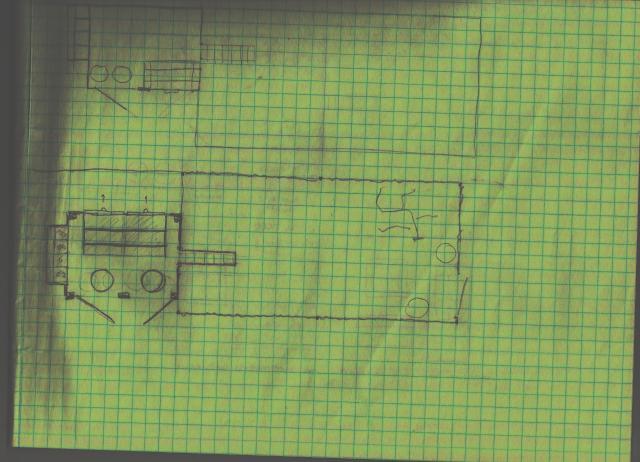
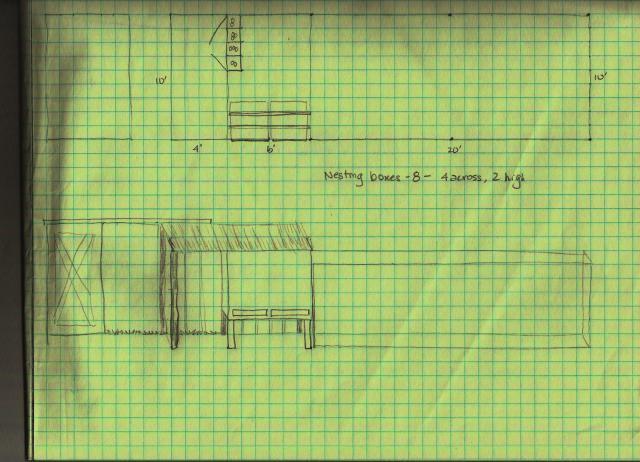
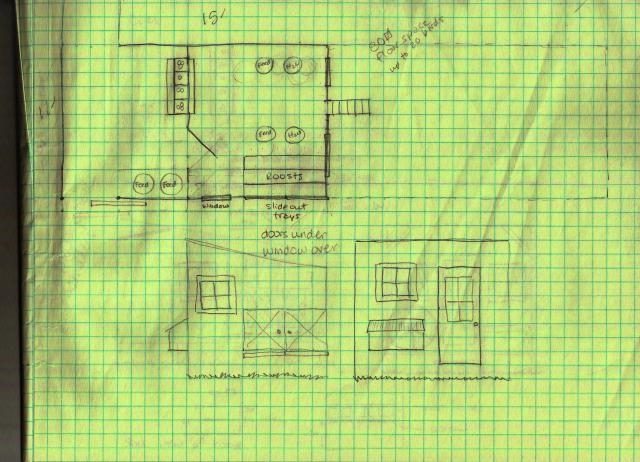
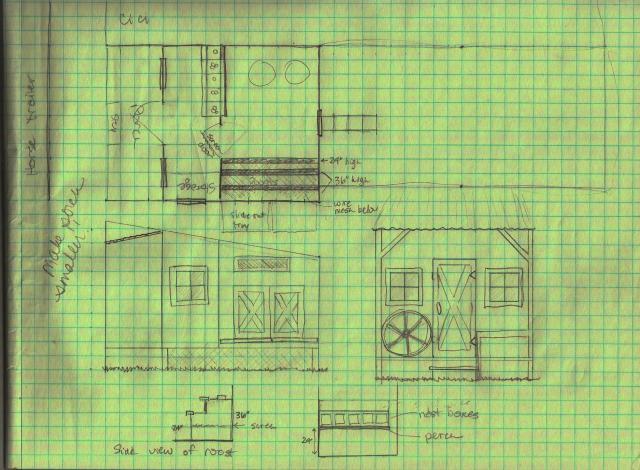
We decided to build our coop by adding on to our existing covered turnout pens for our horses. That started us out with one wall already finished. I sketched up several plans after reading some books and doing research in the coops section in BYC. Here were my first attempts:
I originally envisioned a fancy Western old-style store front for the exterior. However, reality set in when I priced new windows and a new door. We went hunting for second hand items and modified our plans to use what we were able to find that we could afford.
We used recycled posts, roofing, and lumber from our old covered arena. We removed the battens from what became an inside wall and saved them to put up on the new front wall.
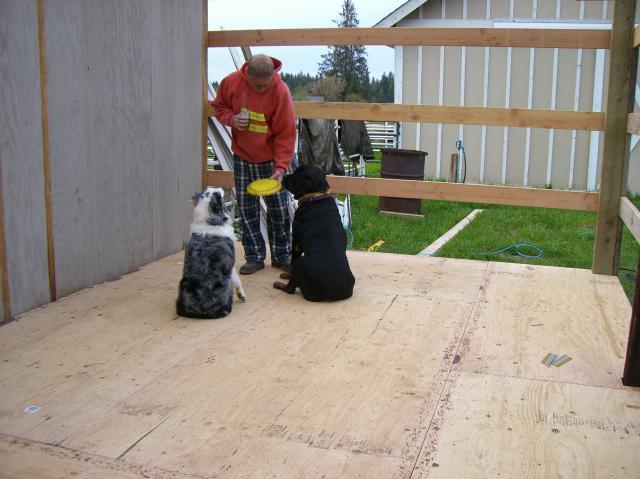
My DH, with assistants Dually and Brinx, checks out the new floor. I put in the floor joists myself, and my DH helped me with the floor sheeting. Good thing my joists are covered up -- they aren't very straight! Every time we ran into something that was out of square (which was pretty often), we'd just laugh and say, "Well, it IS a chicken coop!" I am really thrilled with all of the new skills I've learned. And, let me tell you, I operate a MEAN chop saw!
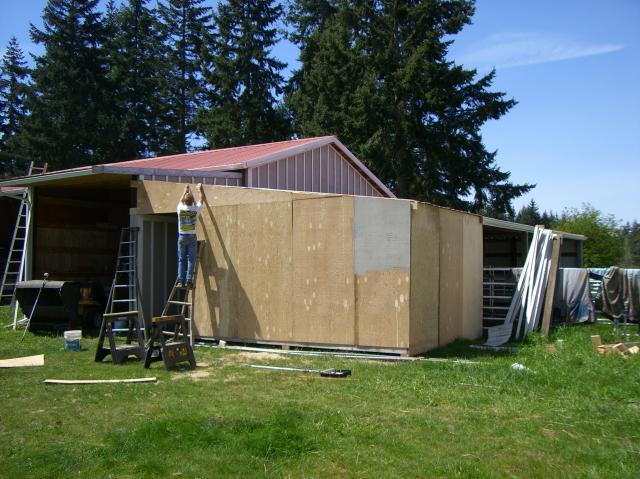
Sheeting is up and painting has started. We did have to buy some 2x4s and 2x6s, plus the plywood sheeting. But we also used a LOT of recycled lumber and metal roofing. This photo was taken shortly before the 3-legged ladder collapsed and my DH took a VERY nasty fall. He had a bruise on his hip that was HUGE and really ugly. This happened the day after I stepped off a workbench and severely sprained my ankle. This "Chicken Experience" has also been a "Painful Experience".
We ran power to the coop from the barn. Thanks to BYC members for giving me suggestions on where to put outlets and switches.
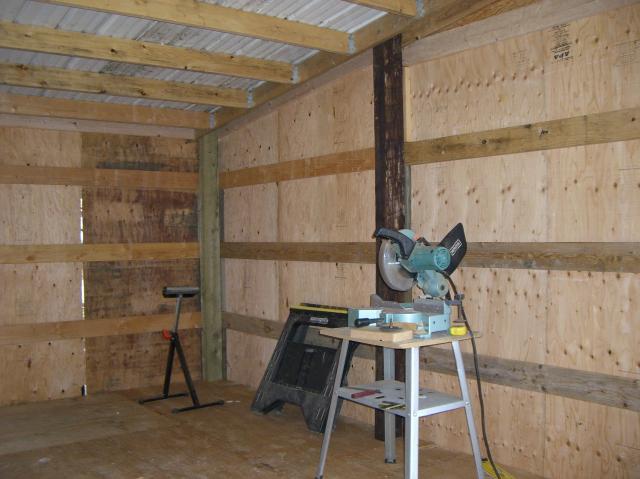
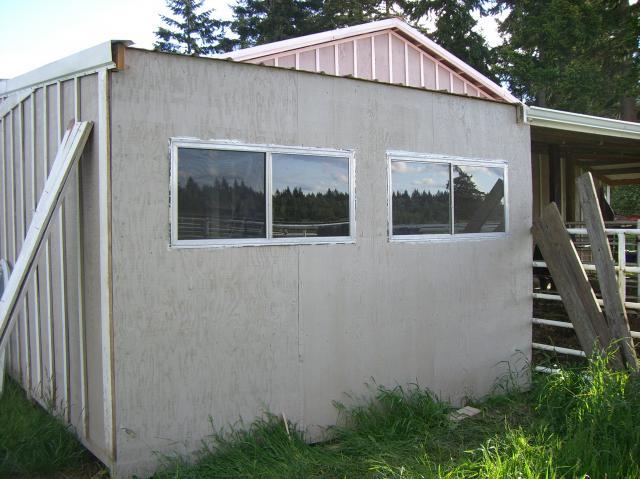
Here's what the bare interior looked like -- typical pole building construction, which has its own challenges when installing windows, walls, and doors.
We made a trip to a Habitat For Humanity "re-store" and found some sliding windows with screens for only $5 each. We'll cover them on the outside with 1/4" hardware cloth to prevent any predators from tearing through the screens. Plus, we'll edge wrap the windows with trim boards to make them look nicer. Also, we still need to add the battens and gutter. Note the battens on the front of the coop -- they came from a wall that became an interior wall.
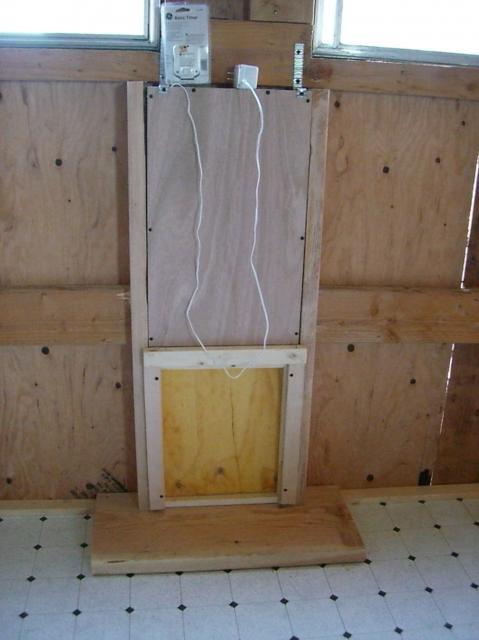
We did splurge on an automatic chicken door from www.automaticchickencoopdoor.com. The cost was $184.94 plus $22.00 shipping. We decided that the money was worth the worry it would eliminate if we were unable to get home to shut the pop door at night. The door was designed to install between 16" wall studs -- we had to fabricate wall studs because of the type of construction. The door will be set on a timer rather than a photoelectric cell to make sure we don't lock any of The Girls out at night.
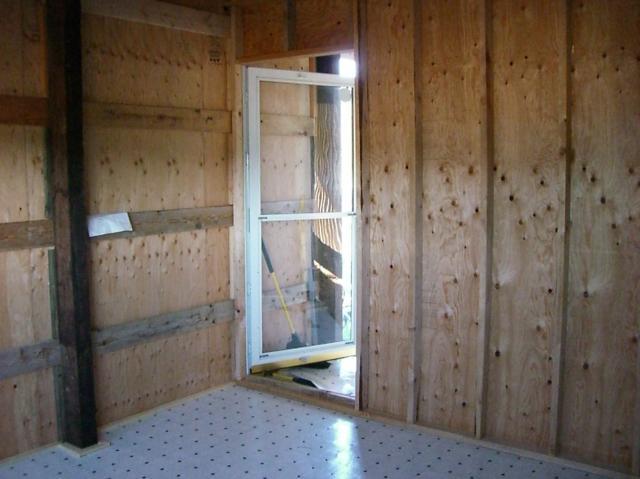
My DH works for the city of Yelm, WA. This Pella storm door was recycled from their annual "City Clean-Up Day" when it was discarded and John spotted it before it was thrown into a dumpster. You'll also notice that we installed inexpensive vinyl flooring from Home Depot to make clean-up easier. The vinyl sells for $4.32 a square yard and comes on a 12' wide roll. I went with recommendations from BYCers and did not glue it down, but used 1"x2" trim boards around the edge to hold it down.
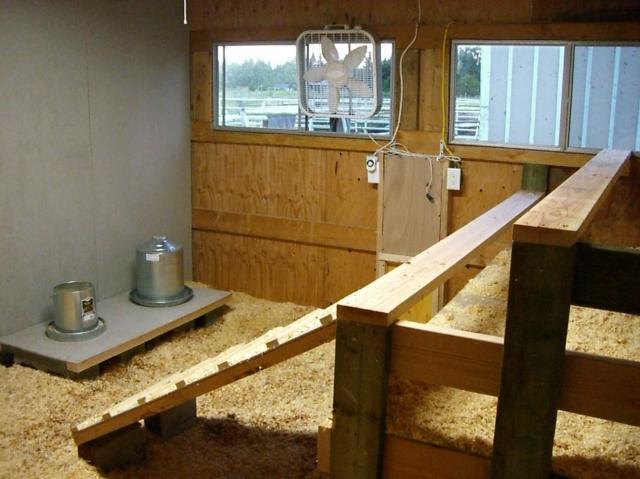
We recycled the wall sections cut out for the windows by using them for a ramp to the roost and a raised platform for the feeder and waterer. It got to be a fun challenge to see what we could re-use! I put the fan on a ThermoCube so it automatically comes on when the temperature reaches 78 degrees in the coop. I purchased two ThermoCubes from QCSupply.com. Model TC3 turns on at 35 degrees and off at 45 degrees,and I'll use it for my water heater and heat lamps; model TC21 turns on at 78 degrees and off at 70 degrees. They had the best price at $12.95 each and US Priority Mail shipping was only $6.15.
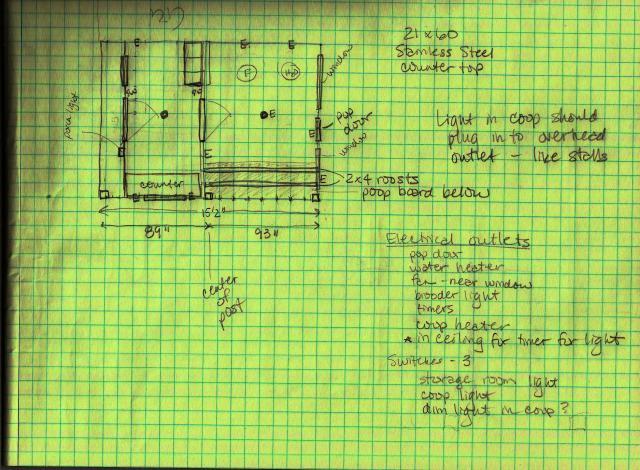
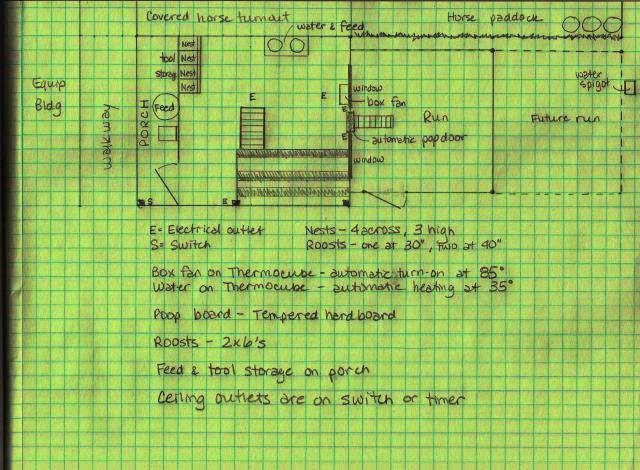
I solicited input from BYC members for ideas on where to put outlets and switches. Here is my initial wiring diagram:
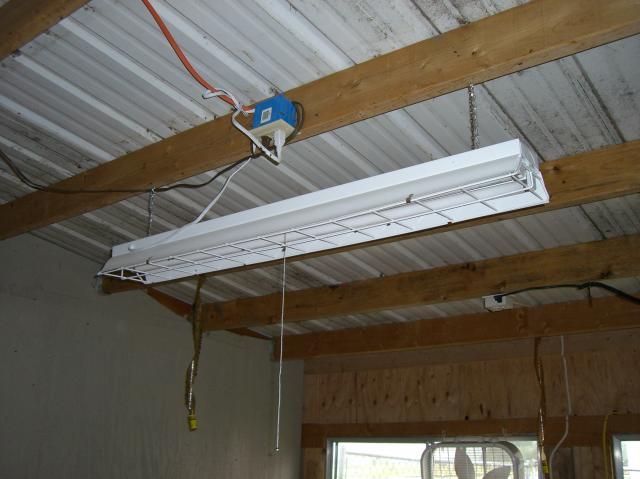
We installed outlets in the ceiling for the shop light and heat lamps. The shop fixture came from Home Depot and cost $22.68. We liked the metal grid that will protect the bulbs from an out-of-control hen in flight. We're using T8 bulbs so they'll work in cold weather. We have some outlets on a switch and some that are always live. That way I can use the switch outside the door to turn the light on inside the coop.
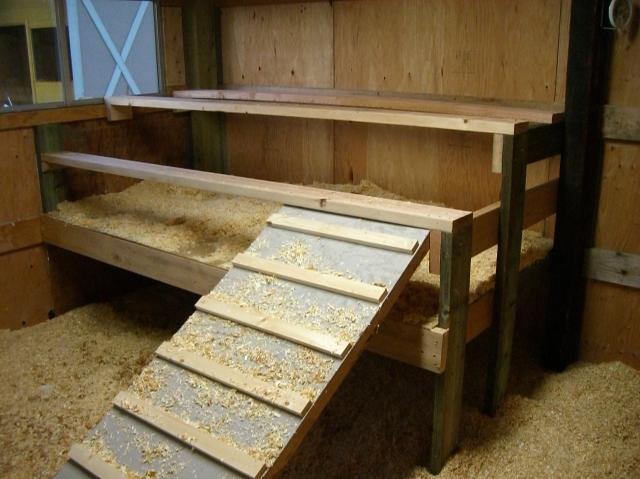
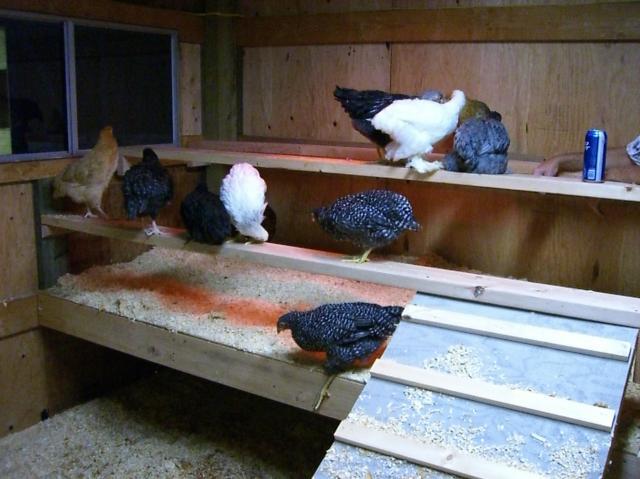
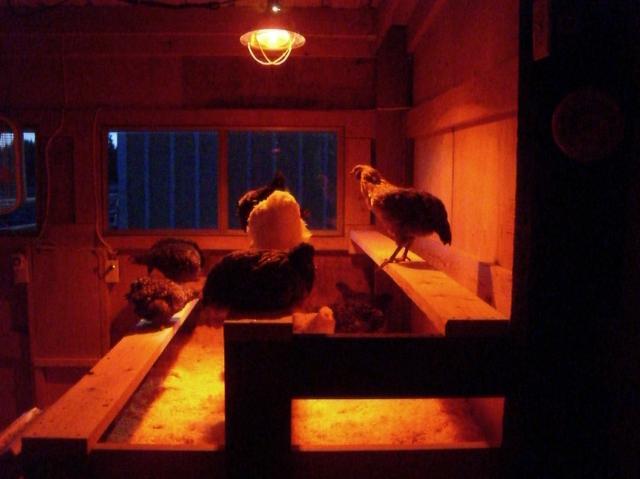
Here is The Girls' roost. So far they've only used the front two. They are fascinated that they have a window with a view! They spent the first two months of their lives in a brooder in the garage and a stall in the barn with no windows. We went with 2x6s so The Girls can sit on the roost and cover their feet when the weather gets cold (we're not planning on adding insulation -- I'll have a heat lamp on a ThermoCube that will come on when the temperature hits 35 degrees). I searched the BYC forum site and found a member that recommended using "tempered hardboard" for a poop board. I called our local lumber store, and they had 4'x8' sheets for only $13. It's basically pegboard without holes, and the shiny side is very slippery. It is working VERY well -- poop just slides right off. Plus, it was a fraction of the price of other moisture-resistant sheeting (fiberglass reinforced panels were $32.47 at Home Depot) . Thanks again to the BYC Forum!!
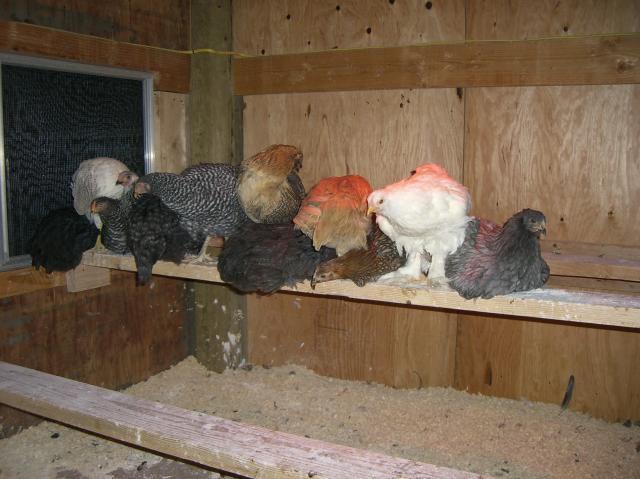
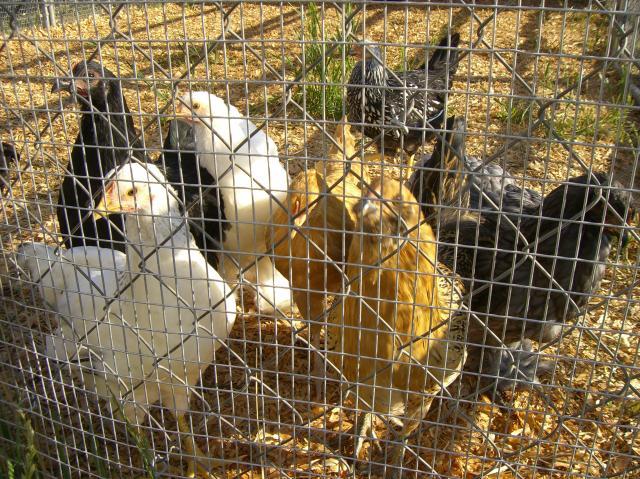
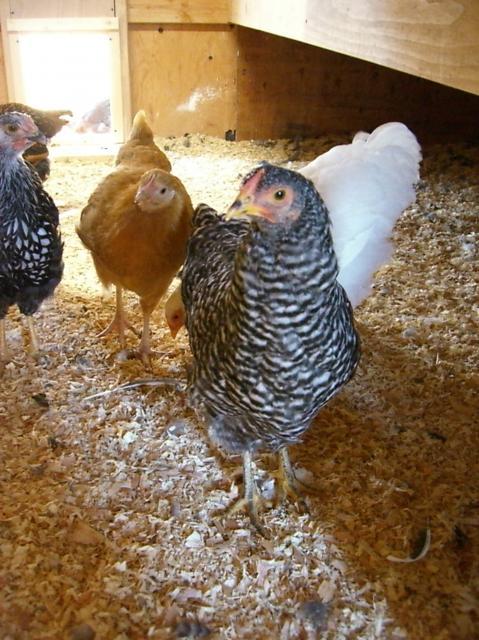
The Girls seem to like it! Please ignore my DH's alcoholic beverage on the roost to the right. That was for him, NOT The Girls! My original flock came from MyPetChicken.com (Meyer's Hatchery) and consists of a Black Australorp, Buff Orpington, Easter Egger, Blue Cochin, White Cochin, Partridge Cochin, Barred Bock, Cuckoo Marans, Delaware, Dominique, Silver Laced Wyandotte, and a Gold Laced Wyandotte. My first hatch is adding a French Black Copper Marans pullet and roo (fingers crossed) and a Wheaten Marans. My second hatch consists of 2 Blue Marans, 2 Splash Marans, and 3 Ameraucanas. Plus we're going to have the dozen extra EE's. Whew! Should be some color in the nest boxes!
Their first night in the coop. We planned the windows to allow enough light to enter from the security light on the end of the barn to act as a "night light". Plus, any night that is cold we'll have the heat lamp on.
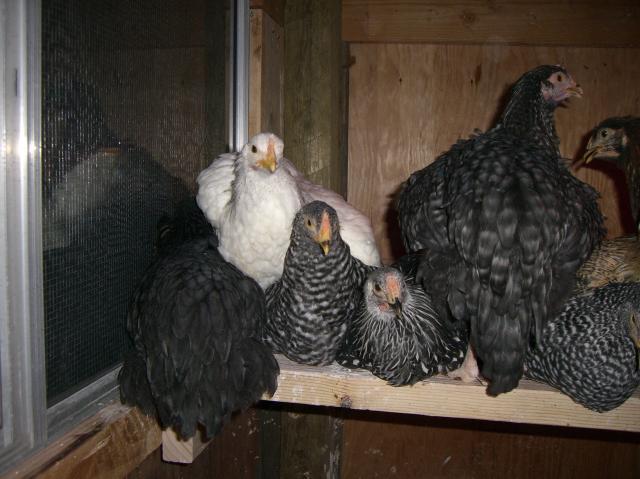
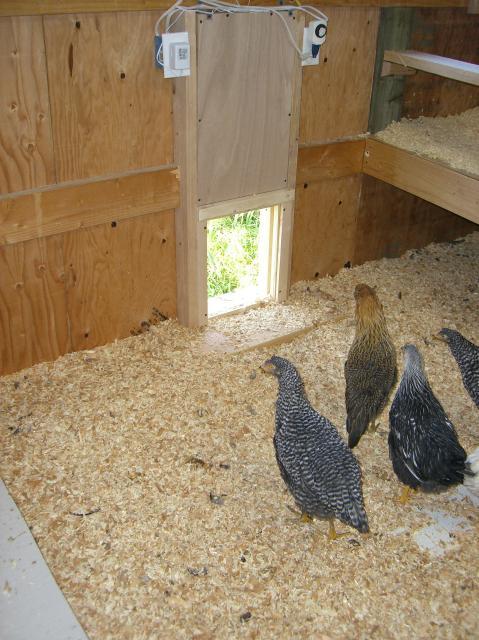
Oh, please! We give them 24' of roosts, with 16' at the highest level. They cram all 12 of themselves in a 4' space. That can't be comfortable!
Excuse me! Pardon me! Hey, get off of me! I'm getting squashed here!
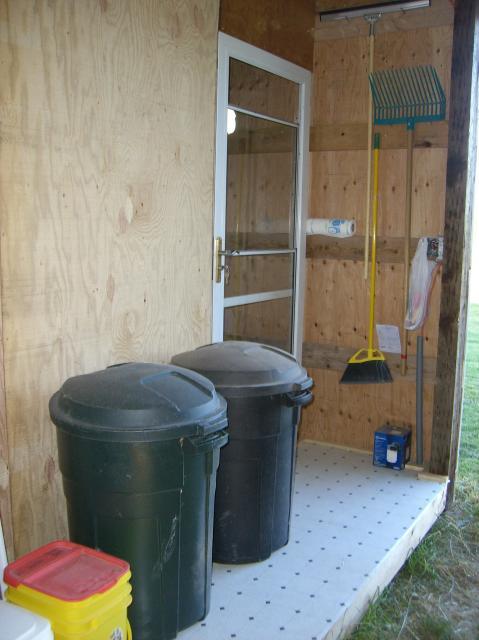
When my DH doubled the flock size with his boss'dozen EE chicks, I sacrificed my originally planned interior storage room for more coop space. But I do have a small porch that is perfect for storage of feed and equipment. The feed and Diatomaceous Earth are in the garbage cans, which seal shut. The smaller tubs hold grit, oyster shell, and scratch, plus treats for The Girls. My tools are all hung and ready for use. Note the drop-down window in the storm door. It was really hot today and opening it just a bit allowed the fan to pull in cooler air. We're going to make a screen for it from hardware cloth so we can leave it down during the warm nights as well.
Elsie the Easter Egger loves dusting in her new house. I didn't realize the gyrations chickens go through when they're dusting. They're pretty fun to watch!
Here is Racquel the Barred Rock. She's one of my favorite hens.
My FIL commented, "I never thought I'd say that a chicken is beautiful, but Clara sure is a pretty hen!" She's my DH's favorite, too.
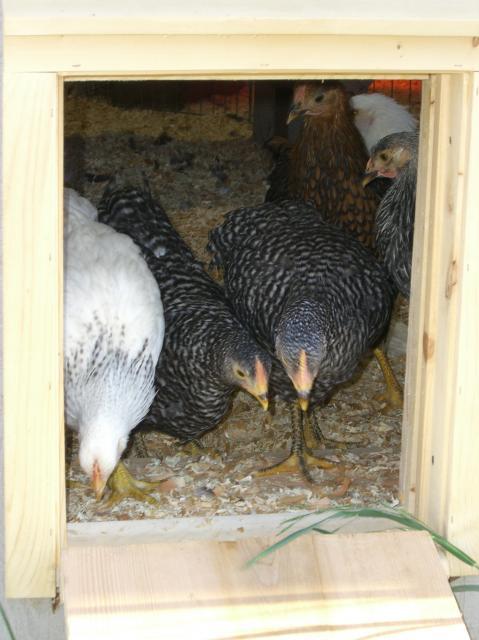
The "Grand Opening of The Door". The Girls just weren't quite sure what to make of it.
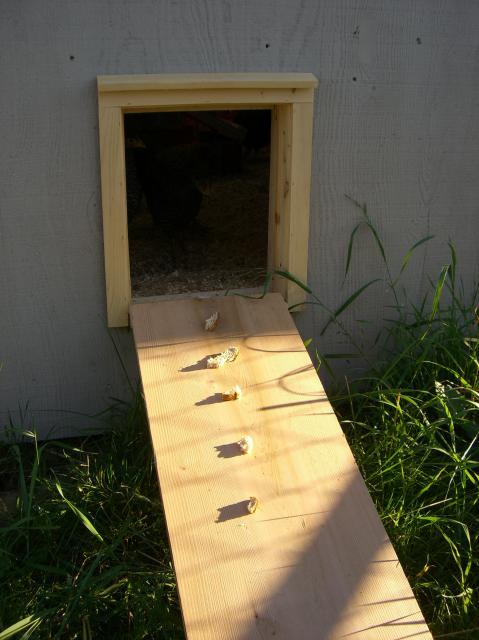
We tried bribing them with bread to try to get them to come out...
They're thinking about it... They'll do anything for food! Well, almost. DH had to go inside and put them out one at a time.
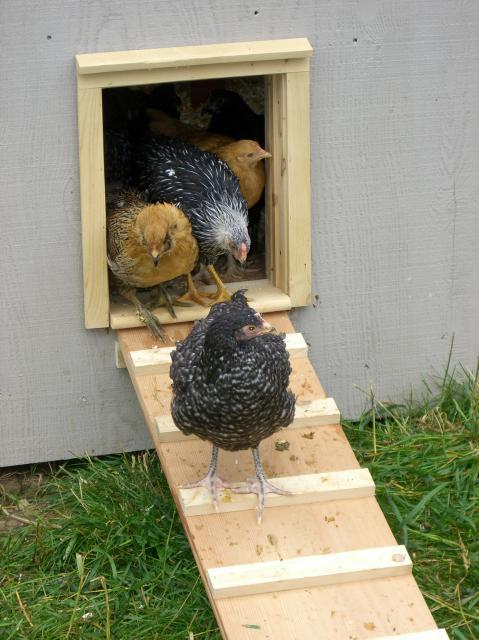
We couldn't stop laughing at them sliding down the ramp, but I had to add rungs for them so they wouldn't get scared and refuse to go outside. Still, watching Clara the Blue Cochin slide down the ramp, walk back up, and slide down again was pretty funny!
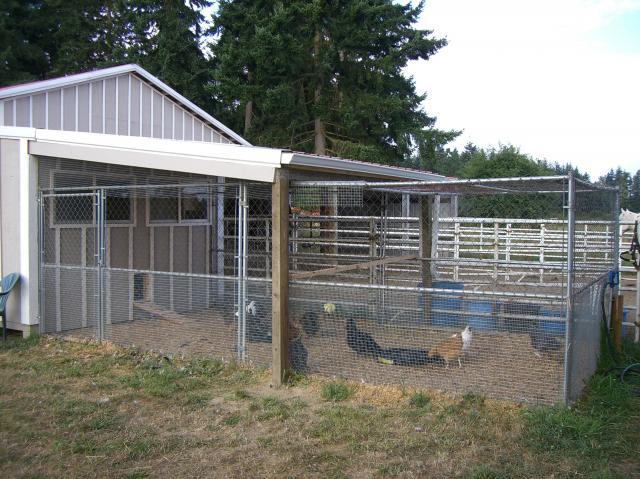
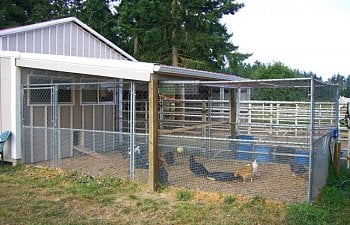
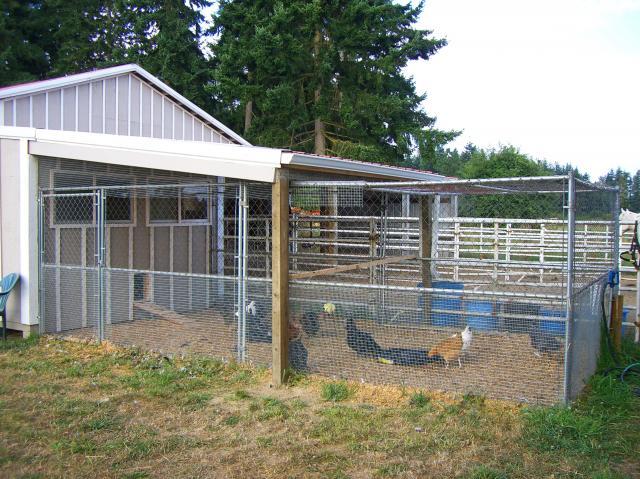
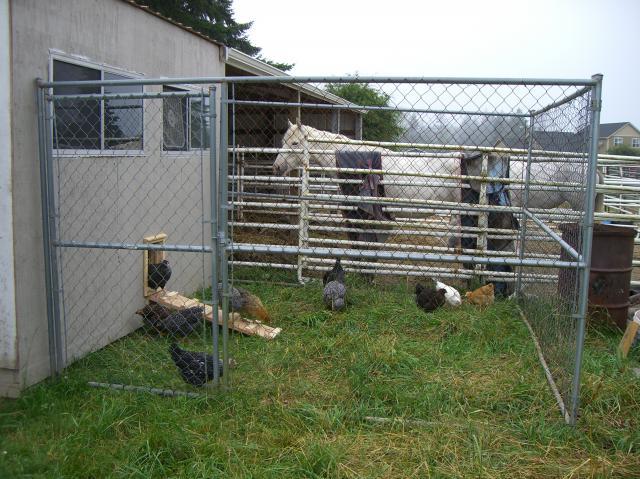
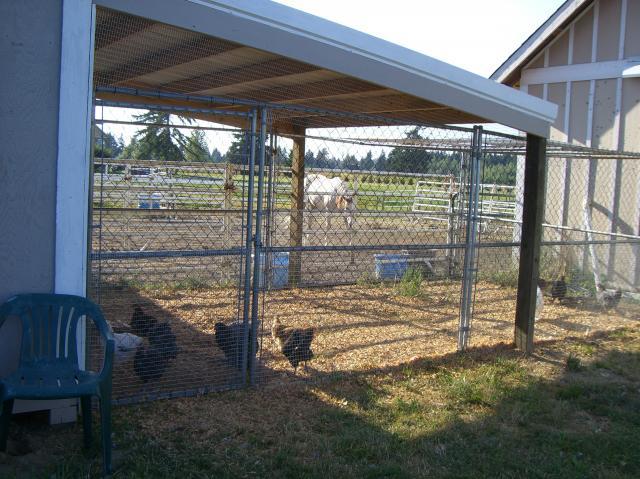
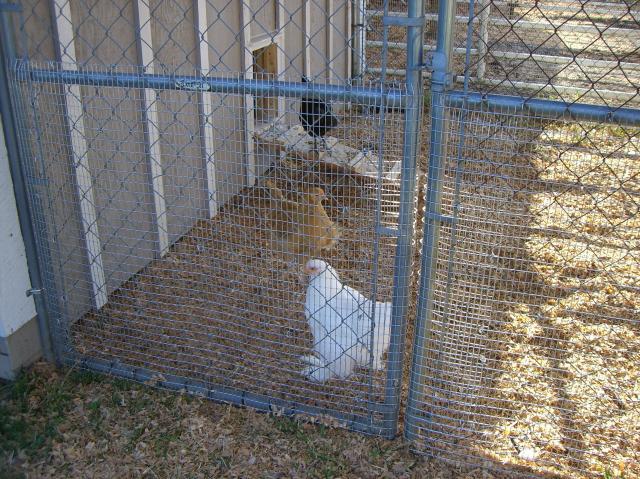
They loved their new run. We started with just a 10'x10'section until we could get rid of the bees nests in the other half of the dog kennel. I hate getting stung!!! Again, recycling at its finest! We will wrap it with hardware cloth and put a cover over the part of the run. That is Cici, my DD's Paint mare, in the background. I was in stitches when I saw her poop and the hens ran to the fence to try to get to it! I love the location of the hen house and run because I can sit on the couch in the living room and watch The Girls right out my back window.
This was our layout when we moved The Girls into their new home. You'll probably find that you'll make a number of modifications from the time you start until you finish. And that's perfectly okay! Everybody needs to tailor their coop to meet their needs and location. Just do what I did -- use the resources at BYC and find the ideas that work for you.
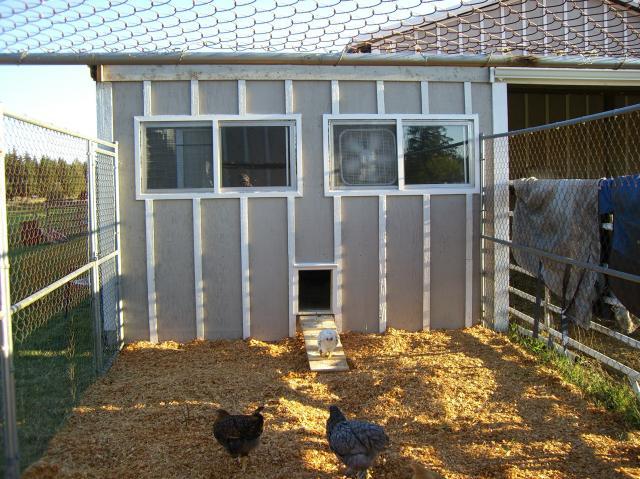
We put 1/4" hardware cloth over the screens on the windows so a predator could not tear its way through. We also trimmed out the windows and put up the battens. A little paint on the trim boards and some fresh shavings -- it's looking pretty awesome.
We expanded the run with the remaining dog kennel panels. Note the leftover kennel panel placed as a partial cover for the run. The Girls are really having a good time dusting in the fresh shavings.
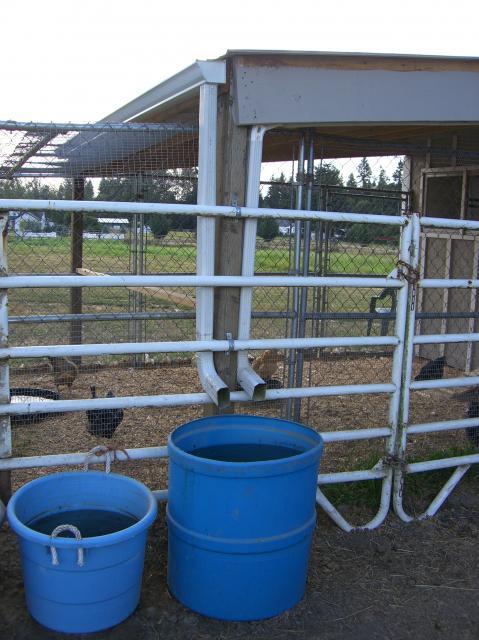
We added a roof over 12' of the run. I want The Girls to be able to go outside in the winter without getting muddy feet. The gutters channel rainwater into the one of the horses' water tubs.
I added an outdoor roost just for fun. Several of The Girls like it, and some just can't figure out how to fly up and land on it -- pretty funny to watch! If you look closely you will see the core of a cabbage hanging from the roof -- they've had a lot of fun pecking at the swinging cabbages we've hung for them!
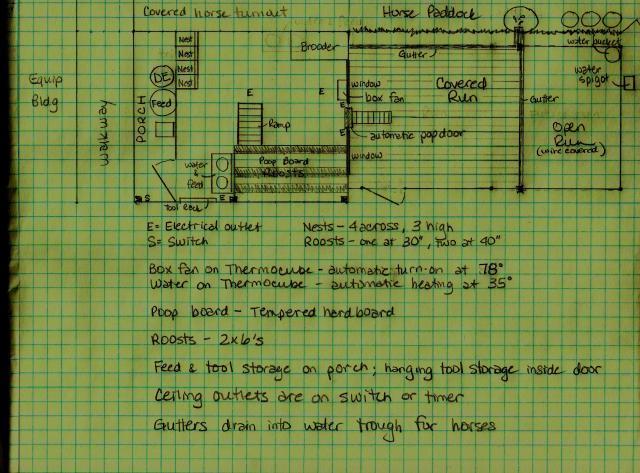
And here is our final plan. Some of the things we changed were the location of feed and water (carrying the waterer when it's full is not fun, so I moved it as close to the door as possible); used the platform from the food and water to make a table to hold my duplex brooder so the babies could move out of the garage; added hanging tool storage inside the coop; finished the roof over 12' of the run; and designed the gutters to drain into the horse trough in the paddock.
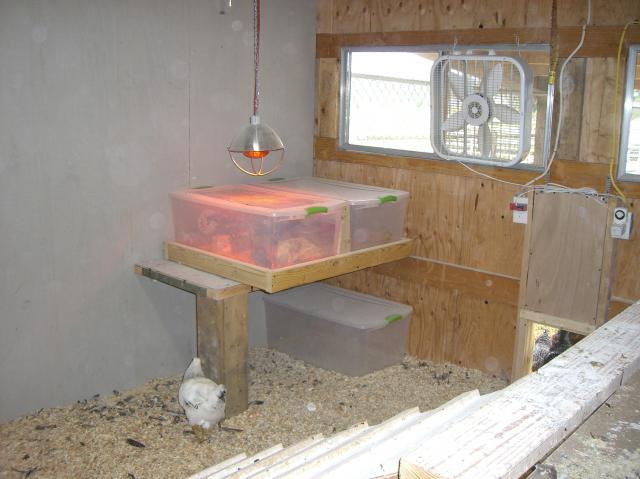
Here is the brooder. I have their heat lamp on a timer, and I can see it through the coop window from the living room to ensure that it's on when it should be. The space underneath will be turned into an isolation area for injured birds.
We wrapped the lower 36" of the entire run with welded wire with 1/2"x1" openings. We also filled in the gaps between the roof and the top of the kennel. I'm more comfortable now knowing that The Girls are safe from hawks and other predators.
We used hog rings to secure the welded wire fencing to the kennel, along with zip ties where needed.
These are some happy Girls! Like they say, "Happy hens lay more eggs".
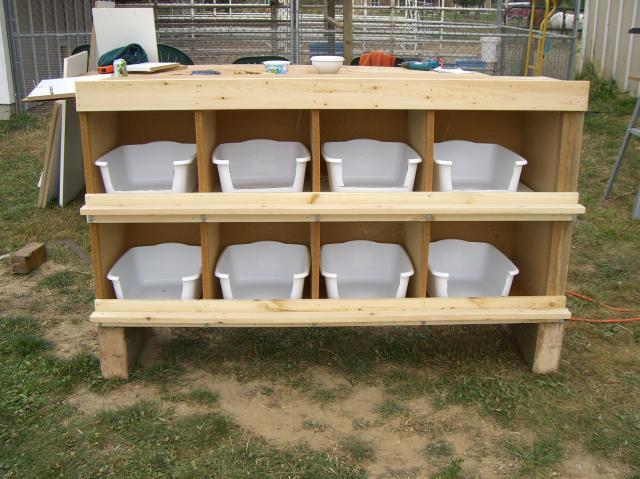
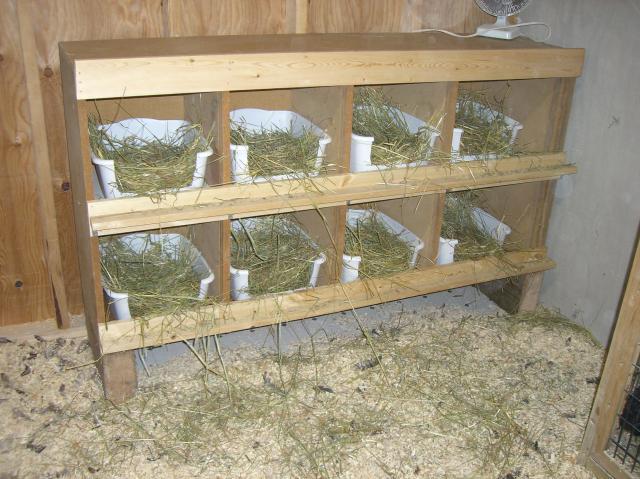
We're getting close to the time The Girls will start laying, so we had to get the nest boxes in. I had originally planned a 4-across, 3-high configuration. We started looking for materials to make the nest boxes from, and I spotted a particle board cabinet in the barn that I had purchased for $2 at a surplus sale at one of our local elementary schools. It was 60"hx30"wx15"d. That would make the nest boxes a minimum of 15"hx15"wx15"d -- nice big nests! A swift calculation and we concluded that 8 nest boxes would be ample for 20-24 hens, so we turned the cabinet on its side, removed the sliding doors, added 4 shelves, put a couple of legs on the bottom, add perches, and what do you know! Instant nesting boxes! I had picked up some plastic tubs from Walmart, so we cut fronts out and put them in the nesting boxes. I lined them with grass hay -- we'll see what The Girls think of them.
Final Costs: Our total costs BEFORE the automatic pop door opener were approximately $775.00. After we added the automatic opener, our costs were around $980. That's pretty darn good for a 12'x15' coop. Below is a breakdown of our expenses:
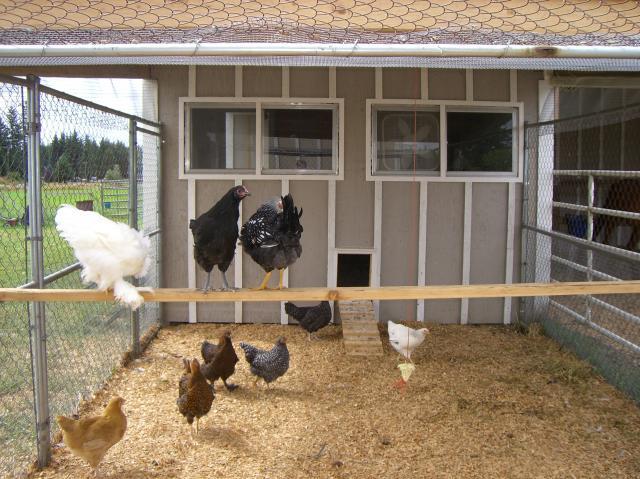
And here is our finished coup!! The Girls are loving it! Now we just need to decide on a good chicken coop name. We're leaning towards "The Fuster Cluck", because that's what it's been!
Our Coop Building Experience...
Let me start by saying this has been a pretty cool experience for my DH and I. He has been enlisting the help of friends to finish the barn -- adding a loft, installing wiring, framing in the tack room (even wiring it for phone and Internet), plumbing for a washer, sink, and hot water tank, wiring for a dryer, installing a French drain for the wash rack.... The new "Hen Palace" became our own little project, with just a little help from a friend to hook up the wiring. My DH had a chicken as a pet as a child, and has been very supportive of the whole immersion into what I call "The Chicken Experience"...
We decided to build our coop by adding on to our existing covered turnout pens for our horses. That started us out with one wall already finished. I sketched up several plans after reading some books and doing research in the coops section in BYC. Here were my first attempts:
I originally envisioned a fancy Western old-style store front for the exterior. However, reality set in when I priced new windows and a new door. We went hunting for second hand items and modified our plans to use what we were able to find that we could afford.
We used recycled posts, roofing, and lumber from our old covered arena. We removed the battens from what became an inside wall and saved them to put up on the new front wall.
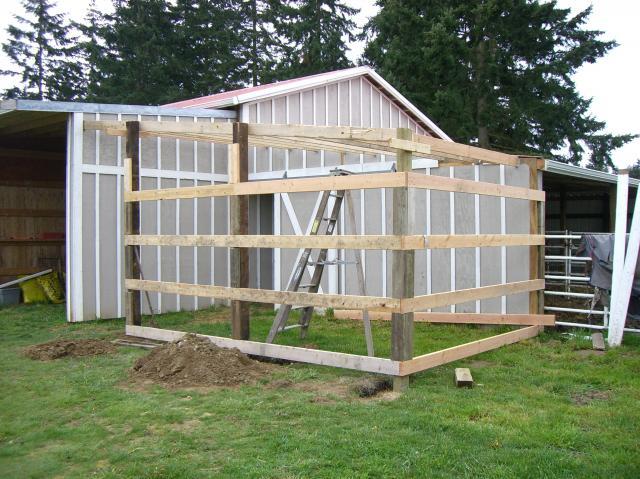
My DH, with assistants Dually and Brinx, checks out the new floor. I put in the floor joists myself, and my DH helped me with the floor sheeting. Good thing my joists are covered up -- they aren't very straight! Every time we ran into something that was out of square (which was pretty often), we'd just laugh and say, "Well, it IS a chicken coop!" I am really thrilled with all of the new skills I've learned. And, let me tell you, I operate a MEAN chop saw!
Sheeting is up and painting has started. We did have to buy some 2x4s and 2x6s, plus the plywood sheeting. But we also used a LOT of recycled lumber and metal roofing. This photo was taken shortly before the 3-legged ladder collapsed and my DH took a VERY nasty fall. He had a bruise on his hip that was HUGE and really ugly. This happened the day after I stepped off a workbench and severely sprained my ankle. This "Chicken Experience" has also been a "Painful Experience".
We ran power to the coop from the barn. Thanks to BYC members for giving me suggestions on where to put outlets and switches.
Here's what the bare interior looked like -- typical pole building construction, which has its own challenges when installing windows, walls, and doors.
We made a trip to a Habitat For Humanity "re-store" and found some sliding windows with screens for only $5 each. We'll cover them on the outside with 1/4" hardware cloth to prevent any predators from tearing through the screens. Plus, we'll edge wrap the windows with trim boards to make them look nicer. Also, we still need to add the battens and gutter. Note the battens on the front of the coop -- they came from a wall that became an interior wall.
We did splurge on an automatic chicken door from www.automaticchickencoopdoor.com. The cost was $184.94 plus $22.00 shipping. We decided that the money was worth the worry it would eliminate if we were unable to get home to shut the pop door at night. The door was designed to install between 16" wall studs -- we had to fabricate wall studs because of the type of construction. The door will be set on a timer rather than a photoelectric cell to make sure we don't lock any of The Girls out at night.
My DH works for the city of Yelm, WA. This Pella storm door was recycled from their annual "City Clean-Up Day" when it was discarded and John spotted it before it was thrown into a dumpster. You'll also notice that we installed inexpensive vinyl flooring from Home Depot to make clean-up easier. The vinyl sells for $4.32 a square yard and comes on a 12' wide roll. I went with recommendations from BYCers and did not glue it down, but used 1"x2" trim boards around the edge to hold it down.
We recycled the wall sections cut out for the windows by using them for a ramp to the roost and a raised platform for the feeder and waterer. It got to be a fun challenge to see what we could re-use! I put the fan on a ThermoCube so it automatically comes on when the temperature reaches 78 degrees in the coop. I purchased two ThermoCubes from QCSupply.com. Model TC3 turns on at 35 degrees and off at 45 degrees,and I'll use it for my water heater and heat lamps; model TC21 turns on at 78 degrees and off at 70 degrees. They had the best price at $12.95 each and US Priority Mail shipping was only $6.15.
I solicited input from BYC members for ideas on where to put outlets and switches. Here is my initial wiring diagram:
We installed outlets in the ceiling for the shop light and heat lamps. The shop fixture came from Home Depot and cost $22.68. We liked the metal grid that will protect the bulbs from an out-of-control hen in flight. We're using T8 bulbs so they'll work in cold weather. We have some outlets on a switch and some that are always live. That way I can use the switch outside the door to turn the light on inside the coop.
Here is The Girls' roost. So far they've only used the front two. They are fascinated that they have a window with a view! They spent the first two months of their lives in a brooder in the garage and a stall in the barn with no windows. We went with 2x6s so The Girls can sit on the roost and cover their feet when the weather gets cold (we're not planning on adding insulation -- I'll have a heat lamp on a ThermoCube that will come on when the temperature hits 35 degrees). I searched the BYC forum site and found a member that recommended using "tempered hardboard" for a poop board. I called our local lumber store, and they had 4'x8' sheets for only $13. It's basically pegboard without holes, and the shiny side is very slippery. It is working VERY well -- poop just slides right off. Plus, it was a fraction of the price of other moisture-resistant sheeting (fiberglass reinforced panels were $32.47 at Home Depot) . Thanks again to the BYC Forum!!
The Girls seem to like it! Please ignore my DH's alcoholic beverage on the roost to the right. That was for him, NOT The Girls! My original flock came from MyPetChicken.com (Meyer's Hatchery) and consists of a Black Australorp, Buff Orpington, Easter Egger, Blue Cochin, White Cochin, Partridge Cochin, Barred Bock, Cuckoo Marans, Delaware, Dominique, Silver Laced Wyandotte, and a Gold Laced Wyandotte. My first hatch is adding a French Black Copper Marans pullet and roo (fingers crossed) and a Wheaten Marans. My second hatch consists of 2 Blue Marans, 2 Splash Marans, and 3 Ameraucanas. Plus we're going to have the dozen extra EE's. Whew! Should be some color in the nest boxes!
Their first night in the coop. We planned the windows to allow enough light to enter from the security light on the end of the barn to act as a "night light". Plus, any night that is cold we'll have the heat lamp on.
Oh, please! We give them 24' of roosts, with 16' at the highest level. They cram all 12 of themselves in a 4' space. That can't be comfortable!
Excuse me! Pardon me! Hey, get off of me! I'm getting squashed here!
When my DH doubled the flock size with his boss'dozen EE chicks, I sacrificed my originally planned interior storage room for more coop space. But I do have a small porch that is perfect for storage of feed and equipment. The feed and Diatomaceous Earth are in the garbage cans, which seal shut. The smaller tubs hold grit, oyster shell, and scratch, plus treats for The Girls. My tools are all hung and ready for use. Note the drop-down window in the storm door. It was really hot today and opening it just a bit allowed the fan to pull in cooler air. We're going to make a screen for it from hardware cloth so we can leave it down during the warm nights as well.
Elsie the Easter Egger loves dusting in her new house. I didn't realize the gyrations chickens go through when they're dusting. They're pretty fun to watch!
Here is Racquel the Barred Rock. She's one of my favorite hens.
My FIL commented, "I never thought I'd say that a chicken is beautiful, but Clara sure is a pretty hen!" She's my DH's favorite, too.
The "Grand Opening of The Door". The Girls just weren't quite sure what to make of it.
We tried bribing them with bread to try to get them to come out...
They're thinking about it... They'll do anything for food! Well, almost. DH had to go inside and put them out one at a time.
We couldn't stop laughing at them sliding down the ramp, but I had to add rungs for them so they wouldn't get scared and refuse to go outside. Still, watching Clara the Blue Cochin slide down the ramp, walk back up, and slide down again was pretty funny!
They loved their new run. We started with just a 10'x10'section until we could get rid of the bees nests in the other half of the dog kennel. I hate getting stung!!! Again, recycling at its finest! We will wrap it with hardware cloth and put a cover over the part of the run. That is Cici, my DD's Paint mare, in the background. I was in stitches when I saw her poop and the hens ran to the fence to try to get to it! I love the location of the hen house and run because I can sit on the couch in the living room and watch The Girls right out my back window.
This was our layout when we moved The Girls into their new home. You'll probably find that you'll make a number of modifications from the time you start until you finish. And that's perfectly okay! Everybody needs to tailor their coop to meet their needs and location. Just do what I did -- use the resources at BYC and find the ideas that work for you.
We put 1/4" hardware cloth over the screens on the windows so a predator could not tear its way through. We also trimmed out the windows and put up the battens. A little paint on the trim boards and some fresh shavings -- it's looking pretty awesome.
We expanded the run with the remaining dog kennel panels. Note the leftover kennel panel placed as a partial cover for the run. The Girls are really having a good time dusting in the fresh shavings.

We added a roof over 12' of the run. I want The Girls to be able to go outside in the winter without getting muddy feet. The gutters channel rainwater into the one of the horses' water tubs.
I added an outdoor roost just for fun. Several of The Girls like it, and some just can't figure out how to fly up and land on it -- pretty funny to watch! If you look closely you will see the core of a cabbage hanging from the roof -- they've had a lot of fun pecking at the swinging cabbages we've hung for them!
And here is our final plan. Some of the things we changed were the location of feed and water (carrying the waterer when it's full is not fun, so I moved it as close to the door as possible); used the platform from the food and water to make a table to hold my duplex brooder so the babies could move out of the garage; added hanging tool storage inside the coop; finished the roof over 12' of the run; and designed the gutters to drain into the horse trough in the paddock.
Here is the brooder. I have their heat lamp on a timer, and I can see it through the coop window from the living room to ensure that it's on when it should be. The space underneath will be turned into an isolation area for injured birds.
We wrapped the lower 36" of the entire run with welded wire with 1/2"x1" openings. We also filled in the gaps between the roof and the top of the kennel. I'm more comfortable now knowing that The Girls are safe from hawks and other predators.
We used hog rings to secure the welded wire fencing to the kennel, along with zip ties where needed.
These are some happy Girls! Like they say, "Happy hens lay more eggs".
We're getting close to the time The Girls will start laying, so we had to get the nest boxes in. I had originally planned a 4-across, 3-high configuration. We started looking for materials to make the nest boxes from, and I spotted a particle board cabinet in the barn that I had purchased for $2 at a surplus sale at one of our local elementary schools. It was 60"hx30"wx15"d. That would make the nest boxes a minimum of 15"hx15"wx15"d -- nice big nests! A swift calculation and we concluded that 8 nest boxes would be ample for 20-24 hens, so we turned the cabinet on its side, removed the sliding doors, added 4 shelves, put a couple of legs on the bottom, add perches, and what do you know! Instant nesting boxes! I had picked up some plastic tubs from Walmart, so we cut fronts out and put them in the nesting boxes. I lined them with grass hay -- we'll see what The Girls think of them.
Final Costs: Our total costs BEFORE the automatic pop door opener were approximately $775.00. After we added the automatic opener, our costs were around $980. That's pretty darn good for a 12'x15' coop. Below is a breakdown of our expenses:
| Chicken Coop Expenses | |||
| Qty | Item | Price Each | Total |
| 15 | 2x4s | $ 1.82 | $ 27.30 |
| 3 | 2x6s - 8' | $ 3.64 | $ 10.92 |
| 2 | plywood, 4'x8' sheets - 1/2" CDX | $ 10.98 | $ 21.96 |
| 1 | automatic pop door | $ 206.94 | $ 206.94 |
| 2 | automatic timers | $ 3.97 | $ 7.94 |
| 1 | gutters | $ 20.00 | $ 20.00 |
| 20 | vinyl flooring, sq. yd. | $ 4.32 | $ 86.40 |
| 10 | T1-11 plywood, 4'x8' sheets - 3/8" | $ 24.00 | $ 240.00 |
| 2 | used aluminum windows | $ 5.00 | $ 10.00 |
| 1 | tempered hardboard, 4'x8' sheet | $ 14.17 | $ 14.17 |
| 40 | joist hangers | $ 0.75 | $ 30.00 |
| 4 | 1x4 pine boards | $ 5.82 | $ 23.28 |
| 1 | hardware cloth (1/4"), ?? Roll | $ 25.00 | $ 25.00 |
| 1 | welded wire, 36"x100' roll (1/2"x1") | $ 114.10 | $ 114.10 |
| 2 | pkgs of hog rings 12.5 gauge | $ 5.20 | $ 10.40 |
| 1 | hog ring pliers | $ 11.50 | $ 11.50 |
| 8 | bags of concrete | $ 2.89 | $ 23.12 |
| 1 | shop light | $ 22.68 | $ 22.68 |
| 2 | T-8 flourescent tubes | $ 1.50 | $ 3.00 |
| 6 | electrical boxes | $ 1.75 | $ 10.50 |
| switches, wallplates | $ 2.89 | $ 5.23 | |
| 4 | outlets | $ 5.00 | $ 20.00 |
| 2 | Thermocubes | $ 16.03 | $ 32.06 |
| 1 | Porch light | $ 4.49 | $ 4.49 |
| TOTALS | $ 980.99 | ||
| Automatic pop door | $ (206.94) | ||
| Total before automatic pop door | $ 774.05 |
And here is our finished coup!! The Girls are loving it! Now we just need to decide on a good chicken coop name. We're leaning towards "The Fuster Cluck", because that's what it's been!