After a cross-country relocation that required total liquidation of my previous flock, we were finally ready to get started on a new coop/run and flock in our new home (so fortunate to have found landlords that are open to just about anything, lol). Work officially started in mid-February and I think we are finally just about done.......between the lovely Oregon weather and some really uncoordinated work schedules - plus having about a hundred other things that needed doing - progress has been slow (painfully so at times).
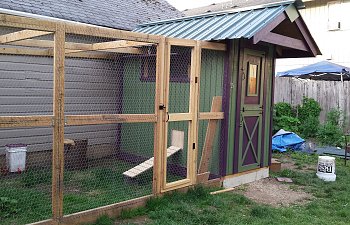
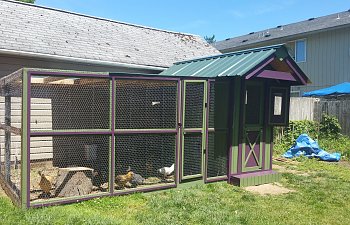
The basics are a 4x8, walk-in style coop with an attached 9x12 run that is 2/3 roofed to allow protection from the 9 months of rainy season and still provide sunning spots for the rare nice day.
The first load of building supplies -- things are (FINALLY) getting real:

The floor - it's "double walled" with ply on top and bottom, with joists every 2 feet. A good, SOLID base!
My husband and Father-In-Law with the first wall framed. The two best builders a girl could wish for - this is a "small" build for them, they also built the 14x20 barn at our old home, the tack room on which was later converted into a chicken coop.
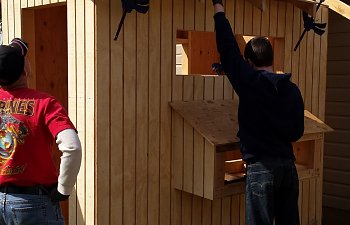
Both side walls are now up and the windows and nest box opening are now in the framing. Windows are framed as 1 ft x 4 ft. Nest box is 48 inches long with three nests.
We even got an assist when our daughter and son-in-law came for a visit (all the way from Ohio) and were put to work in the garage
Before too long, everything was all framed up...
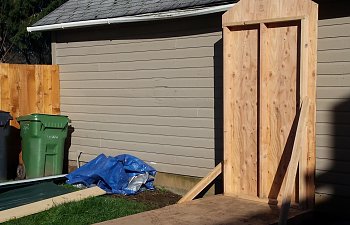
time to disassemble and reassemble outside....Side note - THIS would have been the time to be painting everything.....hindsight is definitely 20/20.
We finally had a day that was dry enough to do some site prep - original location was to have been on the other side of the doorway you see there, so the corners of the coop and garage would basically be meeting - but we rethought that and moved it closer to the house and farther from the neighbors on the other side of the back fence. Broke it all up, tamped it down and leveled it.......
Had gone back and forth about using cement pier blocks, etc - ended up opting for 4x4 rails running down both sides and one down the center
And so began the process of reassembling the coop - wall by wall
I opted for a front, rather than top, opening for my external nest boxes - when hung, the door will be hinged from the bottom.
Everything went back together just like planned!
Time to put a lid on this thing - ply wood, paper and metal - as luck would have it, one of the few colors I was okay with for a roof was green - and the lumberyard DH and FIL work at had multiple pieces in green that had been left from various orders that had ended up in the "scrap" pile (order errors, etc) - SCORE!
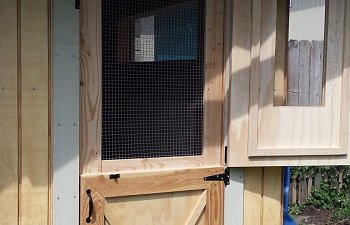
Next up - a door - this is a piece I am particularly pleased with. I wanted the door to provide optional extra ventilation and also light to supplement the windows. Bless my hubby's heart, he really came through and took all the "maybe's" and "could we's" I came up with and designed a "false dutch" door with a window in the top that allows for light even when the whole door is closed, and when you open the top half it reveals the fully screened top half of the actual door - covered with hardware cloth - allowing for lots of good air flow!
By this point we were past the initial deadline.....and the second deadline.....that darn Oregon weather! Because I was planning to brood in the coop, I needed a minimum of walls, floor, roof, door and windows in place to provide a secure place for my chicks. My FIL custom built the windows - a nice, simple frame with plexi - and got them hung. There was some misunderstanding about just where I wanted the hardware cloth - but everything was done before I got home from work that day so darned if I was going to point that out and set things back another day or more with them taking things apart and putting things back. Each window swings upward and is held open with a hook and eye assembly or held closed with wing-nuts. The overhang on the roof and the way the windows hang allow for them to be open even on the rainiest days and keep things inside the coop dry as can be! Worst case scenario the one over the nest box is closed but the one on the other side is able to stay open now that the run over that part is covered.
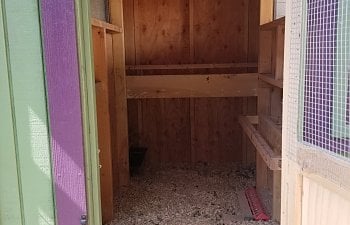
Because my intent is to use deep bedding in the coop, I had a "kick board" installed inside the door to keep bedding from spilling out every time the door is opened - you can see here that by this point the chicks had been with us a few weeks.....
The water and feed are both up on platforms to keep them out of the bedding - the water is visible to the left and is on an overturned litter pan. In the back right corner you can see the "mama heat pad" that I used for keeping the babies warm. This was my first go 'round with that approach and I will NEVER go back to brooding in the house or with a heat lamp! Having power available in the coop is a huge upgrade for me from any previous coop I've had.
Another brag on DH and FIL - they knew how much I wanted to get my babies outside, so I came home for lunch one nasty, rainy day to find them out there starting on the run:
Yes, the dreaded "poultry netting" - a calculated risk made with an informed assessment of daytime predator issues and a secure coop that they are in from dusk to dawn. Our daytime issues are nothing more than neighborhood cats - the amount of activity, people and dogs surrounding us keep raccoons, skunks, opossums (all of whom I know for a fact we have, having seen them) relegated to the night time hours and a 6 foot, solid privacy fence keeps any loose dogs out of the yard in which the coop and run are set. Not my first build, and I'm not naïve about the risk I'm choosing to take - under no illusion about this run being predator resistant.
Remember all that great roofing we got? Well, we had so much left that I had the guys go ahead and cover 2/3 of the run:
Of course, once there is a run, you need a pop door so you don't have to hassle with carrying the wee beasties back and forth, one by one, every time you want to put them in or out......
Again, allowing for deep bedding, the bottom of the opening is a good distance up the wall. Also, for security, the door slides down about four inches below the bottom of the opening when closed to keep prying "fingers" of a predator from getting a grip enough to pull the door up and the track keeps it nice and snug against being pushed inward. The pulley and cable allows for easy operation from outside the coop
The day we installed the ramp (ignore the icky temp ramp to the side)
The nest boxes were put at the bottom of the priority list because they were not necessary right away. They were securely closed off on the inside by a well anchored piece of t1-11 and tarped off on the outside - but it was time to think about doing some work on them
Roofing paper and green shingles with a nice piece of flashing and lots of caulk to keep things dry inside - t1-11 facing going on:
Building the door - the lip you see goes to the inside and creates a snug fit with the opening it slides right into
open:
closed:
From the inside - divider walls not installed in this photo - nests are 14 wide, 16 deep and 18 inches high at the peak of the slope. Landing bar on the front, 24 inches off the floor....was used as a temp roost while the nests were closed off before the poop board/roost was installed - allowed over three weeks of roosting on the actual roost before opening the nests to get them in habit of sleeping in the right place:
Speaking of poop board - roost is a 2x3 with the 3 inch side up. The roost sets 4 inches over the tray. At just 4 feet in length it is a bit small, but the flock size is larger than originally planned due to FIL falling in love with a bird I hadn't intended to keep....will add additional space if/when proves necessary (also helped by the fact the leghorn insists on sleeping in the rafters).
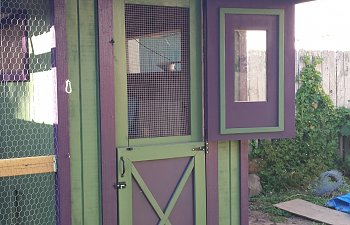
Painting, painting, painting..........oh, and more painting........I am SOOOO tired of painting.......but I *think* I am finally done:
The basics are a 4x8, walk-in style coop with an attached 9x12 run that is 2/3 roofed to allow protection from the 9 months of rainy season and still provide sunning spots for the rare nice day.
The first load of building supplies -- things are (FINALLY) getting real:


The floor - it's "double walled" with ply on top and bottom, with joists every 2 feet. A good, SOLID base!

My husband and Father-In-Law with the first wall framed. The two best builders a girl could wish for - this is a "small" build for them, they also built the 14x20 barn at our old home, the tack room on which was later converted into a chicken coop.

Both side walls are now up and the windows and nest box opening are now in the framing. Windows are framed as 1 ft x 4 ft. Nest box is 48 inches long with three nests.

We even got an assist when our daughter and son-in-law came for a visit (all the way from Ohio) and were put to work in the garage


Before too long, everything was all framed up...

time to disassemble and reassemble outside....Side note - THIS would have been the time to be painting everything.....hindsight is definitely 20/20.

We finally had a day that was dry enough to do some site prep - original location was to have been on the other side of the doorway you see there, so the corners of the coop and garage would basically be meeting - but we rethought that and moved it closer to the house and farther from the neighbors on the other side of the back fence. Broke it all up, tamped it down and leveled it.......

Had gone back and forth about using cement pier blocks, etc - ended up opting for 4x4 rails running down both sides and one down the center

And so began the process of reassembling the coop - wall by wall


I opted for a front, rather than top, opening for my external nest boxes - when hung, the door will be hinged from the bottom.


Everything went back together just like planned!

Time to put a lid on this thing - ply wood, paper and metal - as luck would have it, one of the few colors I was okay with for a roof was green - and the lumberyard DH and FIL work at had multiple pieces in green that had been left from various orders that had ended up in the "scrap" pile (order errors, etc) - SCORE!


Next up - a door - this is a piece I am particularly pleased with. I wanted the door to provide optional extra ventilation and also light to supplement the windows. Bless my hubby's heart, he really came through and took all the "maybe's" and "could we's" I came up with and designed a "false dutch" door with a window in the top that allows for light even when the whole door is closed, and when you open the top half it reveals the fully screened top half of the actual door - covered with hardware cloth - allowing for lots of good air flow!


By this point we were past the initial deadline.....and the second deadline.....that darn Oregon weather! Because I was planning to brood in the coop, I needed a minimum of walls, floor, roof, door and windows in place to provide a secure place for my chicks. My FIL custom built the windows - a nice, simple frame with plexi - and got them hung. There was some misunderstanding about just where I wanted the hardware cloth - but everything was done before I got home from work that day so darned if I was going to point that out and set things back another day or more with them taking things apart and putting things back. Each window swings upward and is held open with a hook and eye assembly or held closed with wing-nuts. The overhang on the roof and the way the windows hang allow for them to be open even on the rainiest days and keep things inside the coop dry as can be! Worst case scenario the one over the nest box is closed but the one on the other side is able to stay open now that the run over that part is covered.


Because my intent is to use deep bedding in the coop, I had a "kick board" installed inside the door to keep bedding from spilling out every time the door is opened - you can see here that by this point the chicks had been with us a few weeks.....

The water and feed are both up on platforms to keep them out of the bedding - the water is visible to the left and is on an overturned litter pan. In the back right corner you can see the "mama heat pad" that I used for keeping the babies warm. This was my first go 'round with that approach and I will NEVER go back to brooding in the house or with a heat lamp! Having power available in the coop is a huge upgrade for me from any previous coop I've had.
Another brag on DH and FIL - they knew how much I wanted to get my babies outside, so I came home for lunch one nasty, rainy day to find them out there starting on the run:

Yes, the dreaded "poultry netting" - a calculated risk made with an informed assessment of daytime predator issues and a secure coop that they are in from dusk to dawn. Our daytime issues are nothing more than neighborhood cats - the amount of activity, people and dogs surrounding us keep raccoons, skunks, opossums (all of whom I know for a fact we have, having seen them) relegated to the night time hours and a 6 foot, solid privacy fence keeps any loose dogs out of the yard in which the coop and run are set. Not my first build, and I'm not naïve about the risk I'm choosing to take - under no illusion about this run being predator resistant.

Remember all that great roofing we got? Well, we had so much left that I had the guys go ahead and cover 2/3 of the run:

Of course, once there is a run, you need a pop door so you don't have to hassle with carrying the wee beasties back and forth, one by one, every time you want to put them in or out......

Again, allowing for deep bedding, the bottom of the opening is a good distance up the wall. Also, for security, the door slides down about four inches below the bottom of the opening when closed to keep prying "fingers" of a predator from getting a grip enough to pull the door up and the track keeps it nice and snug against being pushed inward. The pulley and cable allows for easy operation from outside the coop


The day we installed the ramp (ignore the icky temp ramp to the side)

The nest boxes were put at the bottom of the priority list because they were not necessary right away. They were securely closed off on the inside by a well anchored piece of t1-11 and tarped off on the outside - but it was time to think about doing some work on them
Roofing paper and green shingles with a nice piece of flashing and lots of caulk to keep things dry inside - t1-11 facing going on:

Building the door - the lip you see goes to the inside and creates a snug fit with the opening it slides right into

open:

closed:

From the inside - divider walls not installed in this photo - nests are 14 wide, 16 deep and 18 inches high at the peak of the slope. Landing bar on the front, 24 inches off the floor....was used as a temp roost while the nests were closed off before the poop board/roost was installed - allowed over three weeks of roosting on the actual roost before opening the nests to get them in habit of sleeping in the right place:

Speaking of poop board - roost is a 2x3 with the 3 inch side up. The roost sets 4 inches over the tray. At just 4 feet in length it is a bit small, but the flock size is larger than originally planned due to FIL falling in love with a bird I hadn't intended to keep....will add additional space if/when proves necessary (also helped by the fact the leghorn insists on sleeping in the rafters).

Painting, painting, painting..........oh, and more painting........I am SOOOO tired of painting.......but I *think* I am finally done:


")