This is the latest iteration of my coop. It's 5'x8' (1.5m x 2.5m). It's located in NJ, where we get all four seasons rather intensely -- 95° (35C) and matching humidity in the summer, 0-20° (-10ish C) in the winter, and 40-50" (1m+) of rain annually. So, the coop needed to be able to accommodate a lot of different weather types. The run enclosure around it measures 20'x10' (6m x 3m).
THE ORIGINAL COOP
My coop was originally based on these plans and looked like this:

The structure was two levels, a run on the bottom, and an elevated coop on the left. The ramp was on the right side and instead of a floor, was a roosting bar I added.


I modified the plans to add rudimentary nesting boxes, roosting bars, split the hinged roof doors into two doors instead of one long door. I also made a floor of hardware cloth (a very valuable addition to the plans, as burrowing predators tried to gain access through the floor multiple times).
Despite the modifications, there were several limitations:
- The roost on the right side was popular in the summer, but the coop didn't have proper indoor roosts for cold weather. When it was cold, they mostly slept in the nesting boxes.
- It leaked at the top of the top of the doors when it rained (you can see some of the water damage in the photos above).
- I caulked all the seams and edges but even so, the design encouraged the plywood roof to rot at the edges
- The doors are very heavy and it put a lot of strain on the hinges, requiring periodic repairs
- They call it a tractor, but good luck moving it…..it’s really heavy!
- The door of the run had a tendency to twist, leaving a small gap at the bottom.
- The A-frame design of the coop required some tricky angles to cut and getting them right (or close enough) was a major source of frustration in building it.
DESIGN
Lessons learned from the first time:
1, It needed to be bigger….because chicken math
2, Needed more vertical space for roosting
3, Easy nesting box access is a must. The old coop required opening a heavy door that covered half the whole coop and farthest box from the door was difficult to reach.
4, Enhanced security was essential and I didn't want to have to remember to close the doors, as that was a failure point last time.
5, The old roof leaked because of the way the doors opened, so this time, I'd put the doors in the walls and make the roof overhang a bit.
The coop itself was tired and needed repairs, but the bones of the structure were in good shape. I drew out a new design that would accommodate the points above, while making use of the existing structure to minimize materials and time required to build it. I also didn't want to move the run, as it was solidly secured to the earth, so the new coop would have to fit inside. The door to the run is narrow, ruling out simply bringing in a pre-made coop, so I planned the new coop to build it in place.
The new section was going to be about 4'x3' and grafted on top of the existing structure.
I'd show you the plans, but I lost them. And since you can see each step in photos here, it's better than the rudimentary plans I drew anyway.
TOOLS AND MATERIALS
Since I was working with an existing structure, new materials would be be minimal. The original coop materials cost about $400ish I think (pandemic wood prices). For the new section and the new run door, I used:
- 2.5 sheets of plywood (some salvaged from the old coop),
- 2 or 3 8' lengths of 1x3 trim (some salvaged from old coop)
- 8 8' lengths of 2x4
- 6 8' lengths of 2x2
- Barn red paint (had it on hand)
Tools:
- Circular saw
- A janky miter saw
- Hand saw (for demoing the old coop as there isn't electricity over there)
- Cordless drill
- Wire cutters (for hardware cloth)
- Tape measure
DEMOLITION
I cut off the whole left side of the original coop and removed the floor.
NEW COOP CONSTRUCTION
First step, no more foxes!
While the floor was open, I added a solar-activated door to the side of the coop/run structure. I framed the opening with 2x2s and secured the existing hardware cloth with screws through washers. The door was the Run Chicken T50. It's battery powered as I do not have power at the coop. So far, very pleased with the door. (Special thanks to @Mouthpear for help on picking out the right door! <-- check out the thread if you need to pick out a door)

Then I added new floor joists over the old frame. This was the foundation of the new coop structure.

It required some tricky angle cuts to accommodate the angles of the old frame, but I got it to work.

Then I added the floor on top of the joists. Next came the right side of the new coop. This included an A-shaped cutout where it adjoined the old coop.

To make things easy, I put a 2x2 post in each corner and screwed the wall panels into these posts. Next was the back. I put in 2x2 pillars along the back panel to support the rafters. Not sure that this was really necessary in retrospect. Then came the left wall. This included a large door opening for cleaning the coop.
While the coop was still open, I added the roosting bar.
Then came the front in a few phases: The wall panel that went from the top of the nesting boxes up to the rafters. Again, added 2x2 pillars to support the rafters here and to secure the nesting box partitions. The wall panel for the nest boxes was salvaged from the old coop.

Put the roof on at this point. This is before I secured the roof in place, so there's a little bit of bow in the plywood.

Added hardware cloth over the vents between the rafters. I covered the edges of the cloth with 1x3 trim salvaged from the old coop.

Added partitions to finish the nesting boxes and a hinged roof over the top.

To help my kids reach the nesting boxes, I added a 2x4 along the bottom of the A-frame for them to use as a stool.

After finishing most of the construction, I noticed that wood shavings from the coop kept falling through the side doorway onto the solar door. Not sure if this would create an issue down the line, so I just put a small roof overhang under the coop door to cover the solar door. The roof piece was scrap salvaged from the old coop.

New coop construction was finished at this point. Next up was repairing some issues with the old coop. This door needed new hardware cloth and extra bit of plywood reinforcement strengthened a weak spot.
THE RUN
We built this enclosed run around the original coop. It's roughly 10'x20'. The run came with chicken wire, so I fortified it with galvanized fencing wire on top of the chicken wire (not this exact one, but something like it), as well as a 10” underground barrier around the perimeter. Here's a close-up of the top of the underground barrier--it goes through the galvanized fencing so there's no gap between it and the ground.
Now, a new door for the run. The original door would twist, leaving a gap at the bottom (exaggerated here for effect):

The run enclosure used metal framing and I didn’t have a good way to drill into it anything like that, I built a door frame out of 2x4s, cut to fit tightly inside the existing metal frame opening. The door was built with 2x2s, hardware cloth, and a kick plate from an extra bit of plywood.
L brackets made the corners stronger.

I then used zip ties to secure the wood frame to the metal frame.
I finished it off with a spring to ensure the door stays closed.
All coop doors were outfitted with spring loaded latches and I used this latch for the run door. I secure this with a carabiner clip to prevent any predators from pushing the latch open. I chose this latch for the run door, because you can open it from both sides, so you’re never locked inside when the door springs closed.
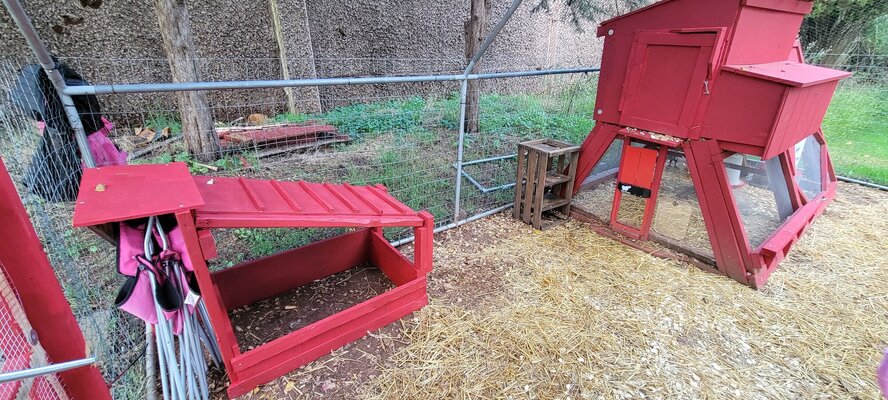
Finished off with a fresh coat of barn red paint.


LESSONS LEARNED
I'm very pleased with how it came out and how it looks now, but if I had to do it over again, I wouldn't do it this way. I wish I had started with a better coop design in the beginning. Something more traditional. The A-frame design leaves a lot to be desired.
Coop 1.0 worked for my carpentry skill limitations and budget restrictions at the time, but I don't like it. For coop 2.0, I didn't have much time to build and I definitely didn't have time to completely demo the old coop and run to start from scratch, so I worked around what was already there.
EDIT: ADDED A DUST BATH
Now that the coop is finished, I set about to build a covered dust bath for the birds. I decided this would be a "no-buy" project-- I'd complete it with just whatever I had on hand.

It's about 4'x2' and includes a covered spot to protect the folding chairs from rain so I can sit with the chickens. Next, I'll fill the bath with dirt and sand.