My primary motivation for getting backyard chickens was the inhumane conditions of chicken farms. For years I paid more for eggs from "free-range" and "cage free" chickens thinking I was doing the right thing only to find out those terms didn't mean what I thought. I wanted my eggs to come from ethically raised chickens.
I had several goals with this coop and run:
- Use left over lumber I had from previous projects -- I had about hundred dollars worth of it laying around (including the large polls used for the feet of the coop).
- Create a coop and run designed for the Central Alabama heat and humidity, but also able to handle our month or so of real winter.
- Have a large run that didn't feel like a cage. It not only should have a large surface area, but plenty of height.
- Take advantage of the almost year-round warm weather. From March to early November it's warm enough at night that the door to the coop can be kept open 24/7.
I got four chickens when they were four weeks old in September. Now, 10 months later, they're all laying eggs and have gone through extreme changes in weather. This winter temperatures got into the single digits, and this summer the heat index has regularly broken 100F. I think I can say that the coop and run are a success.
Design
The coop essentially sits on a table.
Step 1: Building the table. I used 4" x 4" polls for the legs. I arranged them in a 2' by 4' rectangle and used 6" wide lumber to connect them. A 1/2" x 2' x 4' sheet of plywood was coated with deck sealant to protect it from any chicken poop that would leach through the bedding and then placed on top of the legs, and screwed it into place.
Step 2: Frames for the walls of the coop. Here are the designs for the front and back frames with openings for the chicken door, a big door for cleaning, and the nesting boxes which stick out of the back.
Once the frames were done they were placed onto the table and screwed into place.
Step 3: Nesting boxes
They stick out the backside 12 inches and are 25 inches wide with a divider in the middle so there are two boxes that are 12" wide, 12" long and 12" to 18" high (slanted roof). The frame affixes to the back frame of the coop.
Step 4: Roof.
Connecting the two frames at the top is an L-shaped piece of wood that is 4" inches high at the front and 2 feet long. That 4" piece puts the roof on an incline.
For the roof I first built a 4' x 4' frame, placed two 2' x 4' sheets of plywood on it. I took that, and put it on two pieces of lumber that were 4 feet long and 6 inches wide. That was placed onto the top of the coop frame with 1.5 feet sticking out of the front, and 6 inches out the back.
I then put PVC corrugated sheets on top.
Step 5: Screwed plywood sheets on the frame and then sprayed everything down with a wood sealant.
Construction
Coop features
Nesting boxes
I put some additional support underneath the nesting boxes.
This is one of the rare times that the box on the right was used. Usually all of the eggs are laid in the left box, and sometimes they even move the golf ball out of the right box and into the left.
There's a 2" high lip at the entrance to the nesting box so that it feels like the chickens are actually in a box.
I painted the inside of the boxes dark red (except for the top) to help make them darker than the rest of the coop. And as you can see in the other pictures I added shades.
Roost
The roost is a 2" x 4" that's 3' long and 5" inches above the coop floor.
During our several weeks of winter -- and when the polar vortex hits us -- I put down about 3 inches of straw for additional insulation. And when the chickens are seated and sleeping the coop vents are still over a foot above their heads, so cold air doesn't blow on them.
The chickens tend to huddle together on the right side when they're ready to sleep, leaving about 1.5 feet of the roost open.
Doors
All of the doors have quasi doorjambs so to prevent drafts. See the lip below.
The big door for cleaning.
Ramp
The ramp secured using an eye screw but an be lifted out of place.
Roof
Yes, I sprayed insulating foam everywhere.
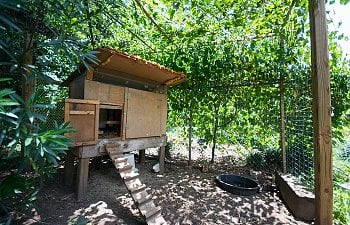
The Run
The run is 12' x 12' x 85" tall.
For the door I bought a wooden screen door at Home Depot. Its frame are 4" x 4" posts that are sunk 2' into the ground with cement. The rest of the posts are 2" x 2". The wire fencing is attached with zip ties.
The main water source is the 5 gallon bucket in the corner with water nipples on the bottom.
I stuck leftover pieces of wood into a tomato cage to give the chickens a bunch of perches to sit on.
A grape vine grows over the eastern side of the fence, completely covering it, and going over top. This provides shade during the summer for the chickens.
What I (think) I did well
- Plenty of ventilation.
- A large, secure run that lets me keep the coop door open at night during warm months. The grape vine helps lower the temperature in the run.
- The big 2' x 2' door makes cleaning very easy and is useful for airing out the coop.
What I learned/could have done better
- The roost had to be redone several times until the chickens would use it. At first it was built with a 2" x 2". They would sit on 2" x 2" polls that I put around the run during the day, but wouldn't touch the one in the coop. I then changed it to a 2" x 4" with the 4" side flat up, 7" above the coop floor. Still no dice. Finally, I took 2" inches off the height, and boom, that night they all went on it.
- The nesting box should have been on the side of the coop, away from the roost. When I designed the coop I didn't fully appreciate how much the chickens would poop while sleeping. A lot of that poop lands near the entrance to the nesting boxes. It doesn't get inside of it, but it's a bit too close for comfort.
- The one problem with using old wood is that some of it had warped, complicating construction. But it does give the coop a rustic look.
- The coop is a bit on the small size for 4 chickens, but they're only in there when they're sleeping. For most of the year the coop door is kept open 24/7 so they can let themselves out in the morning, and in the winter months I let them out when I get up for work at 6:30 AM.
Additional note on free ranging
My original plan was to mostly keep the chickens in the run (which is why I made it so large), and occasionally let them free range in my yard which is pretty big and has lots of tree cover. There are a lot of stray cats in my neighborhood and I was worried that they would attack the chickens. It turned out that the cats are terrified of the chickens -- the chickens chase them out of the yard. I now pretty much let the chickens free range all day, and it's pretty obvious how much they prefer that to being in the run. I'm amazed how they need no supervision. They stay in the yard, rarely touch any of the planted flowers, vegetables, and herbs, no predators bother them, and they always go back to the coop at night to roost. I'll I have to do is open the door to the run in the morning and close it at sunset.