We entered the realm of Backyard Chickens due to my daughter. She is 6 years old, and has Autism. Over the winter, they hatched baby chicks at her school. She became so excited about the chicks, that after reading about how they've been therapeutic for a number of people on the spectrum, we decided that we would get her some chicks for her birthday. We ended up with 3 chickens. A Brahma, Jersey Blue, and Jersey Gem.
.jpg")
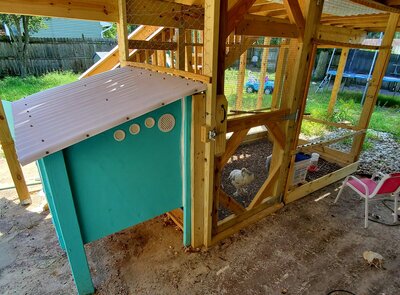
I built our chicken coop using the recently removed from the website Home Depot Garden Club plans. It was a relatively easy and simple coop, but it leaves a lot to be desired. We only have 3 hens at the moments, and I would not feel comfortable having more than four girls in the coop. I’ve made some modifications during building, and since. Instead of cedar siding boards which the original plans called for, I used PVC roof panels that I got in the clearance section of my local home depot. I also got all my wood from the scrap wood pile at my local home depot, where they mark lumber 70% off. I used plywood sheets of different thicknesses, because that’s what they had, so I had plenty of leftover scraps since I purchased extra to account for the damages areas of the wood. I spent less that $50 on all the wood. I also obtained the Teal/Tiffany Blue exterior paint from the discounted “oops” rack in the paint department.
Links to plans, at still available through The Wayback Machine:
https://web.archive.org/web/20191218171113/https://gardenclub.homedepot.com/build-a-chicken-coop-pt-1/
https://web.archive.org/web/20151103044523/http://gardenclub.homedepot.com/build-a-chicken-coop-pt-2/
https://web.archive.org/web/20151101000936/http://gardenclub.homedepot.com/build-a-chicken-coop-pt-3/
Build video is still available on youtube. (Note** youtube videos skip a lot of steps)
Materials needed:
**Note I just used all 8ft 2x4’s since I used cheap scrap pieces.
I also got all my wood from the scrap wood pile at my local home depot, where they mark lumber 70% off. I used plywood sheets of different thicknesses, because that’s what they had.
- One 2-x 2-inch x 8-foot board
- Four 2-x 4-inch x 12-foot boards
- Two 11/32-inch x 4- x 8-foot plywood sheets
- Corrugated roofing panels
- Wood Glue
- One box 2 1/2-inch exterior screws
- One box 1 5/8-inch exterior screws
- Brad nails and nailer
- Two 4-inch plastic drain grates
- Seven 2 1/2-inch narrow utility hinges
- Three barrel bolts
- From the 2- x 2-inch x 8-foot board, cut three lengths, each 32 3/4-inch long. This will eventually become your coop’s rafters. Set your miter saw to 15 degrees and make parallel cuts at either end of each of the three 32 1/2-inch lengths of 2 x 2 boards. These will serve as the rafters
- From the 2- x 4-inch x 12-foot boards, cut three 31-inch lengths to form the floor frame. For the legs and supports, cut seven 48-inch lengths and two 39 1/2-inch lengths. Make a 15 degree cut at one end of 2 48-inch for the front legs and each of the 39 1/2-inch rear legs. This creates the pitch of the roof.
- front panel (33- x 48-inch)
- back panel (24- x 48-inch)
- two side panels (each 32 1/4- x 27-inch)
- a floor panel (34- x 48-inch)
- three dividers (each 111/2- x 10-inch)
- a sub-roof (10- x 48-inch) for a nesting box inside the coop
- Rip leftover scraps into 1” strips, you need at least 6 10” pieces.
Panels will further be cut as follows:


Assemble floor and attach to legs. Add 48” 2x4 to front and back at top of legs. Connect roof supports to these.


Build Nesting boxes:
- Add a 48” 2x4, with the wide side up, with the bottom 10 inches up from the floor of the coop. Screw this between the back legs. This will support the nesting box roof, and used to attach the back panels.
- Attach the nesting box roof and secure it with 1 5/8-inch screws to the 2x4 from the previous step.
- Mark the floor at 12-inch intervals and use your square to draw guide lines at a 90-degree angle from each mark.
- Slide the dividers into place, straighten their alignment with the guidelines, and then trace their edges along the floor.
- Remove the dividers and use wood glue and brad nails to fasten 10-inch lengths ripped down plywood scraps to the outside edges of the lines you traced.
- Once the glue has dried, you can slide the dividers back into place. I glued them in place on the bottom, and secured to the top with brad nails.

Assemble the front and back Panels, and roost bar
- Clamp the left panel to the front left side of the frame.
- Use a pencil to mark a 3-inch border on the panel, and then attach it to the frame by driving 1 5/8-inch screws at each corner of the border.
- Aligning them flush against the right side of the newly attached panel, attach the door panels at the top and bottom of the frame, then attach the final panel to the front right side of the frame.
- Although the panels will be secure at the top, there’s nothing supporting them on the sides. This is where I took 1” thick lengths of scrap plywood or 2x4, and attached to the front panels and 2x4 legs with glue and brad nails.

- You should have three pieces for the back panel.
- Clamp the uppermost and lowest panels horizontally with their edges flush with the outer edge of the frame. The upper panel’s lower edge should align along the nesting box support.
- Draw another 3-inch border and drive the screws at the corners.
- Put the middle panel aside for now.
- At this time, I ripped 1.5” off the edges of a scrap deck board I had, and attached to the front panel, and top of the nesting boxes to use as roosting bar.

- Clamp the panels to the side of the frame, and secure them using 1 5/8-inch screws, making sure that the top edge of the panel does not extend above the slope of the roof support.
- To make a side door for cleaning purposes, I cut the right panel into two pieces. I then attached a 2x4 to the inside of the front legs, and the roof support, creating 2 sections, a triangle and a rectangle. Sorry, I didn’t measure it, just kind of eyeballed it.
- To provide airflow, cut circular holes in the side panels near the front.
- The holes can be cut either with a 4-inch hole saw or by tracing the perimeter of the plastic drain grates directly onto the wood, then cutting along the line.
- Attach full panel to roof rafter and floor. (I’d recommend using some scrap to make a support about halfway down the panel, like on the door side, to prevent any bowing, which I had an issue with after being exposed to the weather.)
- Attach the triangle part of your door side to the upper part, and the door to the lower half using utility hinges.
- After the girls moved into the coop, I first added 3 additional 2.5" round soffit vents on each side. I later removed the top triangle panel on the door side, and replaced with hardware cloth to increase ventilation, as this is an issue with the original plans. I will replace the panel when the weather becomes cooler, using threaded wood inserts and stainless bolts.
.jpg")
Attach Doors and Ramp
- Attach the front door/ramp to the frame using two utility hinges and one barrel bolt.
- Set the hinges into the bottom center panel 1 1/2-inches in from either side using the included screws to attach them to the front panel.
- Place the window bolt at the center and top of the door/ramp, vertically aligned.
- The nest box door should be attached in a similar fashion, using three utility hinges evenly spaced along the bottom and one barrel bolt placed vertically at the center of the top edge of the door.

Put on the Roof
- Cut a piece of plywood to the size of your roof, allowing for an overhang.
- Cut PVC roofing panels to length, and attach with roofing screws.
- I may go back at a later time, remove the center panel and cut a hole in the plywood and cover with hardware cloth, to be almost like a ridge vent, and replace the panel.
.jpg")
Building the run:
I have a 2nd story deck, and built the run underneath the deck in otherwise unused space, with a concrete pad. The run was framed out using 2x4’s as posts and along the bottom. I later added 5/8” fence boards to make the “floor” area deeper, so I can add more wood chips.
I purchased a roll of 5 foot by 150ft poultry netting. Upon receiving it, I realized that it had 2” holes, hence the economical price. I strung 1x2 pt wood at 2’ above grade, at 5’ above grade, and along the bottom of the rafters. The 5” chicken wire was stapled to all 3 stringers. I then got a roll of 24” chicken wire, which was attached over the other layer along the bottom of the run, between the bottom two stringers. Additional 2" wire was cut and attached to the top section, completely enclosing it from the sides. A gate was build out of wood, and covered with the 5’ wire, and then hardware cloth.
I initially filled the run area with play sand from an old sand box we had. But whenever it rained, it began to smell. So it was covered with wood chips obtained from the local recycling center. Free is for me!
I’ve also been adding corrugated roof panels to the underside of the deck to provide some additional rain cover to the coop, and protection. A piece of 2x2 was attached in the corner as an outside roosting bar.

.jpg")
.jpg")