Getting the pallets: $1 each at the local green recycling/compost place. Free found stacked down at our local lake and with permission of the county commissioner. Free from my work, our hospital gets from 2-5 per day. Pallets are more easily taken apart with a wrecking saw and a nails in wood blade rather than hammers and crow/pry bars. The latter tend to split the wood too much.
Planning the design: Taking after my father and his building projects, the plans are all in my head (causing my DH no little amount of stress
 ) and have some fluidity as we go. Having build our first coop and it costing us upwards of $600. I am going for under $100 for this larger coop including the run. I have on hand one window, and old door, and a piece of glass I plan to incorporate into the design. I also plan to collect buckets for nesting boxes - obtained from the local store bakery, bird seed, and kitty litter.
Lets see if I can describe it. Split level. The upper level is for roosting only and will provide a partially shaded and protected area in the run. This is also where the feeders will be located (under.) Seen below. looking under you can see the opening that will become the pop door.
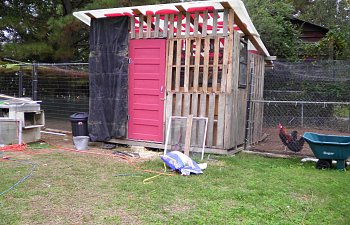
The opposite side (west) will have the human door and storage area door. The plan, at present is to have the nesting boxes inside the west half of the coop.
Seen here the human door, center. To the left of the picture, at the bottom are two brooders that I am planning should any of my hens get any ideas. Above the brooder, I have planned storage and nest boxes.
The North side I have planned to place the water collection barrel for the nipple watering system. I am sold on nipple waterers for chicks and chickens. We used them with our day old chicks and loved them. I installed them in our first coop also.
In this photo above,you can also see the ends of the two brooders. These will eventually have pop doors and their own small runs. Close up below.
The south side will include a window in the space we still have to complete the wall to the left.
This is a work in progress and I will add more photos and explanations as we go. If anyone can forsee a potential issue, feel free to speak up. I am very green at this chicken and building stuff. Thanks.
Finished. Here are a couple of pictures.
Planning the design: Taking after my father and his building projects, the plans are all in my head (causing my DH no little amount of stress

Lets see if I can describe it. Split level. The upper level is for roosting only and will provide a partially shaded and protected area in the run. This is also where the feeders will be located (under.) Seen below. looking under you can see the opening that will become the pop door.
The North side I have planned to place the water collection barrel for the nipple watering system. I am sold on nipple waterers for chicks and chickens. We used them with our day old chicks and loved them. I installed them in our first coop also.
The south side will include a window in the space we still have to complete the wall to the left.
Finished. Here are a couple of pictures.