1 Week in the coop and the Poop-slide is working GREAT!

Hummingbird Hollow

Songster
8 Years
Jul 1, 2011
1,499
169
211
Colorado mountains
I want to thank the folks who posted the thread a few weeks back about their poop-slides and poop-hammocks. I moved my 7 week old pullets out to their coop 8 nights ago and want to report that the poop-slide I created (with inspiration from this forum) is working very well. The first few nights more than half of the girls roosted up on the shelf I built over the nesting boxes, but because I had anticipated that, I had covered it with sheets of corrugated plastic, which is very easy to clean. Since then, they have been roosting on the roosts (braving higher roosts each night) with the poop-slide under them and all the poop has slid down into the Rubbermaid lid at the bottom of the slide. Yesterday I did my first coop cleaning and it took about 45 seconds with the shop vac to suck up what was in the lid and on the shelf, which took care of probably 90% of all the poop deposited in the coop in the past week. (Here in Colorado the air temp is dry enough that the poop vacumes up easily and cleanly and I can just empty the shop vac into the compost bin).

98323_dsci1891.jpg


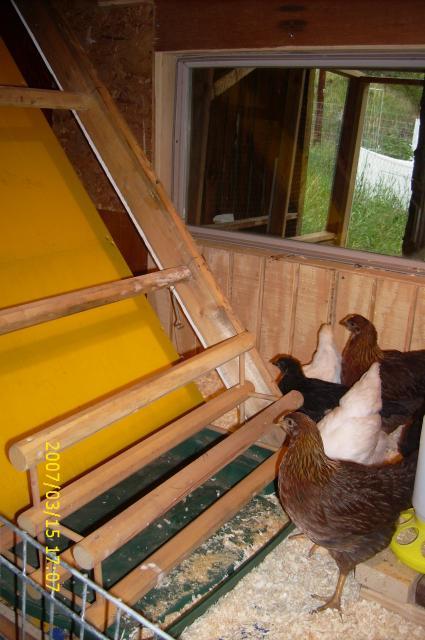
My poop slide is made of two 1"X1" pieces of wood with pieces of corrugated plastic (left over from a different project) attached to them. It hangs with hook & eyes about 6 or 7 inches under the roosts with the bottom resting on the edge of a lid to a big Rubbermaid tub that I no longer have (found the lid while I was clearing the space for the coop and scooped it back out of the trash can before trash day). While this week I simply vacumed, it will be very easy to remove both the poop slide and the lid to hose them off if and when the need arises.
 
Last edited:
Wow. That looks like it works great. We are in the process of converting a stall in the barn to a coop. I was going to go with a poop board, but now we will have to do a little redesigning and go with a poop slide.

I had covered it with sheets of corrugated plastic, which is very easy to clean.

Is this the plastic used for making signs?

~Shannon​
 
Quote:
Is this the plastic used for making signs?

~Shannon

Yes, I have a big pile of them that are 18"X24" that someone gave me when I was running for local office but I never used. I also have some big 4'X8' political signs left over. I used one as the cover of my coop floor, which is also 4'X8'. You might be able to keep an eye out for some store that is holding a promotion and ask them for the signs when the promotion is over...or wait until the next election season and pick them up from the roadside after election night (just don't pick them up before election night or people get REALLY angry
somad.gif
)
 
Last edited:
Interesting idea...My chickens' poop is so wet I think it would just stick to the slide if I tried something like that...
tongue.png
 
Quote:
Some of the poop might stick, but I bet it would still be easier to clean than simply raking it off the bottom of your coop. In my (limited) experience, some sticks, some rolls down to the bottom and even some of the stuff that sticks at first drops down after it dries for a day or two. The plastic stuff is pretty slippery, you could probably use some cheep linoleum counter top material if you could find an appropriate sized scrap at a job site or The ReStore.
 
We also have a very dry climate, and I use the poop hammock in my coop. Just be careful about sucking up the poop into the vacuum cleaner idea. When you do that, you create dust. The dust from chicken poop can have lots of different spores and bacteria in it. Also, if you have any mice in the coop you could pick up hanta virus that way...no bueno. Almost every case we've seen has been related to someone raising dust where mice have been...vacation cabins, rabbit hutches, work trailers... Just be careful with the vacuuming part. Maybe you could position the vacuum (exhaust outlet) outdoors and run a long hose into the coop, and wear a dust mask.

I love the poop slide vs my current hammock. And I recently downsized the flock. We have a big local election coming up in Sept. Have to watch for those signs!
 
Quote:
Thanks for the good advice, I hadn't thought about what was coming out of the vacuum exhaust, only what was going in...and pleased with my own cleverness on how easy the cleaning was going. I'm sure that when the weather starts getting cooler mice will be more of an issue than they are now and I'll need to be extra careful.

Good luck with the local election. May the best man or woman win! (And may they leave lots of plastic signs when the night is over)
 
I just got a request by "private message" regarding my poop-slide, so I thought I'd copy it over here as well in case it was helpful for others. The request asked for additional photos and information....

I will try to get a different angle for you. I used my daughter's camera, and she's gone for the day, probably taking the camera with her.

In the meanwhile, I'll try to describe the roost and poop-slide construction process.

Due to the nature of my coop and the location of the pop door, picture window and access door, only the top roost goes all the way from one wall to the other wall (the coop is 4'X8' and the roost goes across the 4' length)

To support the roosts I used 2 2"X4"s. The first 2"X4" was screwed into the left-hand wall at about a 60 degree angle, stopping a few inches above the floor to accommodate the access door. I had used a hole-saw bit on my power drill to bore three 1"1/2" holes about half-way through the 2"X4" to hold one end of the roosts (which were 1 1/2" thick 24" long 8-sided dowels used in a wine-racking system we tried about 10 years ago.) You can see the bottom roost plus the right side of the second tier roost in the photo, plus the stepping stool arrangement of wine-rack at the bottom in the photo.

The second 2"X4" was a little longer than the first, because I had to measure it and then cut the proper angles at both ends so that it rested against the back wall on one end and the floor on the other end. The top hole on this 2"X4" was cut all the way through the 2"X4" and I used a slightly less than 4' length of 1 1/2" staircase banister material that I picked up at the ReStore (thrift store for Habitat for Humanity) so that top roost goes all the way to the right wall of the coop and is held up by a scrap piece of 2"X4" with a hole cut 1/2 way through it that I could tap into the correct location, once the top roost was in place and secure it with a few screws.

So that's the roost set up. I know you didn't ask for that but I thought it might be helpful to explain the poop slide. For the poop slide, I measure the distance from wall to the floor, paralleling the roost supports about 7" or 8" under the roosts and subtracted the height of my poop-collecting bin lid that would be catching the poop at the bottom. I then cut two pieces of 1"X1" trim to that length. I was fortunate that the corrugated plastic sign material was also 24" wide and it turned out that I could fasten three sheets along the 1"X1"s, using 1/2" screws, and not need to do any cutting. It wouldn't have been too hard to make smaller because the plastic cuts easily. If I had to make it wider, I would have either had to use some type of center support or used a different material.

So, the top of the poop-slide supports lean against the back wall of the coop and the bottom supports rest on the lip of the bin lid. I purchased 4 hook & eye sets to use to hang the poop-slide from the roosts supports (you can see one of them in the photo with a piece of wire extending the eye a few inches) but after installing the two bottom hook & eyes, it became apparent that they weren't really necessary because even when the hooks get jostled and let go of the wire, the poop-slide stays in place pretty well.

The first week I just used the shop vac to suck up the accumulated poop in the bin and the poop on the shelf over the nesting boxes. The second week all the girls were using the roosts so I simply slid the bin out and dumped it directly in the compost bin. It really looks like that is capturing 90% of the poop in the coop. The pine shavings on the floor still look really clean after two weeks of use.

I'll try to get another photo, but I hope this also helps.
 

New posts New threads Active threads

Back
Top Bottom