A Chicken Coop Christmas Ornament

Progress is going to slow down now, with the holiday over and back at my day job.

Honestly, I thought the build would be further along by now. But, everything always takes longer than you think.

Today after work, I hung the left side door. If you look closely, you'll see I had to shim out the bottom hinge.
const501.JPG


And, as predicted, the double doors don't line up perfectly.

const502.JPG
 
The left door frame is about 1/8" out of square. So when the hinges were directly attached to the jam, the door wouldn't close at all.

That's why "real" doors shim the door jamb to be perfectly plumb before nailing it to the rough opening. You never see those shims because they're covered up with the door casing trim.

It was still square when I attached the jamb, but I hadn't bolted the front to the sides yet. I hadn't bolted the front to the sides yet because those bolts pass through the door frame rough opening and through the door jamb. But once it was bolted, it went a little out of square. Since the jamb is glued to the frame for strength, there was no possibility of going back and shimming between the frame and the jamb.
 
You still might be able to adjust your shims to doors meet 'better'...
...if that bothers you. Hopefully you didn't glue the shim.
 
That's true. I hung one pair of double doors once. Those are in the house, so they *had* to be right. But the amount of time it can take to achieve that perfect alignment ....

I dunno. I might go back and fine tune it later, but for now I'm moving on to the next phase.
 
Again today, just a few hours after work. Today was the nesting boxes.

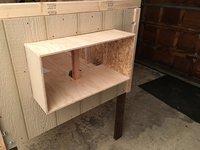
The floor was already mounted. Cut and mount the ceiling. Like the floor, this won't really show and is 3/8" plywood. Theoretically the same size as the floor, but my best piece to use was 1" shorter, so I used that. That'll taper the top of the nesting box inside the coop a tiny bit. I don't think they'll mind.
const601.JPG


Cut the sides out of paneled siding, and cut framing pieces out of 2x2.
const603.JPG


Easiest to attach the frames to the sides outside separately
const604.JPG


Now mount the inside divider, which is out of 1/8" plywood.
const605.JPG


And add corner trim to the whole thing
const606.JPG


I took the suggestions from earlier in the thread about how to mount the door. This will be a bottom hinged door mounted on the 3 1/2" sill. To keep water out, I'll extend the roof line so it drips just past the edge of the nesting boxes. That's why the top is plywood instead of siding - once the roof's in place, you pretty much won't see the top at all.

I'll do the box door at the same time I do the pop door and vent shutters.

This is probably the last progress for a bit. I need to clear out the garage now so that folks can park in it this weekend for a party. And I'll be seeing to the party (and cleaning up after!) all this weekend instead of working on the coop.
 

Attachments

  • const602.JPG
    const602.JPG
    640.9 KB · Views: 1
OK, a couple weeks with other projects and activities... it's time to get back to chicken coop construction. Lots of progress on the walls and doors, but so far, we have no roof, and that's kinda important. So this weekend, the goal is to build the roof.

From previous construction, we have four half rafters, and the rafter support beams. Time to measure, cut and trim the short side rafters.

We can use a protractor to get a rough idea of the included angle, but then cut and test fit a sample piece a few times to get the fit exactly right. The final angle was four degrees different from the initially measured angle.
const701.JPG


Marking the rafters for cutting. This mark is incorrect. The notch needs to be 90 to the face, as I've illustrated in red.
const702.JPG


And the revised cut. After I cut along those initial marks, I had to re-cut after test fitting.

const703.JPG


And marking the notch for the other support beam.
const704.JPG


The rafters need to be joined together for strength and in order to make an effective attachment to the support beam. I used a piece of plywood to join them. This is glued for strength.
const705.JPG


Notched to fit the support beam. This was easy, since the rafters were already notched, so I just needed to use a jigsaw to match the existing notch into the plywood.
const706.JPG


I haven't built the shutters and chicken doors and nesting box doors yet. But the tolerance between the nesting boxes and the roof line is VERY close. So I mocked up the nesting box doors and trim pieces and held them with tape, so I could notch the rafters to fit.
const707.JPG


const708.JPG

Left side rafter marked for trim

const708.JPG


Right side rafter marked for trim
const709.JPG


All rafters fitted in place.

const710.JPG


Now we can attach rafters to support beams with L brackets, making a contiguous roof frame.
const711.JPG


And once the frame is built, it can be removed, for decking, papering, and shingling.
const712.JPG


The weight of the king beam is supported by studs in the actual coop. But it has no support while the roof is standalone. Since we're going to be doing a lot of construction, I added temporary vertical support studs to support the roof while building it. These have to be removed later in order to put the roof back onto the coop. But there's going to be a lot of hammering and weight. And we don't want the unsupported rafters to collapse while we're doing that.

const713.JPG


Decking the roof with 3/8" plywood. Unfortunately, you DO need two 4x8 sheets. One isn't enough.
const714.JPG


Installing drip edge flashing. I've put a lot of work into this project so far. It's worth spending a little extra time so that there's no water penetration to cause delamination later of the roof decking plywood. Once I've built this, I don't want to have to do it again.
const715.JPG


Papering the roof. Held in place with staples. Anyone need 9/10ths of a roll of tar paper? :-D
const716.JPG


Laying the starter course of shingles. I ignored the shingle nailing pattern guidelines in favor of a nailing pattern that drove most of the nails through the deck and into the rafters. Since the roof is so low, nails that penetrate the roof deck are a potential hazard to the chickens I'll have to cover later, so I want to minimize the number of nails I have to cover later. No matter what, some shingles have to be nailed in a place where there's no rafter.

const717.JPG


Fully shingled. Asphalt shingles are HEAVY, and this coop used nearly half a square. If I had it to do again, I'd use lighter corrugated plastic roofing. That's what I'll use to cover the outdoor chicken run. Not shown: big dollop of caulking covering the four final exposed ridge shingle roofing nails.
const718.JPG


const719.JPG

const720.JPG


And with the roof dropped into place back on the coop. That thing is *heavy.* Did I mention how heavy it is?
const721.JPG


const722.JPG


Now it actually looks like a chicken coop.

Final construction phase will be doors/shutters/vents, openings covered with hardware wire, and final trim. Then painting, of course. And once it's in place I'll have to build the enclosed run around it. So lots of work still to do.

But Mrs. Bjmoose is getting impatient, and is ordering her baby chicks this week. So the clock is going to start ticking.
 
Another weekend. On Saturday morning I allowed as how I might possibly finish the coop this weekend. Ha! But I did make more progress. Let's do some "remedial" trim and hang some doors.

You recall early on, I over did the cutouts on the siding where the ridge and support beams sit on the framing and need to have the siding notched. And I made those notches WAY too big.
const801.JPG


OK, it's time to provide the cover up trim for those holes. I got some 1/8" plywood ripped to 4" thickness. Then trimmed some sample angles until I got it exactly right:

const802.JPG


Use the sample template piece to mark the final trim thats going to fit between the siding and the outermost rafter:
const803.JPG


Pieces shown in place on the front. Have to do the same thing on the back. These are attached with construction glue and small 7/8" brads.
const804.JPG


The front doors are built up out of a stacked series of trim pieces. This is because they need to be EXACTLY the same thickness as the trim pieces to which they'll be attached. If you look closely, you'll see the middle piece was ripped to an exact thickness so that the doors would fit in the measured gap provided. For this fit to work - we had to precisely align those pieces of trim earlier! Remember, the center trim is not exactly in the middle. Rather, the Hinge Edge of that piece is exactly in the middle.

Unfinished door on the left, glued and screwed door on the right. I could have drawn a pencil line down the center to align those attachment screws, but this approximate placement continues the "informal, built by hand" look that I've been cultivating so far.

const805.JPG


Door hung on small hinges. These doors are MUCH easier to hang than the big cleaning doors. Note the safety spring hook catch that keeps it locked. You have to carefully place the loop, so that it doesn't interfere with the door being fully opened!

const806.JPG


And the door in the fully open position. Note how the door slightly overlaps the rightmost trim piece - that's what we want and measured for earlier, so that it opens to a neatly blocked position! And then add a hook and loop to hold the door open. This one doesn't need to be predator proof, since it's just holding the door open.
const807.JPG


Both doors hung. One shown closed, and one open. This really shows how the doors fit. I'm very proud of that. They sit flush when fully open, and also sit flush when fully closed.

PS: (In this picture, you can also see that the "surface bolts" that I bought at home depot to hold the big front "cleaning access" doors are actually different sized on the left and right, even though I pulled them out of the same bin. I didn't see it when I installed them, but the photo sure shows it. How annoying!)

const808.JPG


And, both doors open. This is how they'll be almost all the time.

That reminds me: "Hey bjmoose, how come your chicken coop has two doors?"

"Because, if it had four doors, it would be a chicken sedan!." Ha! Ha! Ha! I kill me.
const809.JPG


Let's build the nesting boxes door. Again, it's built up out of pieces the same thickness as the trim, so that it sits flush for neat hinging.

You see that gap at the top of the cross support pieces? That's IMPORTANT. Actually, you can see it better in the next photo.
const810.JPG


Glued and screwed. The gap shows better here. Speaking of gaps. You can see those three pieces are not exactly the same width, leading to a slight gap between the bottom piece and the trim. That gap is only one half the breadth of the saw blade wide. It really illustrates the difference between the "construction quality" that I'm going for here, and "cabinetry quality" which I have neither the tools nor the disposition to build.

const811.JPG


Mounted in place fully open. And now you see why we need the gap. It allows the door to close flush. Otherwise the top plywood of the nesting box would interfere with those cross pieces.

const812.JPG


And fully closed. Theres a pull handle for opening, and a hasp, secured with a carabiner, to secure it shut. I filed the burr off the drip edge flashing, to minimize the risk of cuts while opening the nesting boxes. After it's painted, I still may cover that edge with a bit of tape for further safety.

\
const813.JPG


And the photo that shows the trim, doors, and nest box doors we added. My neighbors are now all razzing me about my "luxury chicken coop" I'm building, and asking whether it has full kitchen and air-conditioning. :-D

const814.JPG
 
Last edited:
Another weekend. On Saturday morning I allowed as how I might possibly finish the coop this weekend. Ha! But I did make more progress. Let's do some "remedial" trim and hang some doors.

You recall early on, I over did the cutouts on the siding where the ridge and support beams sit on the framing and need to have the siding notched. And I made those notches WAY too big.View attachment 1255949

OK, it's time to provide the cover up trim for those holes. I got some 1/8" plywood ripped to 4" thickness. Then trimmed some sample angles until I got it exactly right:

View attachment 1255950

Use the sample template piece to mark the final trim thats going to fit between the siding and the outermost rafter:
View attachment 1255951

Pieces shown in place on the front. Have to do the same thing on the back. These are attached with construction glue and small 7/8" brads.
View attachment 1255952

The front doors are built up out of a stacked series of trim pieces. This is because they need to be EXACTLY the same thickness as the trim pieces to which they'll be attached. If you look closely, you'll see the middle piece was ripped to an exact thickness so that the doors would fit in the measured gap provided. For this fit to work - we had to precisely align those pieces of trim earlier! Remember, the center trim is not exactly in the middle. Rather, the Hinge Edge of that piece is exactly in the middle.

Unfinished door on the left, glued and screwed door on the right. I could have drawn a pencil line down the center to align those attachment screws, but this approximate placement continues the "informal, built by hand" look that I've been cultivating so far.

View attachment 1255953

Door hung on small hinges. These doors are MUCH easier to hang than the big cleaning doors. Note the safety spring hook catch that keeps it locked. You have to carefully place the loop, so that it doesn't interfere with the door being fully opened!

View attachment 1255954

And the door in the fully open position. Note how the door slightly overlaps the rightmost trim piece - that's what we want and measured for earlier, so that it opens to a neatly blocked position! And then add a hook and loop to hold the door open. This one doesn't need to be predator proof, since it's just holding the door open.
View attachment 1255955

Both doors hung. One shown closed, and one open. This really shows how the doors fit. I'm very proud of that. They sit flush when fully open, and also sit flush when fully closed.

PS: (In this picture, you can also see that the "surface bolts" that I bought at home depot to hold the big front "cleaning access" doors are actually different sized on the left and right, even though I pulled them out of the same bin. I didn't see it when I installed them, but the photo sure shows it. How annoying!)

View attachment 1255956

And, both doors open. This is how they'll be almost all the time.

That reminds me: "Hey bjmoose, how come your chicken coop has two doors?"

"Because, if it had four doors, it would be a chicken sedan!." Ha! Ha! Ha! I kill me.
View attachment 1255957

Let's build the nesting boxes door. Again, it's built up out of pieces the same thickness as the trim, so that it sits flush for neat hinging.

You see that gap at the top of the cross support pieces? That's IMPORTANT. Actually, you can see it better in the next photo.
View attachment 1255958

Glued and screwed. The gap shows better here. Speaking of gaps. You can see those three pieces are not exactly the same width, leading to a slight gap between the bottom piece and the trim. That gap is only one half the breadth of the saw blade wide. It really illustrates the difference between the "construction quality" that I'm going for here, and "cabinetry quality" which I have neither the tools nor the disposition to build.

View attachment 1255959

Mounted in place fully open. And now you see why we need the gap. It allows the door to close flush. Otherwise the top plywood of the nesting box would interfere with those cross pieces.

View attachment 1255960

And fully closed. Theres a pull handle for opening, and a hasp, secured with a carabiner, to secure it shut. I filed the burr off the drip edge flashing, to minimize the risk of cuts while opening the nesting boxes. After it's painted, I still may cover that edge with a bit of tape for further safety.

\View attachment 1255961

And the photo that shows the trim, doors, and nest box doors we added. My neighbors are now all razzing me about my "luxury chicken coop" I'm building, and asking whether it has full kitchen and air-conditioning. :-D

View attachment 1255962
AWESOME thread.
Am I missing the ventilation?
:oops:
 

New posts New threads Active threads

Back
Top Bottom