After carefull consideration our family decided to add a small flock to our backyard (March 1, 2017). We turned to Backyard Chickens at almost every step of the process. Enjoy the build!

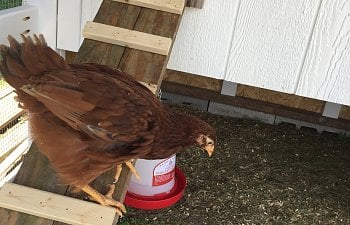
We were inspired the most with the “Chez Poulet” design. With 6 Rhode Island Reds in the brooder, I wanted a coop big enough to make them very comfortable.
Pic of the brooder. The kids made it look like a barn.
I based the dimensions of the coop to allow for 3 ft.² of space per bird. This was the consensus found on BYC. I'm still searching for my, "plans", to share with you. They were very crude and only used to give me a rough idea of the amount of lumber I would initially need to get me started. I tried to forecast the build to reduce or eliminate waste.
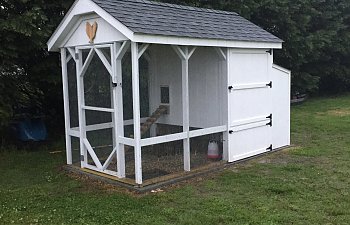
Run 6’x10’ (60 square feet = 10 square feet per bird)
Coop 4’x6’ (24 square feet = 3 square feet per bird)
Storage area / Nesting box 2’x6’
Total footprint is 6’x12’
I used 4”x8”x16” blocks for the foundation. Any good structure sits on a level foundation. This is VERY important. If you have the time, I would highly recommend pouring concrete footers. Leveling the blocks took a lot of time.
I bought about 30 12' kiln dried 2x4's from Home depot. I painted them in my garage. I used Valspar exterior paint purchased at Ollie’s for $18 a gallon to paint the studs. (Another gallon to paint the exterior) I copied the design of the trusses in my shed. I used old scrap plywood to cut the triangles, used construction adhesive and nails to make each truss.
With a lot of help from the gang, we built the trusses in the garage. If you want to cut your time in half, don’t paint. (And buy an air nail gun) I only used treated lumber for the sill plate. (The boards on the bottom in constant contact with the foundation blocks)
I built two identical stud walls in the comfort of my garage. I did paint the bottoms of the studs considering they would be in contact with a potentially wet piece of treated lumber. I will let you know in 10 years if I regret not using treated lumber for the studs. (Note, you can't paint treated lumber until it dries completely and that can take up to a year)
I could easily balance and carry the stud walls out to the project site. Once there, I used old 2x4's to support the stud walls. (Use a big nail but don't drive it all the way home)
You can make very minor adjustments in the temporary bracing to ensure your stud walls are square. This also allows you build your coop if you're doing it alone.
Disregard the German Shepherd taking credit for all of the work.
If by now you are wondering what level of construction experience I have, I will admit I have very little. I have always been good with a hammer and a wrench and my dad taught me a lot but I’ve never built a house. I did built a few sheds, shingle some roofs and helped with some decks when I was in my teens and 20s but construction is not my day to day.
I’m about to reveal my biggest trick and secret with this project considering there are few tutorials on how to build a chicken coop on the internet. I found a lot of construction advice by researching how to build a shed. THIS IS A SHED after all with a few modifications.
Here is a link to a series of video's showing how to build a shed. There are other similar tutorials that break down the construction process step by step. For me, watching these types of videos was a refresher. No two building methods are exactly alike. I chose what worked best for me.
As you can see, the whole family was involved!
This is where I personalized and modified the original inspiration. I wanted a storage area big enough to hold feed, bedding, garden tools and anything else you could imagine. When you lower the nesting box door, you have additional space inside the nesting box area to set egg cartons and other accessories.
The finished business end on the coop. I made my nesting boxes 13" x 13". In the pic, the access doors are not attached yet but they lower with a hinge and allow you to reach in from the back to get the eggs. See pic at bottom below.
Access was denied to the nesting boxes early on to prevent sleeping in the boxes. Roosting bars are made of 2x3 pine. Pop door built in a simple track and attached with a pulley to the outside for easy operation. I only locked them in at night when they were first introduced to the coop to ensure they would sleep on the roosting bars.
I made 10" removable damns on both sides. They were super easy to make a serve a great purpose. They keep the shavings in every time I open the doors.

I spent approximately $1,500 in materials. The roof alone was over $200 and I can’t even do the math on all the hinges and latches that went into it. The most challenging part of the build was constructing the 8 doors, 2 vents and 1 Guillotine pop door. Without having blueprints or plans, I had to carefully consider each dimension.
I used "Smartside" panels for the siding. Great product but you should consider the amount of extra work involved in making sure the grooves in the siding matches up with the grooves in the doors. I accomplished perfect fits by tacking the siding into place (I used maybe 4 screws to hold the sheets in place), marking my door openings and then removing the panel to be cut. Then I re-installed the panel (minus the cut outs) and built the doors using the cutouts. Its really a simple concept but it takes a lot of steps. This also allowed me to work around the weather because I could make the doors in the garage after dark or if it was raining.
Another piece of advice, INVEST in an air nail gun!!!!!! You will save yourself hours in construction time by using nail guns compared to screws. (There is a reason why your home is built with nails) I had a compressor and finishing nail guns (16ga and 18ga) but I did not have a large framing gun. (I bought one after this project for $120 at Harbor Freight Tools). I used a combination of nails and screws. My finishing guns helped a lot with all the trim around the doors.
I'm not really sure what I would have done differently. I guess I wish I would have made the bottom door, used to let the chickens free range, a smaller door. (See the bottom pics...this year, I added a smaller door) The original inspiration has two doors on the bottom and top. I was going to make those double doors but ran into a issue with how the siding would fit together in relation to the studs and the header. Plus, single doors vs double doors saved me on hardware.
Thank you for following along. I give a ton of credit to Backyard Chickens and the community found here for all of the assistance! Now, it’s my turn to help some of you. Feel free to ask any questions you may have.

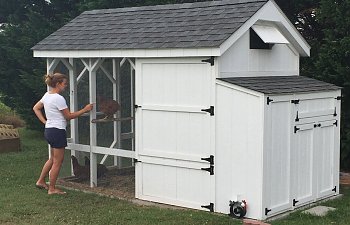
For size perspective...that’s a 5’7”, good looking blonde that knows how to cook and make some good looking babies!
This updated photo shows the nesting box area with one box open and the other closed. This design has been very helpful in storing little miscellaneous items such as grit, leg bands, fake eggs, scratch, egg baskets and anything else I can cram in there that doesn't get used every day.
Per a request to see the doors open. Left door houses full sized tools like shovels and rakes. I am storing my drip irrigation lines and water tank in there for the winter. I had thought about adding shelves but I wanted to see how everything would play out. I’m glad I didn’t add shelves because this set up is working perfect for me.
I added patio pavers to the front and back of the coop where a lot of foot traffic made a mess in wetter months. Also pictured is the new smaller door I open and close every morning and night to let the chickens free range.
We were inspired the most with the “Chez Poulet” design. With 6 Rhode Island Reds in the brooder, I wanted a coop big enough to make them very comfortable.
Pic of the brooder. The kids made it look like a barn.
I based the dimensions of the coop to allow for 3 ft.² of space per bird. This was the consensus found on BYC. I'm still searching for my, "plans", to share with you. They were very crude and only used to give me a rough idea of the amount of lumber I would initially need to get me started. I tried to forecast the build to reduce or eliminate waste.
Run 6’x10’ (60 square feet = 10 square feet per bird)
Coop 4’x6’ (24 square feet = 3 square feet per bird)
Storage area / Nesting box 2’x6’
Total footprint is 6’x12’
I used 4”x8”x16” blocks for the foundation. Any good structure sits on a level foundation. This is VERY important. If you have the time, I would highly recommend pouring concrete footers. Leveling the blocks took a lot of time.
I bought about 30 12' kiln dried 2x4's from Home depot. I painted them in my garage. I used Valspar exterior paint purchased at Ollie’s for $18 a gallon to paint the studs. (Another gallon to paint the exterior) I copied the design of the trusses in my shed. I used old scrap plywood to cut the triangles, used construction adhesive and nails to make each truss.
With a lot of help from the gang, we built the trusses in the garage. If you want to cut your time in half, don’t paint. (And buy an air nail gun) I only used treated lumber for the sill plate. (The boards on the bottom in constant contact with the foundation blocks)
I built two identical stud walls in the comfort of my garage. I did paint the bottoms of the studs considering they would be in contact with a potentially wet piece of treated lumber. I will let you know in 10 years if I regret not using treated lumber for the studs. (Note, you can't paint treated lumber until it dries completely and that can take up to a year)
I could easily balance and carry the stud walls out to the project site. Once there, I used old 2x4's to support the stud walls. (Use a big nail but don't drive it all the way home)
You can make very minor adjustments in the temporary bracing to ensure your stud walls are square. This also allows you build your coop if you're doing it alone.
Disregard the German Shepherd taking credit for all of the work.
If by now you are wondering what level of construction experience I have, I will admit I have very little. I have always been good with a hammer and a wrench and my dad taught me a lot but I’ve never built a house. I did built a few sheds, shingle some roofs and helped with some decks when I was in my teens and 20s but construction is not my day to day.
I’m about to reveal my biggest trick and secret with this project considering there are few tutorials on how to build a chicken coop on the internet. I found a lot of construction advice by researching how to build a shed. THIS IS A SHED after all with a few modifications.
Here is a link to a series of video's showing how to build a shed. There are other similar tutorials that break down the construction process step by step. For me, watching these types of videos was a refresher. No two building methods are exactly alike. I chose what worked best for me.
As you can see, the whole family was involved!
This is where I personalized and modified the original inspiration. I wanted a storage area big enough to hold feed, bedding, garden tools and anything else you could imagine. When you lower the nesting box door, you have additional space inside the nesting box area to set egg cartons and other accessories.
The finished business end on the coop. I made my nesting boxes 13" x 13". In the pic, the access doors are not attached yet but they lower with a hinge and allow you to reach in from the back to get the eggs. See pic at bottom below.
Access was denied to the nesting boxes early on to prevent sleeping in the boxes. Roosting bars are made of 2x3 pine. Pop door built in a simple track and attached with a pulley to the outside for easy operation. I only locked them in at night when they were first introduced to the coop to ensure they would sleep on the roosting bars.
I made 10" removable damns on both sides. They were super easy to make a serve a great purpose. They keep the shavings in every time I open the doors.
I spent approximately $1,500 in materials. The roof alone was over $200 and I can’t even do the math on all the hinges and latches that went into it. The most challenging part of the build was constructing the 8 doors, 2 vents and 1 Guillotine pop door. Without having blueprints or plans, I had to carefully consider each dimension.
I used "Smartside" panels for the siding. Great product but you should consider the amount of extra work involved in making sure the grooves in the siding matches up with the grooves in the doors. I accomplished perfect fits by tacking the siding into place (I used maybe 4 screws to hold the sheets in place), marking my door openings and then removing the panel to be cut. Then I re-installed the panel (minus the cut outs) and built the doors using the cutouts. Its really a simple concept but it takes a lot of steps. This also allowed me to work around the weather because I could make the doors in the garage after dark or if it was raining.
Another piece of advice, INVEST in an air nail gun!!!!!! You will save yourself hours in construction time by using nail guns compared to screws. (There is a reason why your home is built with nails) I had a compressor and finishing nail guns (16ga and 18ga) but I did not have a large framing gun. (I bought one after this project for $120 at Harbor Freight Tools). I used a combination of nails and screws. My finishing guns helped a lot with all the trim around the doors.
I'm not really sure what I would have done differently. I guess I wish I would have made the bottom door, used to let the chickens free range, a smaller door. (See the bottom pics...this year, I added a smaller door) The original inspiration has two doors on the bottom and top. I was going to make those double doors but ran into a issue with how the siding would fit together in relation to the studs and the header. Plus, single doors vs double doors saved me on hardware.
Thank you for following along. I give a ton of credit to Backyard Chickens and the community found here for all of the assistance! Now, it’s my turn to help some of you. Feel free to ask any questions you may have.

For size perspective...that’s a 5’7”, good looking blonde that knows how to cook and make some good looking babies!
This updated photo shows the nesting box area with one box open and the other closed. This design has been very helpful in storing little miscellaneous items such as grit, leg bands, fake eggs, scratch, egg baskets and anything else I can cram in there that doesn't get used every day.
Per a request to see the doors open. Left door houses full sized tools like shovels and rakes. I am storing my drip irrigation lines and water tank in there for the winter. I had thought about adding shelves but I wanted to see how everything would play out. I’m glad I didn’t add shelves because this set up is working perfect for me.
I added patio pavers to the front and back of the coop where a lot of foot traffic made a mess in wetter months. Also pictured is the new smaller door I open and close every morning and night to let the chickens free range.


") .
.