I have a Chicken guard on batteries with a light sensor.
I installed the chicken guard inside the coop (lots of windows and hwc openings in the coop). Adjusting the lumen to open and close was no big problem.
Made my own door from an old plastic cutting board and 2 pieces of U-profile from the DIY shop. The cutting board slides very well.
I have this auto opener now for 6/7 years and its still working. Did have a problem after 4/5 years because of a leakage and a wet rope. But it could be fixed with the help of the seller (good service).
Here are the Diagrams that I have for this. Took me awhile to break it down into steps. Got it together in PDF format. Been meaning to get that done but wanted to make a website to fully go over every part. If you need any explanation on any of it, just ask. I will be making a parts list also.
I am showing three versions of the same diagram. First two are because some people like straight lines and can follow them better, while others can follow curvey lines easier. So I made both.
I was wondering for that coop door how much watts 12v battery should I buy? I am also thinking of getting it solar powered in the future, would it be doable with the sonoff?
I was wondering for that coop door how much watts 12v battery should I buy? I am also thinking of getting it solar powered in the future, would it be doable with the sonoff?
I particularly like this Solar Charge Controller because it has USB ports that come off the bottom and hang straight down. Why? Because you can support the wire to the wall without bending the cord. Why does that matter, why mention USB ports? Well when you get the SONOFF 4CHPROR3 and you use the eWeLink app you can use 1 (free) old cell phone as a webcam. Up to 5 if you pay $9.99 for the year. (I did) The USB port will let you power the unused cell phone.
However if you can afford it, I would go with something a bit bigger like Newpowa 100 Watts 12 Volts Polycrystalline Solar Panel. Not only does it supply more power for future needs but I has better larger wires and connectors.
OK back to the power thing. In my testing the entire System as I show it only draws .02 Amps and with a 12V8.0Ah/20Hr sealed lead acid battery it (on paper doing the math) should last 400 hrs. Of course that is best case. This is the readings I took and the battery life from each action as if that action is a perpetual state. Those that are drawing more power and show less battery life are only in that state for a few minutes (hours if you set it that way) or seconds. In Short the system draws very little power in a 24hr period and only has a couple of spikes when opening and closing.
My plan involves the solar panel and battery. I also imagined using a photocell to determine when to open the door, rather than WiFi, since the coop is a distance from the house. How would I go about substituting that for the sonoff?
I know nothing about electronics, but I know what I need and that there most be a way. Thank you for sharing knowledge! After the auto door project, the auto feeder will be next (so there isn't food sitting out available for the neighbor's chickens).
My plan involves the solar panel and battery. I also imagined using a photocell to determine when to open the door, rather than WiFi, since the coop is a distance from the house. How would I go about substituting that for the sonoff?
Disclaimer: Some of the links are Amazon affiliated links.
Yes there are several ways of doing this.
Let's start with something like this. Automatic Chicken Coop Reverse Polarity Door Gate Opener Works Sunrise / Sunset At $34.99 it is semi cheap, easy to wire but I don't see an easy way to mount this. (I mean properly mount. I do not like hot gluing things.) I was recently shown this one so I don't not have any experience with it.
It also seems to be very difficult to get the photocell in the best possible location. Now you might mount it by getting a small jar with a big enough opening (pickle, Olives, plastic mayo), screw the lid to the wall, drill hole in the center both though wall & lid, run wires though, fill hole with silicone, put some Desiccant Packets for Moisture Control, in the jar and screw jar to wall.
As far as Photocell operation these are/this is my favorite solution. A bit more expensive. For 2 of these, $56.44 including shipping to Texas. However mounting is WAY/SUPER easy for both the unit & the photocell. It has a digital display to show exactly the light sensitivity and time delay. Wiring is minimal. Can provide wiring diagram if needed.
Sensitivity ranges 1: 0.05 - 0.5 Lux, 2: 0.5 - 5 Lux, 3: 5 - 50 lux, 4: 50 - 500 Lux, 5: 500 - 5 KLux. Time delay has two settings 0 -10 min delay, and 0 -19 hours delay. No need to guess where the settings are at. To me that makes it well worth the price.
The unit mounts to DIN rail. I highly recommend. The photocell can be surface mounted or panel mounted.
The ZYT15GK model 12vdc. Contact the seller before ordering and make sure they know to send 12vdc. Make sure they specifically reply back saying that, before ordering. Take screenshot.
Using two sensors will be more reliable. The two Units will have to "agree" on whether there is enough light. Setting them both to very low light sensitivity and a long time delay, will greatly help to reduce false triggering.
Can also be combined with a regular SPDT timer. Some people (like the person I made this video for) are early risers and like to let them out manually but just incase would like to Open the door at a SET time but Close after SUNSET (Photocell controlled). The delay can be set for 0 -10 min delay, and/or 0 -19 hours delay. Again you can actually see what time you are setting it for.
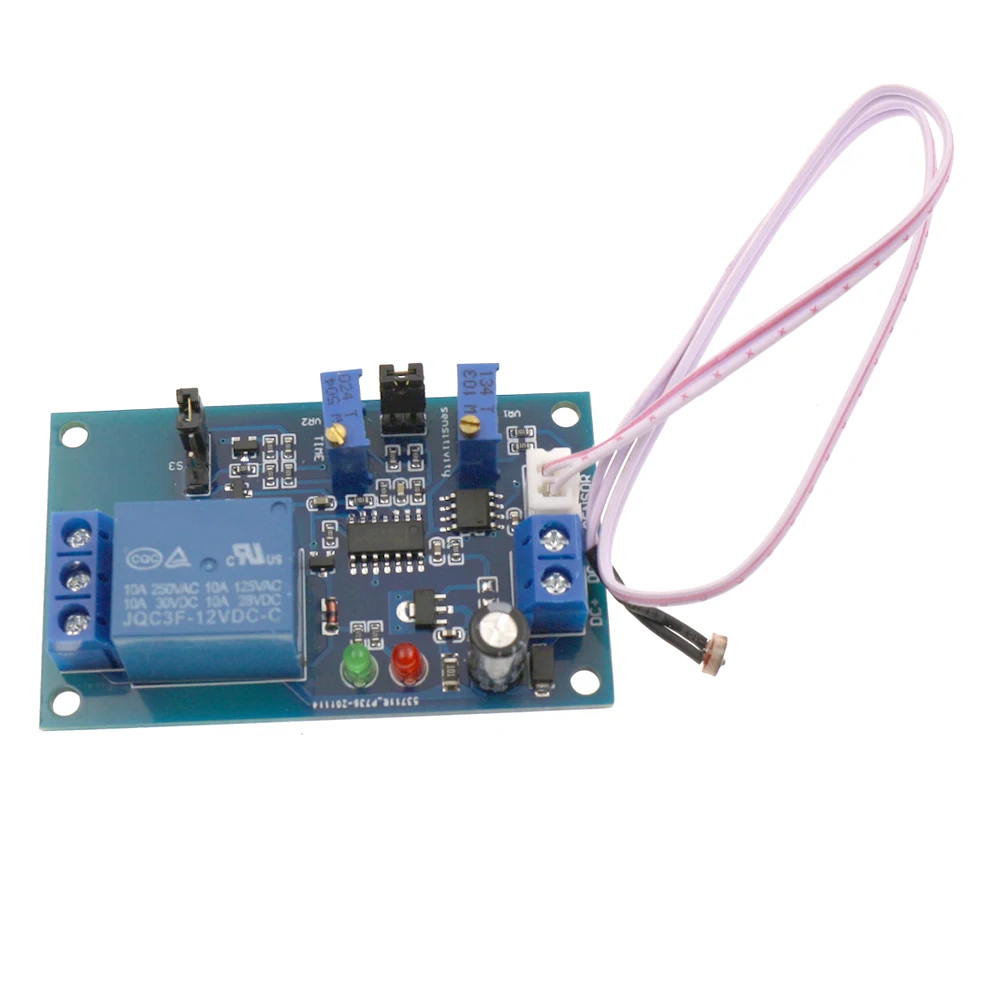
Last is the cheapest, Wiring is the same as the second one. Mounting is semi easy. Will need stand offs. However the timing and light sensitivity are guesswork, if you want to fine adjust. I recommend Highest sensitivity and longest delay. Longest delay is only 200 seconds.
For about the same price (just a bit cheaper $32.64, including shipping to Texas) you can buy 8 of these (6 spares) and that will make 4 sets. Only two are needed, but get a least 4 ($18.03 with get you 4 (2 Sets)), at least two backups. While the Automatic Chicken Coop Reverse Polarity Door Gate Opener Works Sunrise / Sunset may be easier to wire, using two sensors will be more reliable. The two modules will have to "agree" on whether there is enough light. Video on my YouTube Channel. These also have the capability to switch the operation from "Dusk till Dawn" to "Dawn till Dusk". Setting them both to very low light sensitivity and the max time delay, will help to reduce false triggering.
I highly recommend getting extras. I have had to replace two of them, on my demo board, the one in the video. I really like them due to them being able to change from "Dusk till Dawn" to "Dawn till Dusk" so I would still recommend.
Ferrule Crimping Tool Kit (Purchased) I highly recommend using wire ferrules. Will make inserting wire into terminals so much easier and safer, no stray wires.
20 pcs Din Rail Connectors Terminal #1 Recommended. Makes for easy wiring, troubleshooting, rewiring and maintaining. If ordered make sure to test every lever and screw holes, when delivered. If any are bad amazon will send another set. Replace the bad ones and send the rest back. Cleaner wiring, no wires hanging.
120Pcs Compact Wire Connector Assortment Kit Makes for easy wiring, troubleshooting, rewiring and maintaining. Great starter set. The 8 Port ones come in handy when projects get bigger.
150PCS Lever Wire Nuts Connectors Kit Makes for easy wiring, troubleshooting, rewiring and maintaining. Great starter set. The 8 Port ones come in handy when projects get bigger.