After many years of talking about raising a few laying hens, and then not doing anything about it,
we decided now was the right time. We relocated to extreme southern Missouri in March of this year
so Sharon could take on a new position in her company as GM of a hotel in West Plains, MO. I left my
job to make the move and the job market in my line of work is not that great, so the extra free time will
come in handy. Plus after initial start up costs, the benefits of farm fresh eggs will be a nice low cost
treat.
First up was coop construction. Having no back ground in construction, beyond building a wooden box last
summer with my grand daughter, I knew this would be a real adventure. With the help of some serious BYC
browsing I was able to look at some coops and get an idea for what I wanted and what we needed to house the
4 or 5 hens we were planing on having.
I rough drafted a 4x4 coop and 4x8 run and went to work.


Sidenote: I am a big fella, and I'm gettin' old, so my work rate is not what it used to be. The work was done
over several days in what should have been a one or two day build. BUT, we got it done.
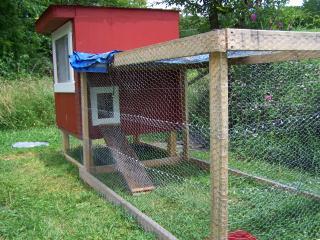
I started out framing the run with 2x4's.
I bought Chicken wire, because I didn't know anything about hardware cloth, and besides, grandma always used
chicken wire. BUT, my roll was only 18" tall, so my 48" tall run required 3 passes of wire to enclose it.
Once it was done, Sharon did most of the stapling of the wire, we used the handy dandy zip tie to joing
the pieces together. One zip tie every three or four holes, all the way around, for 3 layers, plus the top.
I'm sure it's not SOP, but it'll work for me.

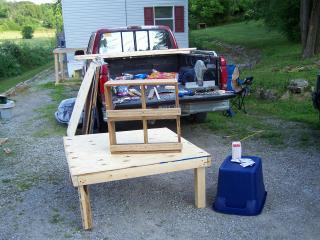
I began the coop by first building the nesting boxes. This was a simple 24x24 square, which was then devided
into four 11 3/4" nests. My skills were immediately evident as you kinda had to tilt your head slightly to one
side to make the nesting box sit straight. (I'll fix it later if one of the hens complain.)
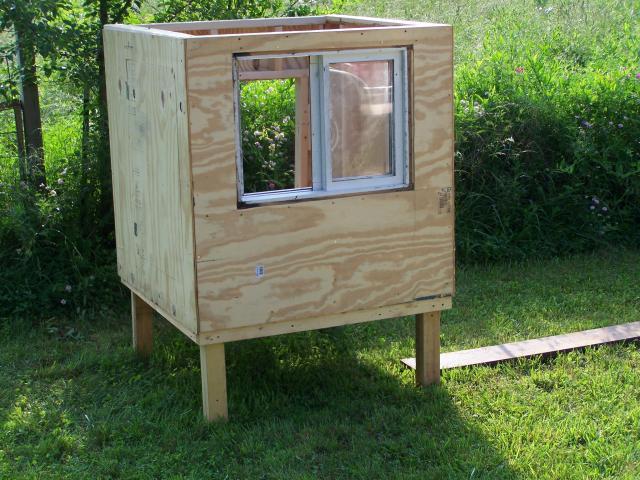
I then framed the floor and screwed down the plywood. I had decided on 3/8" plywood to keep the weight down,
but will go with 1/2 minimum next time. I also opted for wood screws as opposed to nails, as the drill works
better that a hammer. After I had the floor done, I cut 20" pieces of 2x4, using any leftover scrap before
using new lumber, then joined them together to make them 4x4's. I attached these to the corners, under the floor
to elevate the coop up off of the ground.
Using a local Habitat for Humanity store to keep cost down, I found a window for cheap. I also picked up some
extra lumber and trim pieces. Using the measurement of the window, I framed out the wall that it would go into.
I then just layed the framing on the plywood and traced the hole onto the plywood, then used a jigsaw to cut it
out.
I wanted to be able to collect eggs from the outside, so I needed to be able to get into the nesting boxes. I
did the exact same thing as I did with the window wall, except when framing the wall, I actually built the frame around
the nesting box so that it was slightly crooked as well.
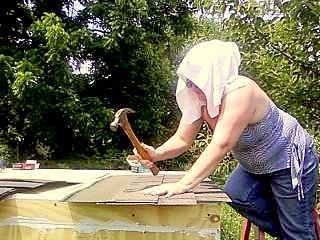
The roof, well, that is where I really broke protocol, It is flat. I know, run off, leaking, all the bad news. BUT, the
ground the coop sits is not quite level, actually making one side a few inches higher than the other. Okay should be
enough to provide runoff of any rain we get. We did put on a good layer of shingles, another Habitat for Humanity deal,
so that will help keep things dry. If things change and I need to move it to a flat area, I'll put a panel over it and
slope the panel.

When I made the pop door, I made it to open in. I know, right? Real genious. I'm sure the girls will wait patiently
while I open it, giving me plenty of room and all. Next time I'll get it right.
After trimming the windows and doors out, we joined the run to the coop, using chicken wire to fill in the gaps.
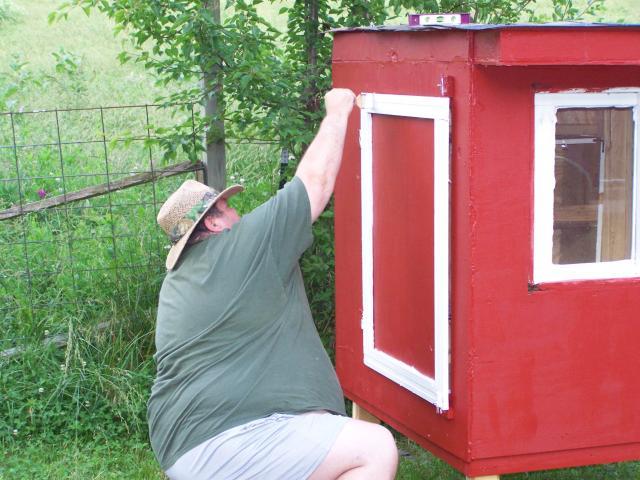
For paint we went with Kilz Red Barn paint & primer, and painted the entire thing. Then we went back over the trim with
a semi gloss exterior white. We worked hard, in short bursts, over the course of a week plus. It turned out a little better
than expected, but not as well as envisioned.
we decided now was the right time. We relocated to extreme southern Missouri in March of this year
so Sharon could take on a new position in her company as GM of a hotel in West Plains, MO. I left my
job to make the move and the job market in my line of work is not that great, so the extra free time will
come in handy. Plus after initial start up costs, the benefits of farm fresh eggs will be a nice low cost
treat.
First up was coop construction. Having no back ground in construction, beyond building a wooden box last
summer with my grand daughter, I knew this would be a real adventure. With the help of some serious BYC
browsing I was able to look at some coops and get an idea for what I wanted and what we needed to house the
4 or 5 hens we were planing on having.
I rough drafted a 4x4 coop and 4x8 run and went to work.
Sidenote: I am a big fella, and I'm gettin' old, so my work rate is not what it used to be. The work was done
over several days in what should have been a one or two day build. BUT, we got it done.
I started out framing the run with 2x4's.
I bought Chicken wire, because I didn't know anything about hardware cloth, and besides, grandma always used
chicken wire. BUT, my roll was only 18" tall, so my 48" tall run required 3 passes of wire to enclose it.
Once it was done, Sharon did most of the stapling of the wire, we used the handy dandy zip tie to joing
the pieces together. One zip tie every three or four holes, all the way around, for 3 layers, plus the top.
I'm sure it's not SOP, but it'll work for me.
I began the coop by first building the nesting boxes. This was a simple 24x24 square, which was then devided
into four 11 3/4" nests. My skills were immediately evident as you kinda had to tilt your head slightly to one
side to make the nesting box sit straight. (I'll fix it later if one of the hens complain.)
I then framed the floor and screwed down the plywood. I had decided on 3/8" plywood to keep the weight down,
but will go with 1/2 minimum next time. I also opted for wood screws as opposed to nails, as the drill works
better that a hammer. After I had the floor done, I cut 20" pieces of 2x4, using any leftover scrap before
using new lumber, then joined them together to make them 4x4's. I attached these to the corners, under the floor
to elevate the coop up off of the ground.
Using a local Habitat for Humanity store to keep cost down, I found a window for cheap. I also picked up some
extra lumber and trim pieces. Using the measurement of the window, I framed out the wall that it would go into.
I then just layed the framing on the plywood and traced the hole onto the plywood, then used a jigsaw to cut it
out.
I wanted to be able to collect eggs from the outside, so I needed to be able to get into the nesting boxes. I
did the exact same thing as I did with the window wall, except when framing the wall, I actually built the frame around
the nesting box so that it was slightly crooked as well.
The roof, well, that is where I really broke protocol, It is flat. I know, run off, leaking, all the bad news. BUT, the
ground the coop sits is not quite level, actually making one side a few inches higher than the other. Okay should be
enough to provide runoff of any rain we get. We did put on a good layer of shingles, another Habitat for Humanity deal,
so that will help keep things dry. If things change and I need to move it to a flat area, I'll put a panel over it and
slope the panel.
When I made the pop door, I made it to open in. I know, right? Real genious. I'm sure the girls will wait patiently
while I open it, giving me plenty of room and all. Next time I'll get it right.
After trimming the windows and doors out, we joined the run to the coop, using chicken wire to fill in the gaps.
For paint we went with Kilz Red Barn paint & primer, and painted the entire thing. Then we went back over the trim with
a semi gloss exterior white. We worked hard, in short bursts, over the course of a week plus. It turned out a little better
than expected, but not as well as envisioned.


