So, here is the promised post about how my husband made his incubator. Please keep in mind that we are very new to this (about a year of chicken-keeping, first try to hatch eggs) so there are probably things that could have been done better and/or more effectively. Still, in the bottom line we had 100% success so we must have done it right, overall!
We began by collecting, over the course of several days, eggs from our favorite hen. While we waited to assemble our experimental batch, the eggs were kept at room temperature and turned several times a day. In the meantime, my husband built the incubator from materials he had gathered previously:
* A large styrofoam box, of the sort used to transport frozen fish. Styrofoam is very light and good at preserving temperature. We washed it thoroughly beforehand, of course, and let it sit in the air for the fish smell to evaporate.
* A 60-watt lightbulb as a heat source.
* A thermostat my husband had ordered from the internet.
* A humidity sensor, likewise ordered from the internet. Those two items were the only he bought, very inexpensively.
* A ventilator picked off from an old computer.
* An empty egg carton, for placing the eggs.
* A plastic box for water, to keep humidity level up.

As you can see, my husband cut out a rectangle in the lid of the box, so that we wouldn't have to remove the entire lid every time we need to turn the eggs or make adjustments in the incubator. This way, temperature and humidity are preserved better. My husband kept the rectangle he cut out, glued another piece of styrofoam to its outer side to use as a handle, and used it to open and close the incubator instead of the big lid.
The lightbulb was attached to the inner side of the lid with permanent glue.
On top, you see the thermostat and humidity sensor. The sensor parts themselves are lowered into the box, and placed in the carton next to the eggs.
We tried to keep humidity levels relatively high, between 60% and 80%. Simply placing a plastic box or dish of water into the incubator wouldn't do the job, and that's why we needed the ventilator. It makes the air circulate and helps water evaporate, thus raising humidity level. We refilled the water every couple of days. Sometimes, when we noticed the humidity rising too high, we removed the styrofoam rectangle to allow humidity to drop.
My husband set the thermostat to 38 C. The thermostat kept the light bulb turning on and off, depending on the temperature.
Eggs were turned around 6 times a day. We kept a chart with record of egg turning, to avoid confusion (for example, so I won't go in and turn the eggs when my husband already did it 30 minutes ago).
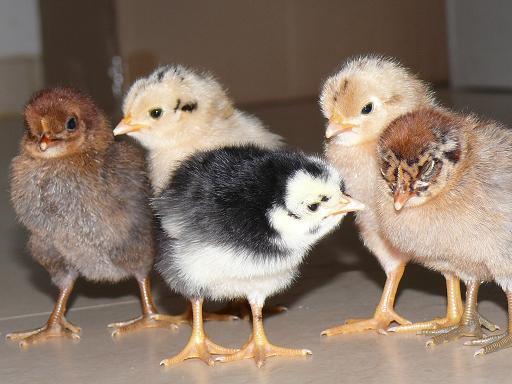
The thing worked for 21 days, and...

We began by collecting, over the course of several days, eggs from our favorite hen. While we waited to assemble our experimental batch, the eggs were kept at room temperature and turned several times a day. In the meantime, my husband built the incubator from materials he had gathered previously:
* A large styrofoam box, of the sort used to transport frozen fish. Styrofoam is very light and good at preserving temperature. We washed it thoroughly beforehand, of course, and let it sit in the air for the fish smell to evaporate.
* A 60-watt lightbulb as a heat source.
* A thermostat my husband had ordered from the internet.
* A humidity sensor, likewise ordered from the internet. Those two items were the only he bought, very inexpensively.
* A ventilator picked off from an old computer.
* An empty egg carton, for placing the eggs.
* A plastic box for water, to keep humidity level up.
As you can see, my husband cut out a rectangle in the lid of the box, so that we wouldn't have to remove the entire lid every time we need to turn the eggs or make adjustments in the incubator. This way, temperature and humidity are preserved better. My husband kept the rectangle he cut out, glued another piece of styrofoam to its outer side to use as a handle, and used it to open and close the incubator instead of the big lid.
The lightbulb was attached to the inner side of the lid with permanent glue.
On top, you see the thermostat and humidity sensor. The sensor parts themselves are lowered into the box, and placed in the carton next to the eggs.
We tried to keep humidity levels relatively high, between 60% and 80%. Simply placing a plastic box or dish of water into the incubator wouldn't do the job, and that's why we needed the ventilator. It makes the air circulate and helps water evaporate, thus raising humidity level. We refilled the water every couple of days. Sometimes, when we noticed the humidity rising too high, we removed the styrofoam rectangle to allow humidity to drop.
My husband set the thermostat to 38 C. The thermostat kept the light bulb turning on and off, depending on the temperature.
Eggs were turned around 6 times a day. We kept a chart with record of egg turning, to avoid confusion (for example, so I won't go in and turn the eggs when my husband already did it 30 minutes ago).
The thing worked for 21 days, and...
If you've always wanted to hatch eggs but thought it's very difficult to do in a home setting, here are two complete novices who did it successfully, so you can do it too! It's a wonderful, very rewarding experience for the whole family, and we hope to repeat this adventure once more before summer is over.

