Oh! Shoot! I finally managed to get pictures!
I'll write it out, and if it goes on the next contest, so be it!
Katies Readheaded Redneck GI Bator
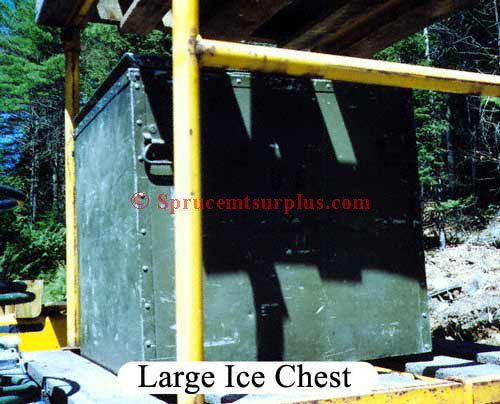
First, I managed to get an old Army Field Ice Chest. Free. Big, insulated, steel, box of a thing that weighed a TON. When standing the normal way, it measured 2.5 feet tall, 2.5 ft wide, and 3.5 ft long. The lid opened on top like a normal chest freezer would do. It had a small drain hole in the bottom, where water would run out in the field. It had no cooling system; it was just a really big ice chest.
So, first step was to get it in the house. My son, age 11 (weighing in at about 45 lbs soaking wet) and I attempted to carry it up the front steps into the living room. I slipped on the stairs, ripped a muscle in my lower back, and ended up bed ridden for 11 days, and am still recovering, unfortunately. But we got it in the living room, through sheer red-headed stubbornness.
So, after taking a bunch of pain meds, we turned the cooler onto its side, so the door would now open like a refrigerator. Rather than trying to put feet on it, we just put it up on blocks in the living room. I guess that makes it a Redheads Redneck Bator. Next step was to cut a large view hole in the lid
thank goodness for power tools. We placed a large sheet of plexi over the hole, caulked it in place, and ran a layer of duct-tape around the edges. (Yup, definitely a Redneck Bator). The old gasket that sealed the door was rotted and falling apart, so I removed that, and used weather-stripping to run a new gasket to seal the door.
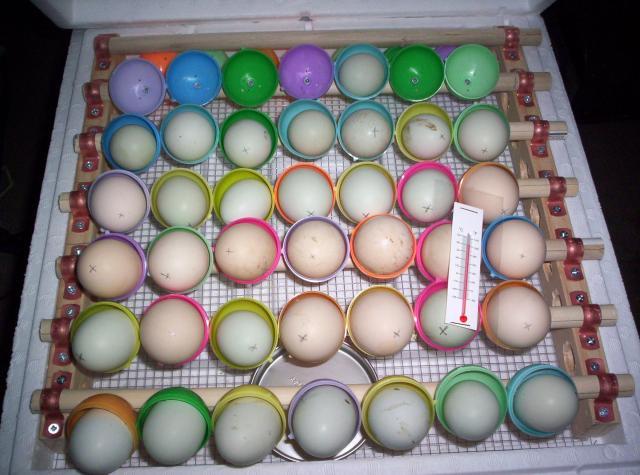
I had a set of wire shelves left over from a kitchen remodeling project, and they fit inside just perfectly. I also discovered that a standard turner for a Styrofoam Bator fit perfectly in each shelf, so I had 4 shelves, each with a tuner.
For heat, I followed the same wiring that many on here have done
the water heater thermostat, wired into a light fixture, and then to a plug. Since this was a fairly large Bator, I decided to use a ceiling fan light fixture, $5 at Home depot. It had 3 light sockets, and through a bit of trial and error, I discovered I needed 3 100w bulbs to adequately heat the chest. Also through trial and error, I figured out the best place to hang the thermostat, to which Id attached a heavy duty wire twisty, and found I needed to hang it on the second shelf.
Next was ventilation. I left the small drain hole open for an air vent. Then, on Gatekeepers advice (thanks Gate!) I cut a hole in the top of the Bator and dropped in a bathroom ceiling fan. I plugged it in, and then covered it with a shallow wooden tray, so that it wasnt pulling in too much cold air at one time.
Last was humidity, which Ive struggled with. I placed a roast pan on the bottom of the cooler next to the light. That wasnt enough, so I added 2 loaf pans in the little bit of leftover space on the bottom of the cooler. That still wasnt enough, so I added a second large roast pan on the lowest shelf, and that got my humidity up to the 30-33% humidity mark.
For the last few days, I added a humidifier next to the vent fan on top, and covered the whole thing with a Rubbermaid tub. It isnt elegant, but it has pumped up the humidity for the hatch.
I removed the turners, lined the wire shelves with the bumpy foam shelf liner stuff and set the eggs in on their sides. I debated doing an egg carton hatch, and decided to go natural this time and see how it works. I tried to group all of the bantam eggs on 1 shelf, since they may hatch first. There are well over 200 eggs in this Bator (I had a styro Bator going with the overflow, and added them in tonight when I removed the turners) and when I was moving the eggs, I only felt 4 that were light like nothing had developed! YIKES! So, well see what kind of hatch rate happens. I have eggs in here from so many wonderful folks on the board, and more types of eggs than I can even remember right now!
Hatch date is Monday the 18th of May!