Micro Farm Coop Worklog [UPDATE: SHINGLES ON - PAGE 27]

Cheep a'lil Talk a'lil :

Off topic question...I think I remember you saying that you planted over a hundred tomatoes. Do you use tomato cages? If so what kind? I'm getting sick of the metal ones. $3 for a small $7 for a small, what a rip!! And then they rust and fall apart.
So I'm looking for something new to use.

With so many tomatoes, we'd go broke buying cages for them, so no. We use stakes.. I ripped down some untreated 2x10's in half and then cut a 45 degree angle, knocking them in half @ 5'.

Next year I'll be testing a new idea however (as this year, so much rain, they're all on the ground) that makes use of cattle panels. I figure I can get more planted per row and have them tighter together.

At 16', it'll take, ohh... 8 panels to do two rows in my garden. So at $7 per cage for 100, it'd run me $700... At 8 panels around $20 each, it'll run me $160... I like those #'s better.
wink.png


Granted, that leaves out the posts, which you need 2 per panel, except the first per row which needs 3. Tractor Supply has 8' T-posts running at $6.89/ea, so with that figure it'd cost me... Hmmm... $125 in posts for 18 of them.

Bumps the total mind you, but it's still only $285.

I've got four panels already and will certainly be beta testing this idea next year to see how it works on 60' rows.​
 
Last edited:
My goal for the day... Finish putting the run panels up and flush trim the one roof panel so that I can work on sheeting.

If I'm lucky, I'll have part of the roof shingled by tomorrow.
 
isn't it surprising how long they take to build? we were blessed with 8 chicks and started in april and sill need to finish painting..but at least the eggs are in the nest box so far lol.
 
Quote:
With so many tomatoes, we'd go broke buying cages for them, so no. We use stakes.. I ripped down some untreated 2x10's in half and then cut a 45 degree angle, knocking them in half @ 5'.

Next year I'll be testing a new idea however (as this year, so much rain, they're all on the ground) that makes use of cattle panels. I figure I can get more planted per row and have them tighter together.

At 16', it'll take, ohh... 8 panels to do two rows in my garden. So at $7 per cage for 100, it'd run me $700... At 8 panels around $20 each, it'll run me $160... I like those #'s better.
wink.png


Granted, that leaves out the posts, which you need 2 per panel, except the first per row which needs 3. Tractor Supply has 8' T-posts running at $6.89/ea, so with that figure it'd cost me... Hmmm... $125 in posts for 18 of them.

Bumps the total mind you, but it's still only $285.

I've got four panels already and will certainly be beta testing this idea next year to see how it works on 60' rows.

Excllent! I think I will be buying the supplies over the winter so I will be ready for next year.
 
Well, the run is fully in place and bolted up, MINUS THE DOOR. Will be doing it tomorrow and getting it painted and ready to hang. Most likely going to put a tarp up over the door opening so they can try the run out.

That is, after I finish the pop door and get it installed.

Cheep, how many toms do you plant and how large is your garden plot?
 
I didn't do a big one at all this year. We were gone for over a month this summer so I wasn't going to do a garden at all. But my green thumb got the best of me, I just had to grow something!
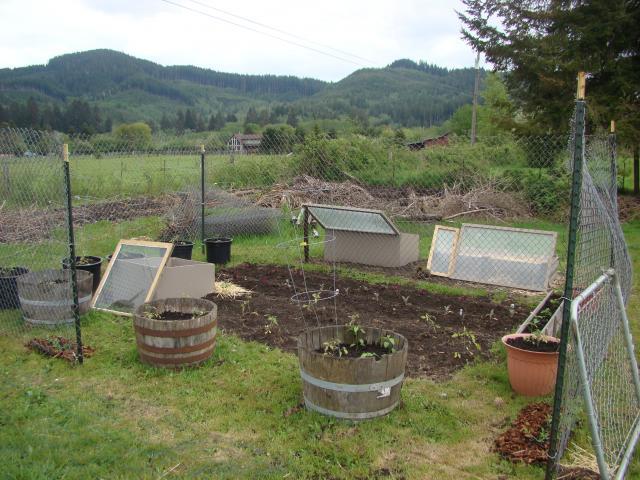
This is a picture of it from this spring. So sad looking isn't it?

25566_dsc03777.jpg


I planted a total of 22 tomatoes, some are Oregon Spring (which I've never heard of but was told they grow well in our area) and the others are Romas.
I plan on a MUCH larger garden next year and will definately double, possibily even triple, the tomatoes from this year. My problem is fencing, I want a huge garden, but I also have to figure out how I'm going to keep the elk out. Sort of a problem when they jump ove a 6' tall fence with no problem.

I had a question about your nesting box. Are you going to put any sort of flashing where the top of the box meets the wall? How are you going to close the gap there if you don't use flashing?
 
Last edited:
The run and the pop door are finished... Which is good, as the newbies need a little space away from the old crew. The old ones are out enjoying the grass in the run right now.

I still have some painting to do, as well as trim work, but that comes last.

I'll be sure to post some pictures soon of the run, door and newbies.
 
LOL.. Thanks.. It's something I whipped up for a website I'm going to be working on. Figured it's about time I do a personal project.

Now... Pictures.... Lets see...

Here's a shot of the door up.. I've yet to paint it and am not looking forward to doing so with the wire already on, but I wanted to get it done so they could enjoy the run. That and stop harassing the new ones.. Ended up having to separate one.
5570_1189784272352_1460724611_30500758_887621_n.jpg


5570_1189784312353_1460724611_30500759_2790522_n.jpg


By the overhang I needed to step cut one of the panels so that it fit under. To close up the gap I made this little trivet and screwed it in place.
5570_1189784352354_1460724611_30500760_2665041_n.jpg


Here's one of the newbies... This one my wife picked out.. She's very friendly and shy of others.. Ended up having a wing feather yanked which bled, which caused more plucking... She's in her own crate for a bit.
5570_1189784392355_1460724611_30500761_1518442_n.jpg


Here are two other newbies.. We have another black one as well which does not have cheek fluff.. Interesting mutts for sure.
5570_1189784432356_1460724611_30500762_5913891_n.jpg


This is the pop door... I built it in one unit, wide enough to slip between the studs and screw in place. It was made out of 2x4 and 1x6 for the roof. The side 2x4's received a rabbit cut so that two aluminum shelf bars could be screwed in place. These act as guides for the 1/4" thick lexan slider. The whole unit is 36" tall.

I took a piece of lexan and used CA to glue it down in place to strengthen the drill out location.
photo.php


Here is the door up.. You can see the window [door] is a rather pretty frosted look. Lets in a good bit of light when closed. At the very bottom is a 2x4 cross brace which is attached to either side of the studs. The pop door assembly simply rests on this.
5570_1189813753089_1460724611_30500833_3178548_n.jpg


Everyone [except the newbies] enjoying their first time out.
5570_1189813793090_1460724611_30500834_6842784_n.jpg


I used a 2x4 for the ramp to the door and tacked on several scrap pieces for runners, spaced an inch or so apart. You can see the bottom sill of the pop door protrudes outward and is angled. Just like with windows, it's to shed water. The back of the sill is angle cut and flush with the aluminum tracks so that when the door closes, it's below the sill by 2" preventing it from being lifted. You can also see the roof. There will be trim that goes along the top and sides to finish it out.
5570_1189813833091_1460724611_30500835_6154997_n.jpg


A closeup, albeit over exposed, of the pop door. Looking at the left you can see the flush track.. At the top is a 1/2" gap.. I was in a hurry and marked the top cut by eye... I should have measured.
wink.png

5570_1189813873092_1460724611_30500836_7266187_n.jpg


..
...
....

Well that's it for now.. Next thing is to roof it... Then build windows... Then trim it out.... Then paint the trim and call it done..
 

New posts New threads Active threads

Back
Top Bottom