I am new to chickens and got lots of great information here so I thought I would post what I have done for other newbies coming along. I have 12 hens at the moment (8 Orpingtons, 3 Plymoth Rocks, and 1 Black Turken adopted from a friend).

1. I used the existing barn for the roof. It is two floors with a small area downstairs to get in when I am gone. Food and water are in the bottom in hopes of keeping the coop as dry as possible. I added the picture window but now as they try to fly through it when they get excited I realized I may have to just drap some chicken wire over it so they know they can't get through. I choose this spot because it is right off the garden. I can now let them in the garden or not depending on which door I open.
2. Two big doors. One in top and one in bottom so I can get in and out. 6'5" 380lbs. You can see the small door to the garden if you look hard. In this picture it wasn't finished yet. I'll put another small door on the barn side so I can let them out when I don't want them in the garden. I let them free range all over our 30 acres. They only use about 5 of it so far though.
3. You can see the picture window here as well as the sliding door in the floor. This has a ramp down to the lower section. The door also slides shut so when it is really cold I can help keep air from coming in from below. You can really see it but there is a roost along the back wall. Since this picture I have added another about 12" in front of it so they can spread out a little. I also added two holes on the back wall with removable screens and a door that closes over them so I can open it for ventalation as well as scoop out the coop straight to my composter.
4. I also added two holes on the back wall with removable screens and a door that closes over them so I can open it for ventalation as well as scoop out the coop straight to my composter.
5. I also added a screened in door to the main door for cross ventalation during the summer when it is hot.
6. Ramp to the down stairs.
7. Nesting boxes. I was having trouble with them nesting in only one box. I read somewhere to add golf balls to the nest boxes and it works. I have one or two golf balls in all but the one nest box and they now lay faily evenly.
8. Nesting box access for the kids. I have the rope using two pullies, one at top and one at bottom, both with two wheels so my little girls can easily pull it up and get the eggs. They all fight over whos turn it is.
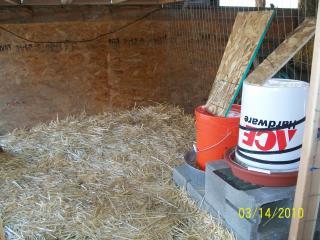
9. Last but not least. A must for the lazy farmer like myself. The auto feeder and waterer made from the 5 galon buckets. Notice the heat tape around the bucket to keep it from freezing in the cold weather as well as it is sitting on a heat mat that I use in the greenhouse for starting plants. The water (white bucket) is higher up due to the fact that they chickens were kicking straw into the water when they dig around. They have longer necks than I thought so the reach with no problems.
Well thanks for all the help everyone.

1. I used the existing barn for the roof. It is two floors with a small area downstairs to get in when I am gone. Food and water are in the bottom in hopes of keeping the coop as dry as possible. I added the picture window but now as they try to fly through it when they get excited I realized I may have to just drap some chicken wire over it so they know they can't get through. I choose this spot because it is right off the garden. I can now let them in the garden or not depending on which door I open.

2. Two big doors. One in top and one in bottom so I can get in and out. 6'5" 380lbs. You can see the small door to the garden if you look hard. In this picture it wasn't finished yet. I'll put another small door on the barn side so I can let them out when I don't want them in the garden. I let them free range all over our 30 acres. They only use about 5 of it so far though.

3. You can see the picture window here as well as the sliding door in the floor. This has a ramp down to the lower section. The door also slides shut so when it is really cold I can help keep air from coming in from below. You can really see it but there is a roost along the back wall. Since this picture I have added another about 12" in front of it so they can spread out a little. I also added two holes on the back wall with removable screens and a door that closes over them so I can open it for ventalation as well as scoop out the coop straight to my composter.

4. I also added two holes on the back wall with removable screens and a door that closes over them so I can open it for ventalation as well as scoop out the coop straight to my composter.

5. I also added a screened in door to the main door for cross ventalation during the summer when it is hot.

6. Ramp to the down stairs.

7. Nesting boxes. I was having trouble with them nesting in only one box. I read somewhere to add golf balls to the nest boxes and it works. I have one or two golf balls in all but the one nest box and they now lay faily evenly.

8. Nesting box access for the kids. I have the rope using two pullies, one at top and one at bottom, both with two wheels so my little girls can easily pull it up and get the eggs. They all fight over whos turn it is.

9. Last but not least. A must for the lazy farmer like myself. The auto feeder and waterer made from the 5 galon buckets. Notice the heat tape around the bucket to keep it from freezing in the cold weather as well as it is sitting on a heat mat that I use in the greenhouse for starting plants. The water (white bucket) is higher up due to the fact that they chickens were kicking straw into the water when they dig around. They have longer necks than I thought so the reach with no problems.
Well thanks for all the help everyone.
Last edited:


