Hello everyone - I have a small flock of backyard chickens and decide to raise quails also. Learned so much from this site and a few youtube videos I watched. I came up with an incubator design, with these special features:
- using this thermostat from Amazon ($17 at Amazon, you can get cheaper on eBay but have to wait for shipment from China)
- adding a ceramic tile a couple inches underneath the eggs to act as a "thermal mass" which helps keeping temperature constant
- adding an egg turner copied from this design
- creating an air flow that helps circulate the hot air while keeping temperature constant where the eggs are
- locating the water & sponge near the top ventilation holes to help draw moisture as well as ease of filling water from outside (well this one I stumbled upon - didn't think of it until I experimented with humidity control)
You can see the cross section of the box here:

And here's the construction:
Wood box, 3/8 " plywood, 24" L x 17 W x 14 H
Adding the 2" insulation foam I had laying around
After installing all the electronics, cabling, light bulbs, fan, motor for egg turner. You can see the narrow right compartment with the components. The left square is the 12" x 12" half inch tile (thicker is better - more thermal mass)
adding wire rack above the tile to hold the eggs. Below is the tray with wet cloth (white) for humidity, but I don't think I need that anymore, now that I have a different location for source of moisture.
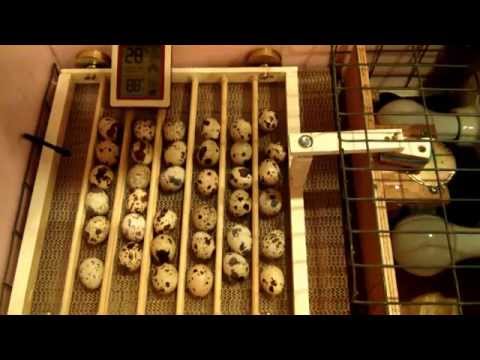
Adding closet liner to hold the eggs. Actually if I could change something I will add a finer grid wire rack. It's currently 1" x 2" which is too large for quail eggs so they don't turn very smoothly.
Adding the eggs turner. I used 4 wheels with ball bearings (bought real cheap at a surplus store). I'll try to upload a video of how it works. Don't know how to upload video yet.
Adding wire rack above the components for tray of water and wet towel. Have to be careful not to drop water on the electronics.
Here's the top with double pane window. The 4 ventilation holes on the right draw in the air, the left ones are for exit. I'm actually plugging up half of them to maintain the moisture.
Found a local guy (Craigslist) who sold me 3 dozens for $15. I was hoping for the jumbos but I saw that his quails were not that big. Also I'm not too sure of fertility. But this is what I have to try out at the moment. Just started this batch yesterday. Temperature is solid at 99 degrees F on the Accurite digital thermometer. The other 2 aquarium thermometers read 100 degrees.
Now the wait ...
(actually I have a couple questions which I will ask in a following post)
- using this thermostat from Amazon ($17 at Amazon, you can get cheaper on eBay but have to wait for shipment from China)
- adding a ceramic tile a couple inches underneath the eggs to act as a "thermal mass" which helps keeping temperature constant
- adding an egg turner copied from this design
- creating an air flow that helps circulate the hot air while keeping temperature constant where the eggs are
- locating the water & sponge near the top ventilation holes to help draw moisture as well as ease of filling water from outside (well this one I stumbled upon - didn't think of it until I experimented with humidity control)
You can see the cross section of the box here:
And here's the construction:
Wood box, 3/8 " plywood, 24" L x 17 W x 14 H
Adding the 2" insulation foam I had laying around
After installing all the electronics, cabling, light bulbs, fan, motor for egg turner. You can see the narrow right compartment with the components. The left square is the 12" x 12" half inch tile (thicker is better - more thermal mass)
adding wire rack above the tile to hold the eggs. Below is the tray with wet cloth (white) for humidity, but I don't think I need that anymore, now that I have a different location for source of moisture.
Adding closet liner to hold the eggs. Actually if I could change something I will add a finer grid wire rack. It's currently 1" x 2" which is too large for quail eggs so they don't turn very smoothly.
Adding the eggs turner. I used 4 wheels with ball bearings (bought real cheap at a surplus store). I'll try to upload a video of how it works. Don't know how to upload video yet.
Adding wire rack above the components for tray of water and wet towel. Have to be careful not to drop water on the electronics.
Here's the top with double pane window. The 4 ventilation holes on the right draw in the air, the left ones are for exit. I'm actually plugging up half of them to maintain the moisture.
Found a local guy (Craigslist) who sold me 3 dozens for $15. I was hoping for the jumbos but I saw that his quails were not that big. Also I'm not too sure of fertility. But this is what I have to try out at the moment. Just started this batch yesterday. Temperature is solid at 99 degrees F on the Accurite digital thermometer. The other 2 aquarium thermometers read 100 degrees.
Now the wait ...
(actually I have a couple questions which I will ask in a following post)
 i havent hatched anything before but this looks fairly simple. Hope ya hatch some
