New Coop

pintail_drake2004

Songster
6 Years
Jun 12, 2017
480
959
196
IL
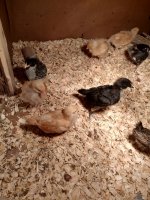
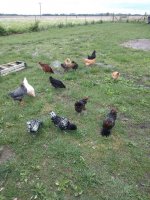
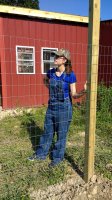
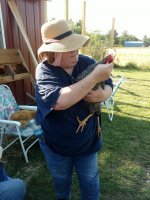
Well, my fiance and I started this project back in October of 16, this is the first chicken coop we have built. We decided to make an addition off an existing cattle barn, and build an 8x12 coop with a 600 sq ft attached run. Since the pre existing cattle barn had a partial concrete floor, it was easy to frame in an addition.
1038338-d74640e43e60e473e30e7831453e9aec.jpg
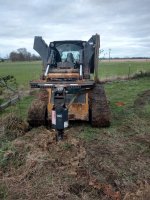
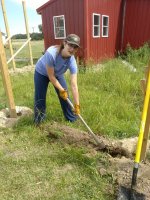
Here I am packing down the rock waiting on the concrete to be delivered.
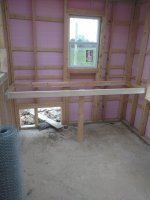
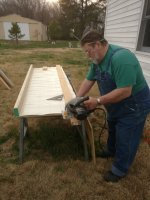
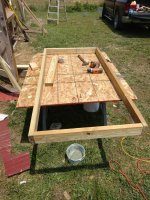
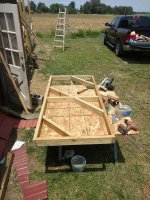
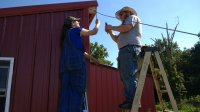
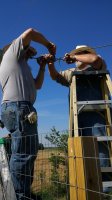
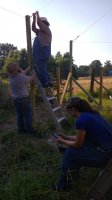
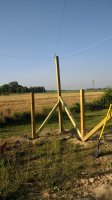
I was sure to put bolts in the concrete to secure the coop to the foundation. I have a bad habit of "over engineering" projects. Since it was almost winter, we decided to build the walls of the coop in my barn, then move them to the concrete slab after they were finished. Building the coop walls in the barn offered us some relief from the weather-although our winter was very mild-as well as extra light. My father helped me construct the walls after I got off work.
1038344-9d9624f5971fab18091dae59f5f155ea.jpg

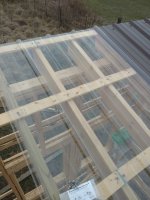
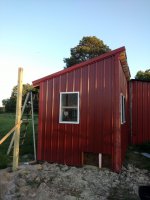
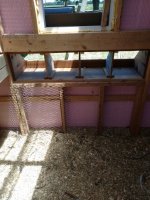
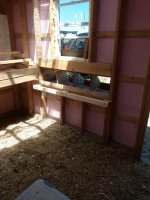
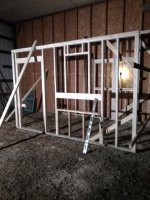
My fiance and I don't do anything without a lot of research. We read that the chickens need some more light in the winter to keep up with production. So after we moved the walls outside and secured them to the concrete via the bolts, we started to attach our metal siding. We made sure there was plenty of ventilation via windows and eve vents. and to add extra light we also added a skylight! there is over 21 sq ft of ventilation in the coop, not counting the human door or pop door.
1038345-8d687c3cee700d3f0b59ebdda432f4ce.jpg
 

Attachments

  • IMG_20161025_074614291.jpg
    IMG_20161025_074614291.jpg
    422.9 KB · Views: 14
  • IMG_20170114_172228351.jpg
    IMG_20170114_172228351.jpg
    916.9 KB · Views: 13
  • IMG_20170220_155229010.jpg
    IMG_20170220_155229010.jpg
    887.4 KB · Views: 11
Our chickens arrived mid February, so the pressure was on to get the coop done.
1038354-34f989320225336aca72348bd66eb8c3.jpg

Since I work a lot, and so does she, our time was limited to a few hours on sunday afternoons after I got off work. We made sure to go the our best to be organized to allow us to accomplish the maximum amount of task each time we worked on the coop. The Feb 28 tornado set us back a few weeks, so I had to work overtime on the coop to make up for lost days. While a friend was cleaning up debris from the twister, he offered to dig my post holes for the run. I was thankful, as I was not looking forward to digging those by hand!
1038357-66faee781190081a1dcaa19b7230d735.jpg

My fiance did not have any construction experience before this project, and she was willing to learn all she could. Even the smallest task like sealing the red cedar nest box, she jumped right in there and did her best!!! i am so proud of her.
1038359-f14b980b1f73f34dbb6255d94f12e465.jpg
 

Attachments

  • IMG_20170307_194833305_HDR.jpg
    IMG_20170307_194833305_HDR.jpg
    992.5 KB · Views: 13
  • IMG_20170326_172002331_HDR.jpg
    IMG_20170326_172002331_HDR.jpg
    974.1 KB · Views: 11
  • IMG_20170329_180204773.jpg
    IMG_20170329_180204773.jpg
    944.9 KB · Views: 13
We wanted to do a poop board to make things easier on us. I framed in the poop board base, and made the poop board removable "just because" you never know!
1038360-9fc0b616a61f6170dddec05793aeb817.jpg

My father had some old vinyl flooring from another project he gifted us for our poop board. here he is helping me making the final cuts for the poop board.
1038362-6f9f3663a913f558fdc7dc9e22b6a19b.jpg

We filled the poop board with sand and Sweet PDZ so hopefully the chickens wont have to worry much about the smell.
I cant believe how quickly they have have grown!
1038369-7ce746c7ab775d40c1b2f53549df1b8e.jpg
 

Attachments

  • IMG_20170329_180223563.jpg
    IMG_20170329_180223563.jpg
    871.1 KB · Views: 12
  • IMG_20170329_182014369.jpg
    IMG_20170329_182014369.jpg
    893.6 KB · Views: 11
  • IMG_20170501_184525225.jpg
    IMG_20170501_184525225.jpg
    1 MB · Views: 11
Once we had the coop ready for the chickens, we move them from the brooder outside on April 9. We still didn't have the run completed yet, but we kept them locked in the coop for 2 weeks to get them programmed that this was "Home" and a safe place to be.
1038381-80169757fed639537ea1b043006189b6.jpg

The next order of business was the fence around the coop. We decided to go with 6' fence buried 1' deep. My lovely fiance wanted a "good workout" so I politely offered her a grub hoe so she could trench. I'm not sure I can repeat what she said here, but bless her heart, she trenched the whole thing over 2 days, making sure it was 1' deep. There was an old road bed there-we didn't know it was there when we started this project-and she had to dig through 5" of pack rock!
1038383-f22910805788839ecab2850d9c0f280c.jpg

While she worked on that, I took some scraps and built a gate for our fence. I wanted something simple, so I quickly threw together a frame. Keeping everything as simple and square as I could!
1038385-2c4fb5c68a8fb4c68311133f77ec16e6.jpg

Then I had a few left over scraps from the scrap pile, so I mitered the edges and added some decorative bracing for the wire.
1038388-3436319aded4b54adf6d7c4ddc1000d2.jpg
 

Attachments

  • IMG_20170513_191941793_TOP.jpg
    IMG_20170513_191941793_TOP.jpg
    865.7 KB · Views: 12
  • IMG_20170530_154106348.jpg
    IMG_20170530_154106348.jpg
    1 MB · Views: 14
  • IMG_20170605_122448966.jpg
    IMG_20170605_122448966.jpg
    1 MB · Views: 12
  • IMG_20170605_131856130.jpg
    IMG_20170605_131856130.jpg
    1 MB · Views: 13
We and an over abundance of hawks, owls, and eagles here, so we opted for a canopy over the run. I use to work for the IL DNR raising pheasants for the controlled hunts, and our pens were set up in a similar way just on a larger scale. Here I was adding air craft cable around the top perimeter of the fence post, approximately 9' above ground.
1038399-cf5ad3f8afbef6e5119f1bd135fe35ae.jpg

After that was completed, I realized our chickens were 16 weeks old!!! So I had better get started on finishing up the nest box. Here I added the removable partitions.
1038400-ecb2e4dd9ca15daea17e9237059743cc.jpg

Next, I use some scrap lumber to fashion a perch to the nest boxes. I wanted them to have something to hop up to before getting into the box.
1038401-66b1a005ced0e884e2d5158a98d2853a.jpg

After I got off work that sunday, my folks came to help me and my fiance string the canopy supports across the run. Here my fiance is assisting me in stringing up the main 1/2" cable support. This one spans the farthest across the run, and will support the most weight. All the rest will be smaller cables.
1038402-9df77cd4000382370ac2d37ae41bdb90.jpg
 

Attachments

  • IMG_20170606_102038915.jpg
    IMG_20170606_102038915.jpg
    854 KB · Views: 10
  • IMG_20170606_132002037.jpg
    IMG_20170606_132002037.jpg
    952.3 KB · Views: 12
  • IMG_20170606_140948402.jpg
    IMG_20170606_140948402.jpg
    939.5 KB · Views: 11
  • IMG_20170610_164211424.jpg
    IMG_20170610_164211424.jpg
    1 MB · Views: 11
Since the 1/2" cable is difficult to work with, Dad stepped in to help with getting the tension right.
1038410-44569599dc31f5794765a704334d3d68.jpg

My Fiance was an excellent supervisor
1038413-8ec62b7d9e2ccfc095e2926e9f98bf3a.jpg

Mom was able to tame one of our barred rock roosters pretty quickly!
1038414-a07c6e97feb473457dab63864acbbc40.jpg

As we were running out of light, we were able to get the last support cable installed. Each cable was equipped with a turnbuckle and quick connect for easy use.
1038418-3feeea2312665eb66c50f2918e14a9d8.jpg

The support cables installed and ready for the canopy! We can see the light at the end of the tunnel!
1038419-a309f48738af9fdad97e817f5ba11b23.jpg
 

Attachments

  • IMG_20170610_164911572.jpg
    IMG_20170610_164911572.jpg
    1.2 MB · Views: 11
  • IMG_20170610_165331080.jpg
    IMG_20170610_165331080.jpg
    1.4 MB · Views: 11
  • IMG_20170610_171049828.jpg
    IMG_20170610_171049828.jpg
    960.3 KB · Views: 10
  • IMG_20170610_181940045.jpg
    IMG_20170610_181940045.jpg
    1.2 MB · Views: 12
  • IMG_20170610_182023028.jpg
    IMG_20170610_182023028.jpg
    1.3 MB · Views: 10

New posts New threads Active threads

Back
Top Bottom