
I've had several email's and PM's asking about our outdoor brooders, so thought I'd post a few pictures of the ones we have right now, it might give a few people some additional ideas for brooding other than traditional indoor brooders.
We live in extreme northern Mississippi and use these year round, but mainly from mid February until around mid October. We've had temps here the past month from mid 20's at night and as high as 85, but the last few weeks have averaged around low 40's at night and up in the upper 70's in the daytime. We have had extremes from 10 degrees at the low end up to highs of over 100 degrees in the past year.
Outdoor brooding is not for everyone, and I think it works best for those of us who raise lots of chicks, but just putting it out there.
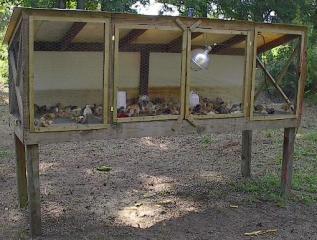
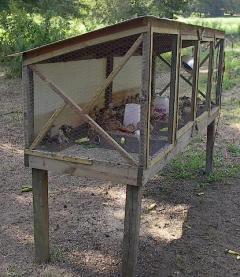
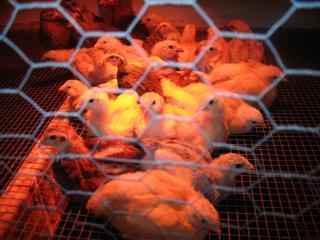
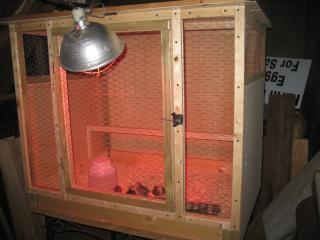
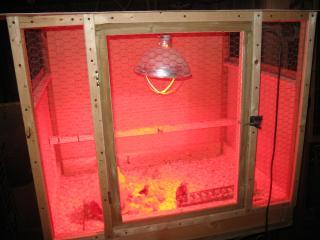
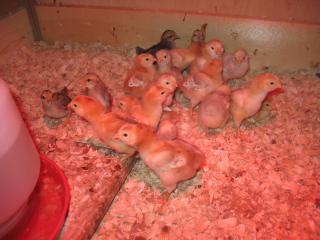
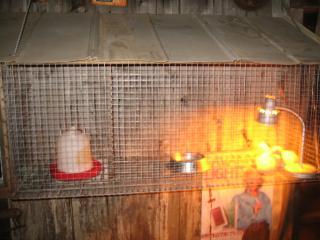
Below is our main outdoor brooder. It's 10' long and 2' wide by 3' high at the front, made out of scrap and recycled materials, so it's not very pretty, but it works fine. We've brooded as many as 50 chicks from day old until 5 weeks old in it, usually around 25 to 30 at a time. According to most post I've read, brooders should have 1/2 foot of space per chick, ours is 20 square feet so rated for about 40 chicks, but we usually have far less than that at any given time. We have tarps cut and sewn to use on the sides as side curtains for the first week or so and anytime there is bad weather in the forecast. We've brooded over 500 chicks in a year in outdoor brooders, and only lose maybe 2 or 3 chicks at most per brood most years. We have a 250-watt GE red heat bulb for heat and use it according to the outside temps. It's on three-foot legs to make the doors at a comfortable height for working with the chicks, feeding & watering them. (And the right height for the kids to open the doors and play with the chicks!) We cover about half of the wire floor with paper towels the first two days and sprinkle a bit of feed on the paper towels around the feeder to help them learn where the feed is at. After that it's just a hardware cloth floor. We remove the side curtains after the first two weeks if the weather and temps allow, and only run the heat during the night as long as the daytime temps are above 85 degrees. I prefer to let them enjoy as much natural sunlight and fresh air as possible.
from the front view
End / side view
night time view
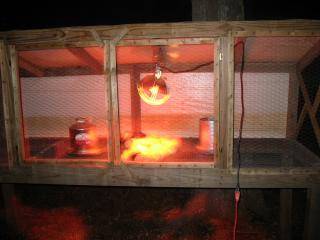
another night time view
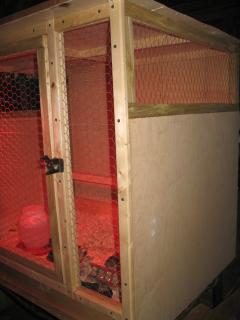
Here is another brooder we just built a few weeks ago for smaller hatches and winter use when we need a bit more protection from the weather and have smaller amounts of birds to deal with. It started life as a cheap dining table in the shed we had bought for a dollar or two at the auction a year ago to use during a family cook-out. It's about 3' wide and almost 4' long, metal legs and wood top. It is built on top of the table using it as a floor / base. Framed with 1 x 2 and 2 x 2 lumber, luan plywood walls and back, chicken wire front and upper sides. The top is made of a piece of scrap fiberglass I had laying around, used hinges and latch. The solid floor allows me to use shavings and the semi-solid sides and solid top and back gives more protection from the wind. The heat light is mounted in the center of the ceiling with an eye bolt now, but the first pictures were taken before it was finished. It would have to be inside the barn during the winter due to the open front unless I add side and front curtains, but can be put outside and used as a brooder or a hospital cage during the summer if needed.
Front view
Side view
Night time view
Another night time view
And then when all the brooders are full and your son brings home baby ducks? You have to make do. Not a great picture, was taken at night and didn't turn out well, but you get the idea.
Anyway, maybe it will give someone some new ideas that are a bit out of the norm. There are always as many different ways to do things as there are folks to do them!
We live in extreme northern Mississippi and use these year round, but mainly from mid February until around mid October. We've had temps here the past month from mid 20's at night and as high as 85, but the last few weeks have averaged around low 40's at night and up in the upper 70's in the daytime. We have had extremes from 10 degrees at the low end up to highs of over 100 degrees in the past year.
Outdoor brooding is not for everyone, and I think it works best for those of us who raise lots of chicks, but just putting it out there.
Below is our main outdoor brooder. It's 10' long and 2' wide by 3' high at the front, made out of scrap and recycled materials, so it's not very pretty, but it works fine. We've brooded as many as 50 chicks from day old until 5 weeks old in it, usually around 25 to 30 at a time. According to most post I've read, brooders should have 1/2 foot of space per chick, ours is 20 square feet so rated for about 40 chicks, but we usually have far less than that at any given time. We have tarps cut and sewn to use on the sides as side curtains for the first week or so and anytime there is bad weather in the forecast. We've brooded over 500 chicks in a year in outdoor brooders, and only lose maybe 2 or 3 chicks at most per brood most years. We have a 250-watt GE red heat bulb for heat and use it according to the outside temps. It's on three-foot legs to make the doors at a comfortable height for working with the chicks, feeding & watering them. (And the right height for the kids to open the doors and play with the chicks!) We cover about half of the wire floor with paper towels the first two days and sprinkle a bit of feed on the paper towels around the feeder to help them learn where the feed is at. After that it's just a hardware cloth floor. We remove the side curtains after the first two weeks if the weather and temps allow, and only run the heat during the night as long as the daytime temps are above 85 degrees. I prefer to let them enjoy as much natural sunlight and fresh air as possible.
from the front view
End / side view
night time view
another night time view
Here is another brooder we just built a few weeks ago for smaller hatches and winter use when we need a bit more protection from the weather and have smaller amounts of birds to deal with. It started life as a cheap dining table in the shed we had bought for a dollar or two at the auction a year ago to use during a family cook-out. It's about 3' wide and almost 4' long, metal legs and wood top. It is built on top of the table using it as a floor / base. Framed with 1 x 2 and 2 x 2 lumber, luan plywood walls and back, chicken wire front and upper sides. The top is made of a piece of scrap fiberglass I had laying around, used hinges and latch. The solid floor allows me to use shavings and the semi-solid sides and solid top and back gives more protection from the wind. The heat light is mounted in the center of the ceiling with an eye bolt now, but the first pictures were taken before it was finished. It would have to be inside the barn during the winter due to the open front unless I add side and front curtains, but can be put outside and used as a brooder or a hospital cage during the summer if needed.
Front view
Side view
Night time view
Another night time view
And then when all the brooders are full and your son brings home baby ducks? You have to make do. Not a great picture, was taken at night and didn't turn out well, but you get the idea.
Anyway, maybe it will give someone some new ideas that are a bit out of the norm. There are always as many different ways to do things as there are folks to do them!

