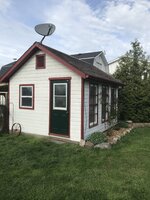
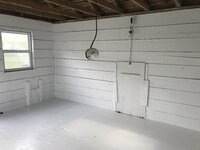
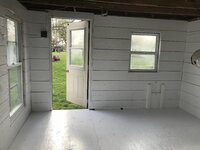
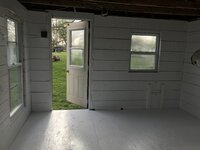
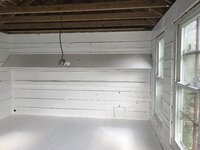
Painting interior of coop

Oooh, listen, about the pressure washer. A lot of people are saying that it's really wet, so a quick note about that. It really depends on the pressure washer.

A friend of mine loaned me their "pressure washer" when mine broke (ancient and second hand). It was this cute little thing with container for soaps and it was barely stronger than the strongest setting on my hose nozzle and everything got SOAKED.

A real pressure washer costs at least $4-500 and requires the use of safety gear. Boots, heavy jeans, safety glasses because the water comes out with enough pressure to cut you like a knife. If you can wash your car with it = it's not a pressure washer because the real thing will find that rust flake and start stripping off paint.

And they actually leave things pretty dry, just a little more damp than a good quality steamer.

The one that Id be borrowing retails at around $2-300. It was pretty efficient with taking off chipping paint and left scrape marks on our plastic chair. Definitely not a high end one though and still left things pretty sopping wet.

Another poster mentioned using a steamer. I have a steam cleaner I use in the house for my floors. I‘m wondering about using that out there now. I might just give it all a good scrub though instead to prep for the paint and seal it up.
 
I have a simple household steam cleaner too. I bought it for another reason (dust mite) , but had in mind it is the best way to eliminate the bird mite too, if I ever get a lot of them in my coop.

I didn't get an infestation of bird mite in the coop after using DE. So I never actually used it. I check regularly on bird mite from spring until end of autumn. If I find a few mites or something that looks like mite : I put some extra DE in the sand bath, under the shavings/hay in the laying nests (mixed with sand) and paint the inside walls and roost once more with this DE-'paint'.
But keep in mind my method doesn't seem to work for everybody. :idunno Maybe you have another type of bird mite in the States?

BTW, I love you're coop-to-be. Its so spacious with beautifull windows. :love

Perfect, I’m loving all the info on how to use DE. It’s new to me. Good to know this works well for you. Thank you, we’re very excited to get this coop operational!
 
I think that my old coop would melt if I tried to wash the interior, especially with a power washer! Just vacuum it off, wipe gently, and then stain, whitewash, or paint it. That peeling paint is the biggest problem you have there.
DE is not a good thing to use! It's nearly ineffective, and inhaling the dust is bad for us, and for the chickens.
Mary

I didn’t know that! I ordered it after something I read thinking I was going to use it in a mix for the chickens dust baths. I value your an aarts opinions highly though so I’ll skip that. Maybe it’s not too late to cancel with all the delays in shipping right now. Thanks for the heads up.
 
I think that my old coop would melt if I tried to wash the interior, especially with a power washer! Just vacuum it off, wipe gently, and then stain, whitewash, or paint it. That peeling paint is the biggest problem you have there.
DE is not a good thing to use! It's nearly ineffective, and inhaling the dust is bad for us, and for the chickens.
Mary

Vacuuming and brushing will be the way we go after the lead test arrives this week.
 
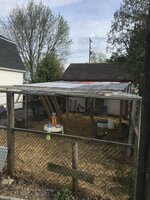
Just to update this post with progress, here is what we’ve done so far. The run (25x13 feet) now has a roof (18 ft) and is fully caged in aside from the gate that we are replacing tomorrow. The interior of the coop was painted with KILZ primer and a white exterior gloss paint. The middle wall, the ceiling boards and all the plastic sheets were taken down. We will be putting a steel skirt around the bottom to cover all the mouse holes and help prevent new ones. Nest boxes came down other than the roof part and will be replaced. Wire will go up on ceiling to prevent them from roosting on the beams and the lights will be hung back up. Soil and old paint tested negative for lead. Don’t mind the extra wood, junk and my sons toys in the run, we still have a bit of clean up to do. One of the next steps is deciding on where the roosts will be. The 3 windows are facing south and there is a fourth on the west wall where the human entry door is as well. We’re thinking about putting the roosts in an L shape along the north (windowless wall) and west wall and making poop boards underneath them. Wondering if anyone has any different suggestions on what we have done and planned so far please let me know. Input is very welcome! I appreciate all the help I’ve received from many people on this site. Now that the long frost seems to be over here in Canada, we‘re looking forward to the chickens moving out of our house! Thanks again.
 

Attachments

  • 06EE6EB4-85DA-4347-B2E7-E2C99C41E3A8.jpeg
    06EE6EB4-85DA-4347-B2E7-E2C99C41E3A8.jpeg
    706.6 KB · Views: 16
  • D415C593-184D-4B48-A5CC-B076D80A5678.jpeg
    D415C593-184D-4B48-A5CC-B076D80A5678.jpeg
    320.2 KB · Views: 15
  • 29978502-DB8B-42D8-9B13-76793BFCA7C1.jpeg
    29978502-DB8B-42D8-9B13-76793BFCA7C1.jpeg
    437.2 KB · Views: 14
  • 459E8CCE-30D7-4BB4-A83E-B554648DE5C9.jpeg
    459E8CCE-30D7-4BB4-A83E-B554648DE5C9.jpeg
    373.2 KB · Views: 13
  • 85317E11-654B-478E-9926-35128FC8DEC5.jpeg
    85317E11-654B-478E-9926-35128FC8DEC5.jpeg
    1,011.6 KB · Views: 14
  • FB678BB8-0920-42AE-AC24-D9C97A9DAB52.jpeg
    FB678BB8-0920-42AE-AC24-D9C97A9DAB52.jpeg
    335.5 KB · Views: 16
Last edited:

New posts New threads Active threads

Back
Top Bottom